Central Vacuum Keeps Running? Relay Fix, 2 Units Tested
Stop a central vacuum that keeps running: one wire test tells you if it's a stuck relay or a wall-inlet short. We ran it on 2 units, DIY fix from $6.
Written by Reggie AlvarezReviewed by Dale FerrisLast updated on July 4, 2026
When you buy through links on our site, we may earn an affiliate commission (at no extra charge), which we use to fund new product tests. Learn more.
Read it your way
Short on time? Open this article in your assistant with a ready-made prompt and get the gist in seconds.
Found this useful? Make us a preferred source so we show up in your Google results.
The first time my own central vacuum would not shut off, the motor roared in the garage while the hose hung on its hook, doing nothing. Pulling the hose changed nothing, and flipping the switch changed nothing, so I yanked the cord out of the wall just to get quiet.
A central vacuum that keeps running like that is almost always one of two faults, and a single one-minute test tells you which. I ran that test on two of my own units, a NuTone VX550 and a Beam Serenity 2100, and they gave me opposite answers, which is exactly why this guide shows both outcomes instead of guessing at one.
By the end you will know how to stop a central vacuum that keeps running right now, how to tell a stuck relay from a wiring short, and roughly what each fix costs.
TL;DR: A central vacuum that keeps running is almost always a stuck relay inside the power unit or a short in the 24-volt low-voltage wiring. Unplug the unit, disconnect the two low-voltage wires, and plug it back in. If it still runs, the relay or board is stuck (a rebuild starts around 6 and $18 in parts.
The 30-Second Fix: Why Your Central Vacuum Keeps Running
A central vacuum that keeps running almost always has one of two faults: a stuck relay inside the power unit, or a short in its 24-volt low-voltage wiring. Built-In Vacuum, a central-vac retailer, frames the problem the same way.
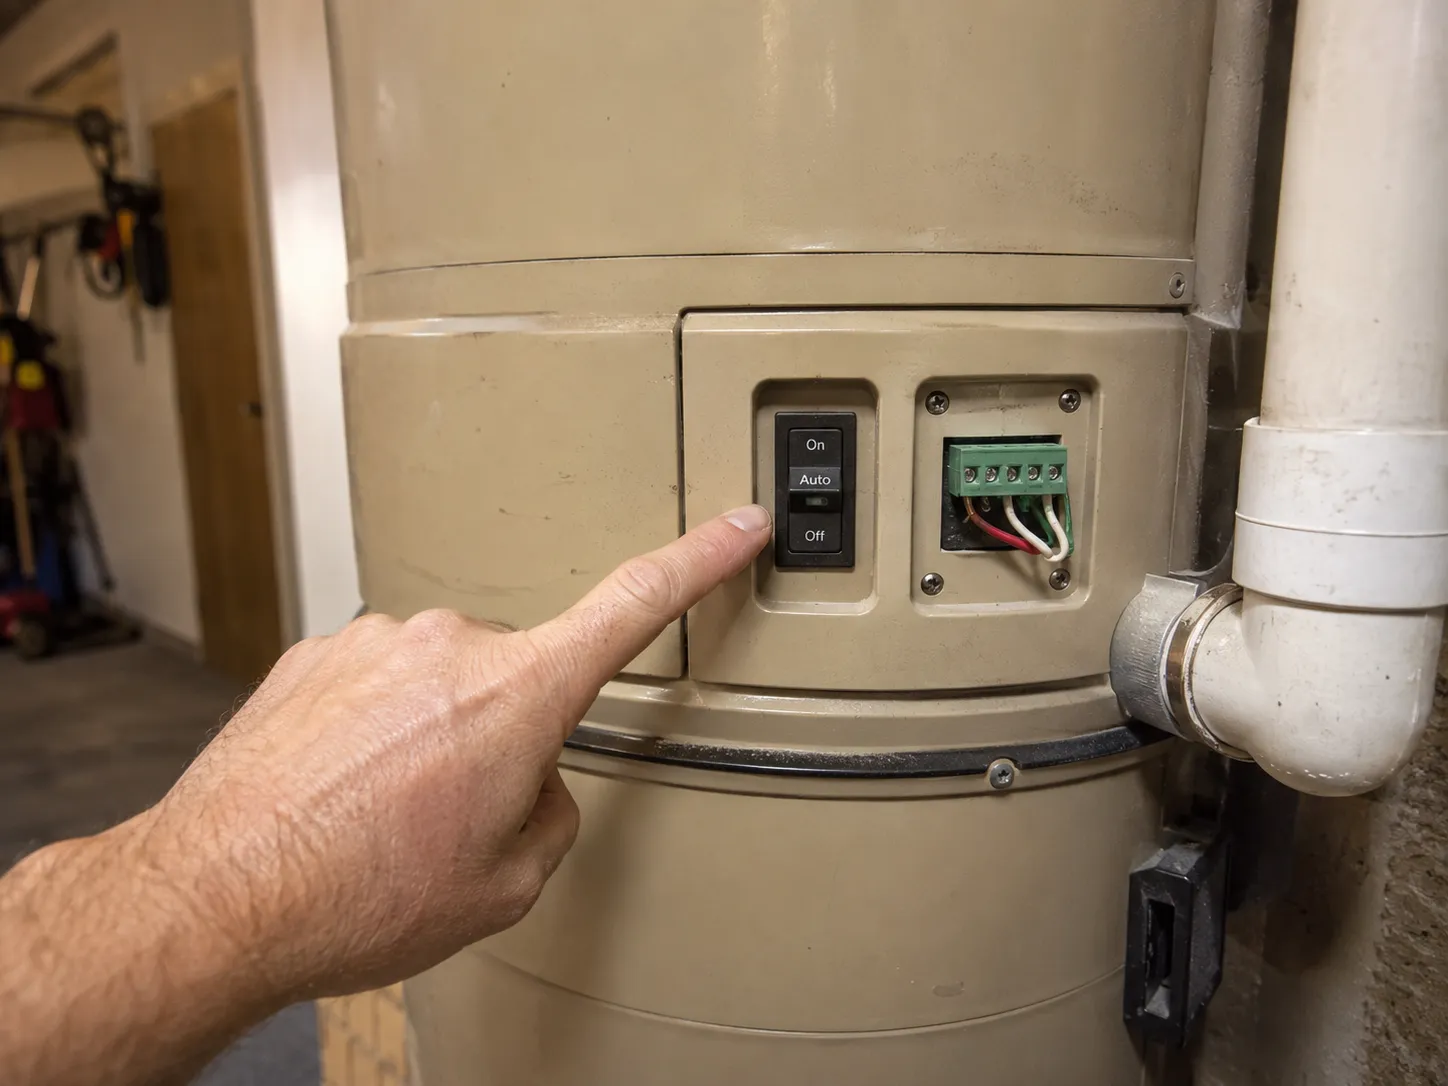
Before any teardown, set the unit's switch to Auto and confirm no hose is plugged into a wall inlet anywhere in the house. If the motor still will not shut off, unplugging the power unit at the outlet stops it safely while you diagnose.
Here is the order I run every time, fastest first:
Set the on/off switch on the power unit to Auto (not On).
Walk the house and confirm no hose is left plugged into any wall inlet.
If it is still running, unplug the unit at the outlet. That is a safe interim stop, not a repair.
On my 18-year-old NuTone VX550, none of the gentle steps worked. The switch did nothing in any position, and the only thing that stopped the motor was pulling the plug, which told me immediately the signal was stuck "on" inside the machine rather than at a hose.
Honest limit: Unplugging only buys quiet. A relay that is welding shut can keep degrading, so treat the outlet trick as a pause, then run the test below the same day.
Which of the two faults you have comes down to one test, and that is next.
The One Test That Tells You Which Problem You Have
The single test that tells you which problem you have takes about a minute. With the central vacuum unplugged, disconnect the two low-voltage signal wires where they attach to the power unit, then plug the unit back in.
If the central vacuum keeps running with those thin wires off, the fault is inside the unit. If it stops, the fault is a short out in the house wiring or a wall inlet, the same split documented in Built-In Vacuum's troubleshooting flowchart.
Those two low-voltage wires (often called the 24-volt or thermostat-type wiring) carry the small signal that switches the relay when a hose is inserted. Disconnecting them upstream of the relay is what cleanly separates a unit problem from a house-wiring problem.
Run it like this:
Unplug the power unit at the outlet.
Find the two low-voltage wires at the unit, usually on simple spade terminals or wire connectors.
Disconnect both.
Plug the unit back in and watch what the motor does.
Here is how to read the result.
Test result | What it means | Where to fix it | Typical cost |
|---|---|---|---|
Keeps running with the wires off | Stuck relay or control board inside the unit | The stuck-relay section below | 60–140 board |
Stops the moment the wires come off | A short out in the wiring or a wall inlet | The short-hunting section below | 18 |
Stops sometimes, runs other times | An intermittent short, usually a marginal inlet | Hunt the short, then fix that inlet | 18 |
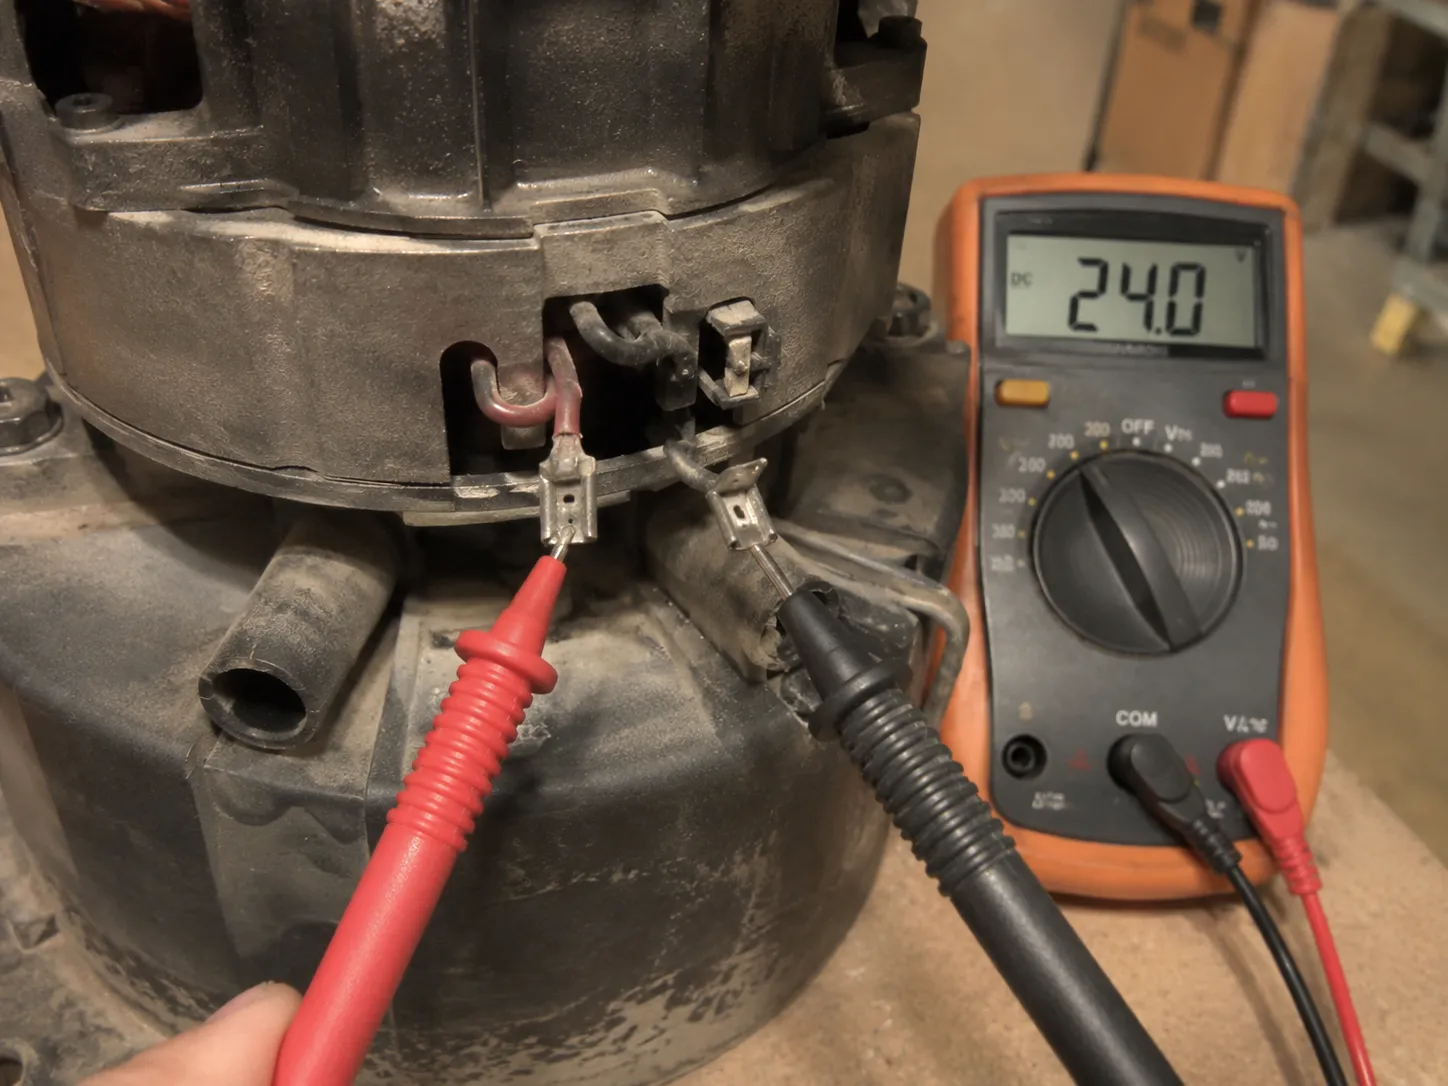
If you want to confirm the unit side works, jump the two terminals with a screwdriver or read across them with a multimeter; you should see around 24 volts AC. MyCentralVacuum describes the same isolation step for separating a unit fault from a wiring fault.
When I did this, my two units split perfectly. The VX550 kept roaring with both wires off, which pointed straight at its relay, while the Beam 2100 went silent the instant the wires came loose, which pointed at a short somewhere in its inlets.
If your machine has a completely different symptom, like no suction or a dead motor, start with the broader vacuum-fix walkthrough before running this test.
Honest limit: A "stops sometimes" result is the tricky one. It usually means a marginal inlet short that only bridges when a contact shifts, so treat it as a short and work the inlets carefully.
Still Running With the Wires Off? Stuck Relay (Welded Points)
When a central vacuum keeps running even with the low-voltage wires disconnected, the relay inside the power unit is stuck closed, holding the motor energized no matter what the hose signal does. Edison Vacuums notes that a failed relay or control board behaves exactly this way.
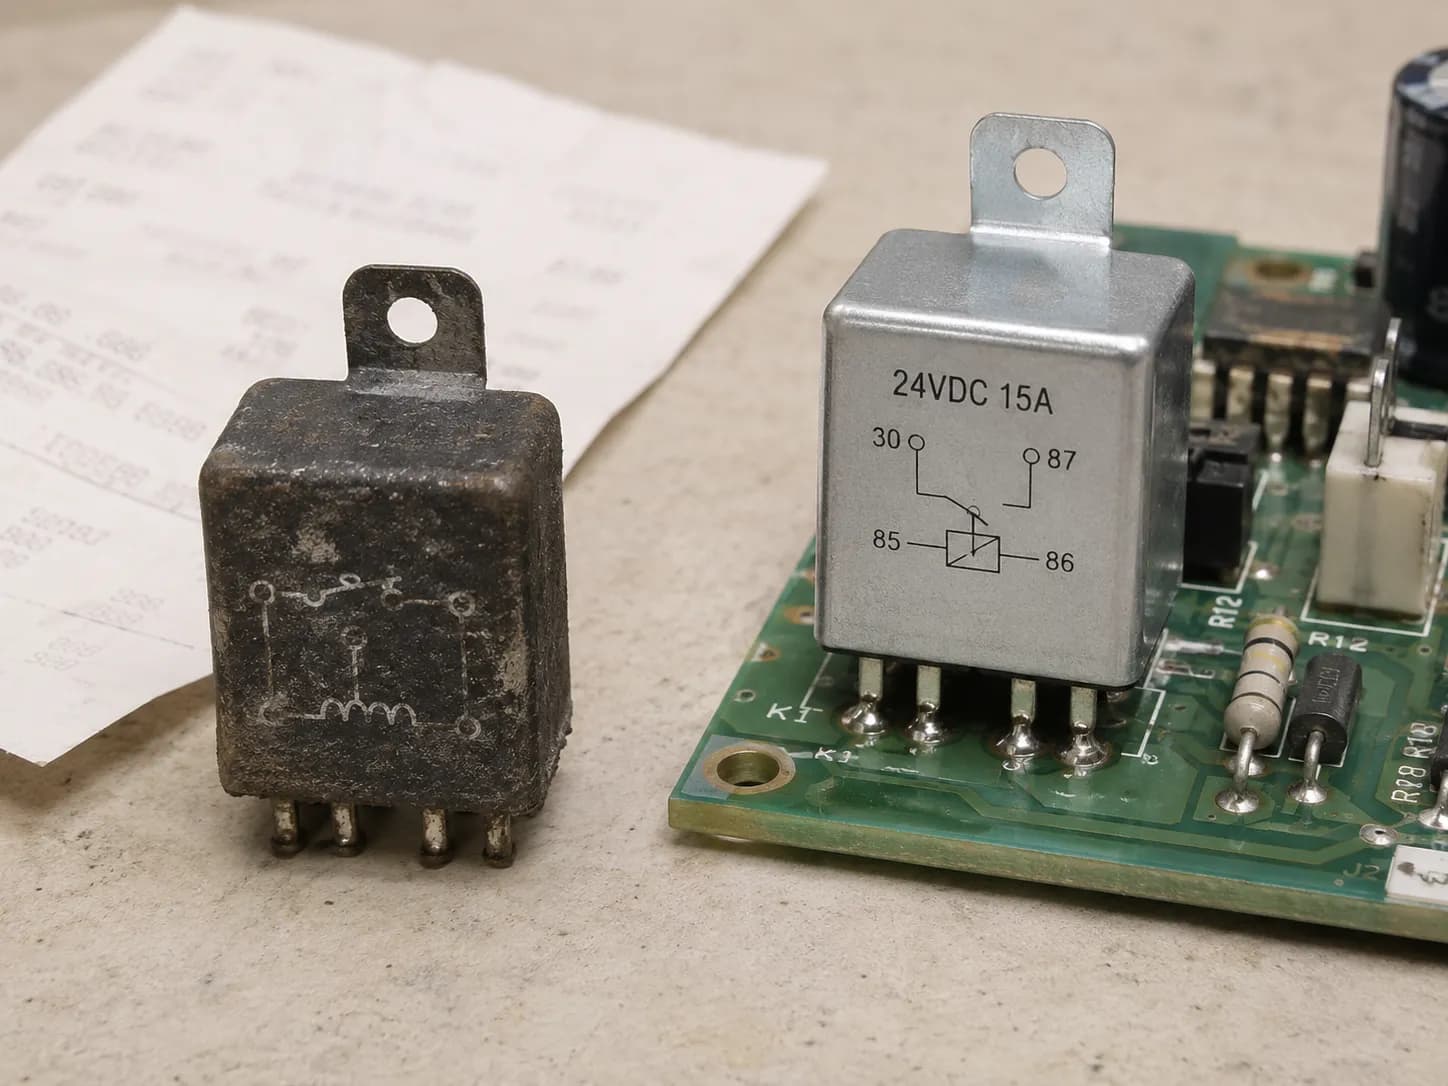
The fix depends on your relay type: a standalone relay can often be rebuilt for a few dollars, while a relay mounted on a circuit board usually means replacing the whole board. Either way, the replacement should be rated 24 volts and 15 amps or higher.
Relay points weld because every start sends an inrush of current across the contacts, and years of small arcs eventually fuse them. A higher-amp replacement simply tolerates that abuse longer.
To tell which relay you have, look at the layout inside the canister:
Standalone relay: often behind a curved side panel held by a single Phillips screw, an L-shaped black or white block, commonly rated 24 volts and 10 amps. This is the rebuildable kind.
PCB-mounted relay: soldered onto the main control board alongside the transformer. Here you replace the board, matched to your brand and model.
Repair path | When it applies | Skill needed | Typical cost |
|---|---|---|---|
Rebuild the standalone relay | Older unit, relay behind a one-screw side panel | Basic soldering with a fine-tip iron | About $6 for the relay |
Replace the whole control board | Relay sits on the circuit board, or a newer integrated unit | Swap the board, match by brand and model | $60–140 |
My VX550 was the lucky kind. Behind the single-screw side panel sat a standalone L-shaped 24-volt, 10-amp relay, and I rebuilt the board with a $6 HVAC-type relay rated 24 volts, 15 amps and a fine-tip iron.
It has run clean for four months since.
Trigger to watch: Newer central-vac power units put the relay inside an integrated control board, so there is no separate relay to rebuild. On those, a whole-board swap is the only route, which is why identifying your relay type matters before you order anything.
If the board is integrated, or soldering is not your thing, skip ahead to the installer-and-cost section.
Stops With the Wires Off? Hunt the Low-Voltage Short
If the central vacuum stops the moment you disconnect the low-voltage wires, a short is bridging the 24-volt circuit somewhere out in the house. MyCentralVacuum reports the usual culprits are a coin or screw lodged in a wall inlet, moisture inside a garage or basement inlet, or a low-voltage wire pinched by a drywall nail.
A bridged inlet fools the system into thinking a hose is permanently inserted.
Start with the common sources:
A coin or screw fallen behind an inlet faceplate, bridging the two contacts.
Moisture or rust inside a garage or basement inlet.
A low-voltage wire pinched by a drywall screw, or chewed by pests, often after recent attic or remodel work.
Then isolate it methodically:
Reconnect the low-voltage loop at the unit so the runaway returns.
Open or disconnect one wall inlet at a time.
The moment the motor goes quiet, the inlet (or the wire run to it) you just touched is your culprit.
Recent work? If anyone has been in the attic, crawlspace, or walls lately, suspect a pinched or nicked wire first. New drywall screws and stray nails are a classic cause.
On my Beam 2100, working inlet by inlet pinned the fault to the garage inlet in a few minutes. A stray drywall screw had dropped behind the faceplate and was sitting squarely across the two contacts, holding the circuit closed.
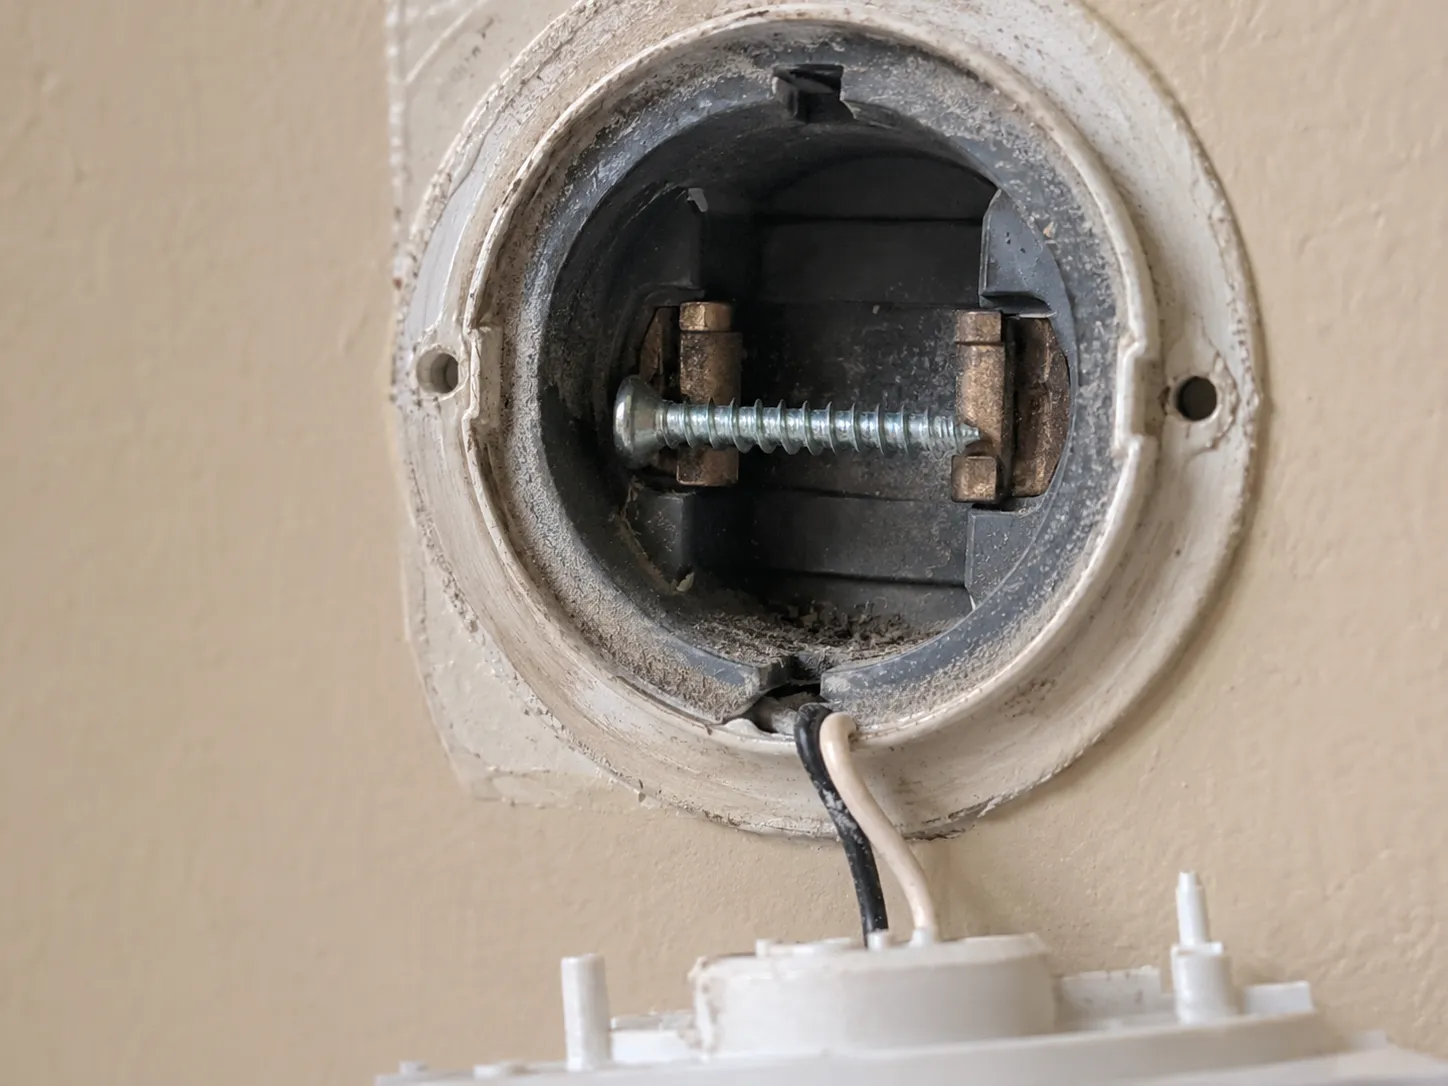
Honest limit: If the short is a wire crushed inside a finished wall, you may not be able to reach it. That is the point to weigh an installer or a key-fob bypass, both covered further down.
A shorted or damaged inlet itself is a quick fix, which is the next section.
Fixing the Wall Inlet: Clean, Reverse or Replace the Contacts
Knowing how to fix a central vacuum wall inlet is worth more than any single part, because the same inlet can cause a runaway (when it shorts) or a dead spot (when its contacts die). Work from cheapest to most involved: clean, then reverse, then replace.
Built-In Vacuum confirms that one universal rectangle valve replaces about 99 percent of older wall inlets, with two contacts inside the hole and two screws on the back.
The repair ladder, in order:
Clean: if the two contacts look tarnished, scuff them with fine sandpaper or a pencil eraser to restore the connection. This is the free fix and it works more often than people expect.
Reverse: if an inlet is shorting, loosen the faceplate, reverse the low-voltage wire on its two terminals, and reseat it.
Replace: if contacts are bent or worn or the inlet is cracked, swap in a universal rectangle inlet. Geek Vacuums shows it is a two-screw faceplate job.
Symptom at the inlet | Action | Typical cost |
|---|---|---|
Contacts look tarnished or read no voltage | Clean with fine sandpaper or a pencil eraser | $0 |
A wire is shorting the inlet | Reverse the low-voltage wire on the terminals | $0 |
Contacts bent or worn, or the inlet cracked | Replace with a universal rectangle inlet | $12–18 |
One of my 30-year-old inlets had simply gone dead, reading 0 volts at the contacts. Thirty seconds with fine sandpaper on each contact brought it back to a clean 24 volts and full suction, which saved me from replacing all seven inlets in the house.
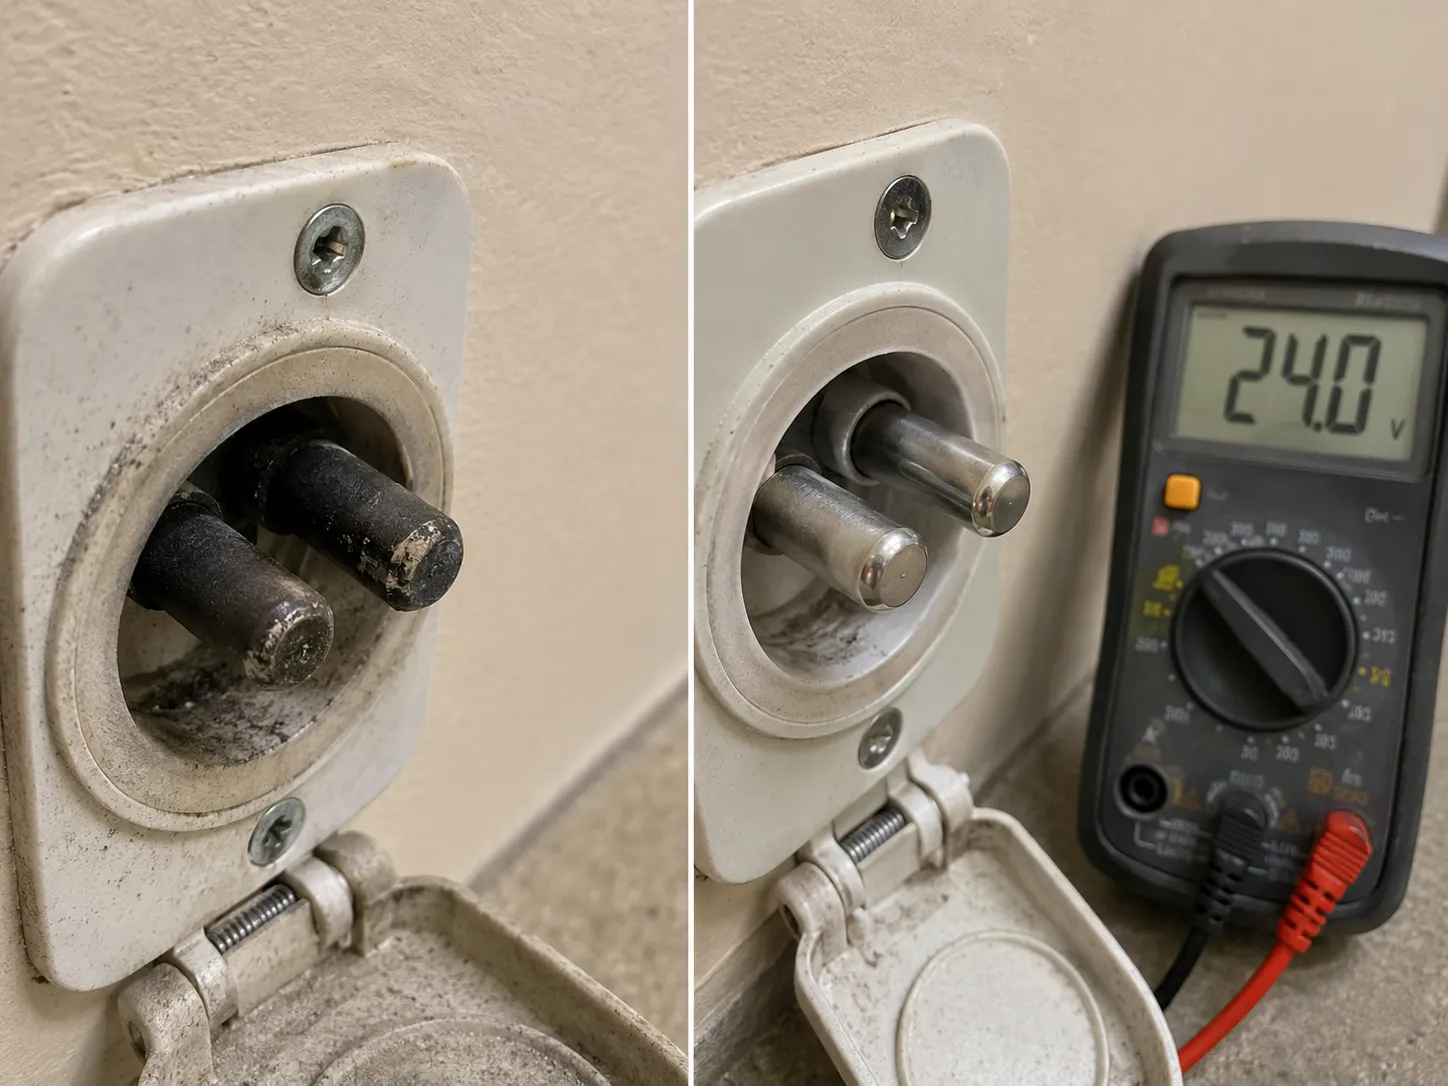
Safety: Most inlets are simple low-voltage. Electric inlets add two small 110-volt holes near the main opening: do not probe those, and cut power before touching an electric inlet, or call an electrician.
If cleaning or swapping the inlet does not settle it, the fault is back in the wire run or inside the unit, so re-check the short hunt or read on for when to call a pro.
The Easy Culprits People Miss (Switch, Handle, Auto Mode)
Before opening the power unit, rule out the three easy culprits people miss. A central vacuum that keeps running is sometimes just the unit switch left on instead of Auto, a hose with its handle switch stuck on, or a failed on/off switch on the unit itself.
CentralVac notes that a hose with a built-in switch can fail and trigger the system on its own. Each of these takes under a minute to check.
Run through them in order:
Auto mode: make sure the unit switch is on Auto, not stuck on On.
A hose left active: check every inlet for a hose left plugged in, and test any low-voltage hose whose handle switch may be stuck or shorted.
The unit's own switch: disconnect the leads to the unit's on/off switch and watch the motor. If it stops, that switch is shorted and needs replacing.
I lost the better part of a day to the second one. A spare low-voltage hose had been left plugged into a basement inlet with its handle switch flipped on, quietly holding the whole system running while I hunted for something far more complicated.
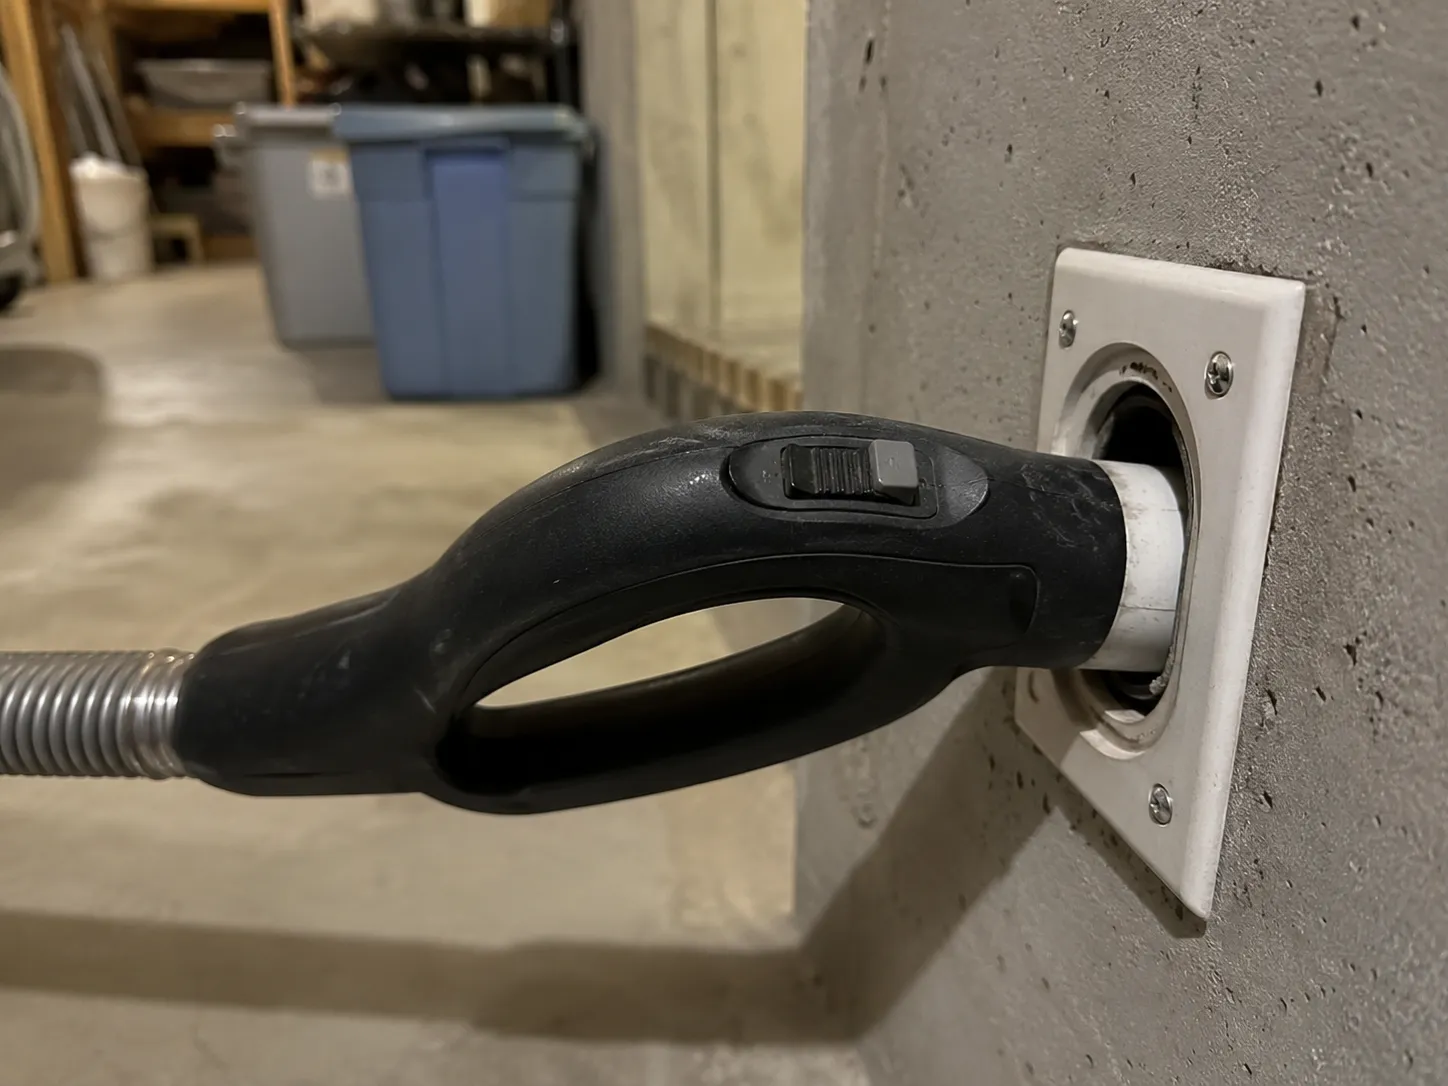
Rule these three out first, and you will avoid the slightly embarrassing afternoon I spent diagnosing a hose I forgot I had left out.
When to Call an Installer (and What It Costs)
Call a central vacuum installer when the short is in an in-wall low-voltage wire you cannot reach, when the power unit uses a newer integrated control board, or when it is a multi-motor system. Short of that, the common repairs are inexpensive and DIY-friendly.
A relay rebuild runs about 60 to 12 to $18. A service call usually costs several times more than the part.
Use this to decide where each fault lands.
Fault | DIY or pro | Typical cost in 2026 |
|---|---|---|
Stuck standalone relay | DIY rebuild | About $6 for the relay |
Failed or integrated control board | DIY swap if accessible, otherwise pro | $60–140 part |
Shorted or cracked wall inlet | DIY | $12–18 |
Oxidized inlet contacts | DIY clean | $0 |
Unreachable in-wall wire short | Installer, or key-fob bypass | Service call, several times the part |
Failing motor alongside the fault | Weigh repair against a new unit | Varies |
If a wire is truly buried, you do not have to open the wall. Many systems can abandon the low-voltage wires entirely and switch the unit with a key-fob remote receiver, which is a clean bypass for an unreachable short.
Across both my units, the whole adventure cost a 14 inlet on the Beam, well under the quoted service call for either job. Low-voltage work is relatively safe to handle, though Edison Vacuums rightly warns that misidentifying a terminal can damage the board, so go slowly if you open the unit.
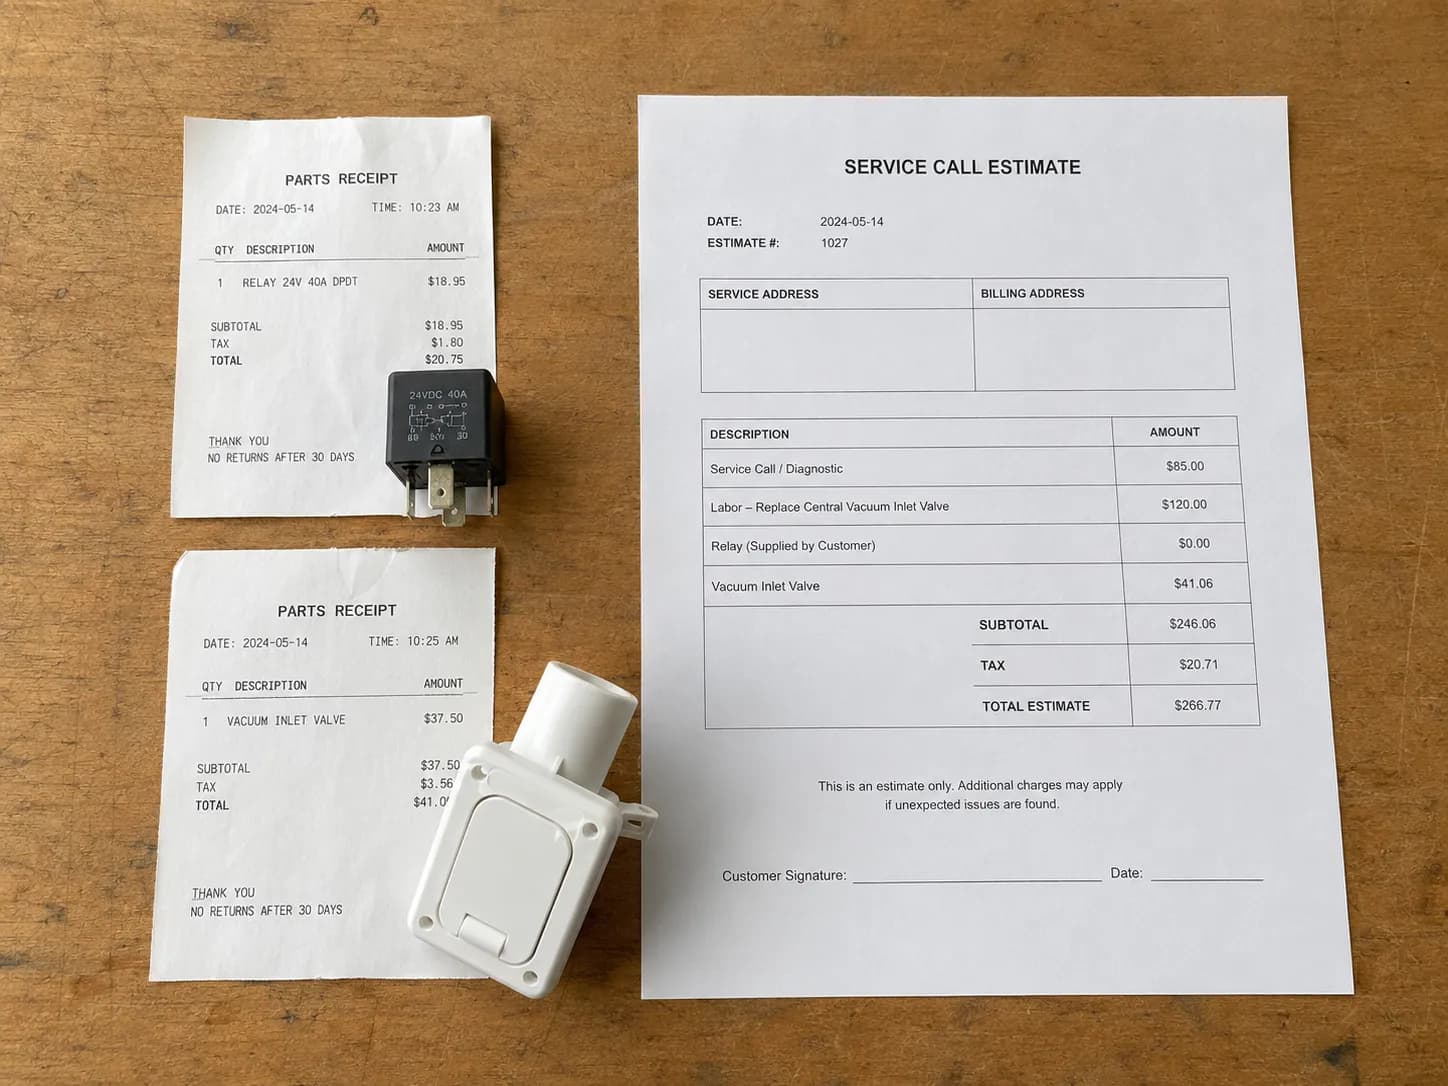
Honest limit: If the motor itself is also failing, for instance screeching or smelling hot, a new power unit may beat a string of repairs. Weigh the part cost against the age of the whole system before you commit.
If you have reached this point, you have already isolated the fault, which is the hard part. The fix is usually cheap and well within reach.
Frequently Asked Questions
Why won't my central vacuum shut off unless I unplug it?
The relay inside the power unit is most likely stuck closed, or a short in the 24-volt wiring is holding the circuit "on." Run the one-minute test: unplug the unit, disconnect the two low-voltage wires, and plug it back in. If it still runs, the relay or board is the problem; if it stops, you have a short to hunt.
How do I know if it's the relay or the wiring?
Disconnect the two low-voltage wires at the central vacuum power unit and plug the unit back in. If the central vacuum keeps running, the fault is the relay or control board inside the unit.
If it stops, the fault is a short in the house wiring or a wall inlet.
Can I run a central vacuum with the low-voltage wires disconnected?
Not normally, because the wall inlets rely on that 24-volt loop to switch the motor on. The exception is a key-fob remote receiver, which lets you abandon the low-voltage wiring and activate the central vacuum wirelessly instead, a common fix for an unreachable wire short.
How much does it cost to fix a central vacuum that keeps running?
A standalone relay rebuild costs about 60 to 12 to $18. A professional service call typically costs several times the price of the part, which is why the isolation test pays off.
Is it safe to leave a central vacuum running?
No. A motor held "on" keeps wearing and heating with no airflow to cool it, which risks the motor and the relay over time.
Stop it (unplug the unit if needed) and diagnose the cause rather than living with it.
What does the low-voltage wire on a central vacuum do?
It carries the small 24-volt signal that tells the relay to switch the motor on when a hose is inserted into an inlet. Every inlet is wired into that same loop in parallel, which is why a single shorted inlet can run the whole system.
The Bottom Line
A central vacuum that keeps running feels like an electrical emergency, but it rarely is. Underneath the roaring motor is a simple binary: either the relay inside the unit is stuck, or something out in the 24-volt wiring is shorting the circuit closed.
The one-minute wire-disconnect test settles which, and from there each path is short and affordable. A welded relay is often a few-dollar rebuild or a board swap, and a shorting inlet is usually a coin, a stray screw, or tarnished contacts you can clean for nothing.
That is what running this on two different units taught me: the same test, the same calm sequence, two opposite answers, and both fixed for less than the cost of a single service call. Stop the motor safely, run the test, follow the path it points to, and a central vacuum that keeps running becomes an afternoon repair rather than an installer's bill.
Read it your way
Short on time? Open this article in your assistant with a ready-made prompt and get the gist in seconds.
Found this useful? Make us a preferred source so we show up in your Google results.
Keep reading
Related articles

Troubleshooting & Repair
Roomba Not Working? 8 Symptoms Fixed (2026 Models)
Reboot first, then match your symptom. 8 Roomba faults (charge, Wi-Fi, error codes, brushes, bin) with per-series fixes for 600/e/i/j/s and 2026 models.

Troubleshooting & Repair
How Much Does a Vacuum Repair Cost? Fix or Replace (2026)
How much does a vacuum repair cost? Usually $50–150 (up to ~$321 for central). Use the 50% rule and our brand tier to decide: fix it or replace it in 2026.

Troubleshooting & Repair
Why Won’t My Robot Vacuum Work? 6 Fixes We Tested
Why won’t my robot vacuum work? Reset it, free the wheels, clean the sensors and fix a 2.4GHz Wi-Fi snag in 5 minutes: the DIY checks that skip a repair bill.

Troubleshooting & Repair
Not Broken? Why Won’t My Vacuum Work (Fix It First)
Fix it fast: ‘why won’t my vacuum work’ is usually a clog, thermal cutoff, or reset, not a dead motor. Match your symptom to the exact fix.
The discussion
Comments
Every comment is reviewed before it goes live.