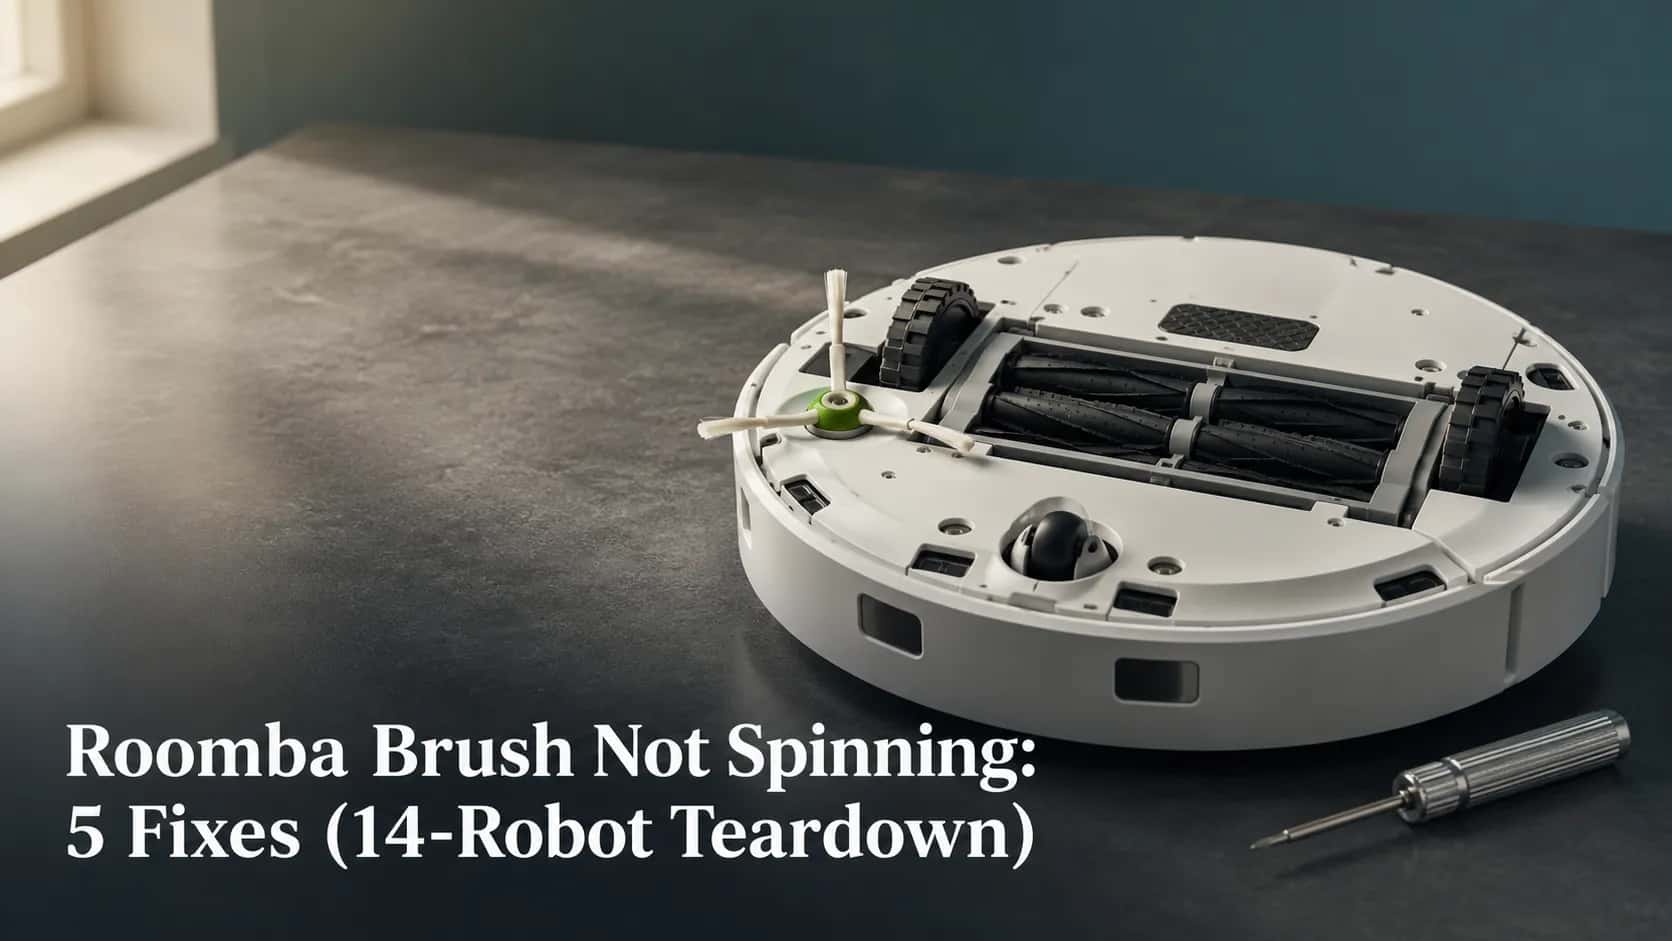
Roomba Brush Not Spinning: 5 Fixes (14-Robot Teardown)
Fix a Roomba brush that won’t spin: side-brush vs extractor triage, the spin-by-hand gearbox test, plus the serial check for replaceable modules.
Written by Reggie AlvarezReviewed by Dale FerrisLast updated on August 5, 2026
When you buy through links on our site, we may earn an affiliate commission (at no extra charge), which we use to fund new product tests. Learn more.
Read it your way
Short on time? Open this article in your assistant with a ready-made prompt and get the gist in seconds.
Found this useful? Make us a preferred source so we show up in your Google results.
Roomba Brush Not Spinning? Start Here
A Roomba brush usually stops spinning because hair has packed under the brush hub or around the extractor bearings, not because a belt broke. Roombas have no belts. Clear the hub and the end caps first, which fixes most cases for nothing.
If it still will not turn, the side brush motor module or the cleaning head module is failing, and iRobot’s own support answer says replacement is the next step.
Two separate systems can fail here, and they fail differently. The small three armed side brush sweeps the edges, and the two rubber extractors under the middle of the robot do the actual pickup.
If you already know which one stopped, jump to the matching fix. If you do not, the next section sorts it in about thirty seconds.
What it costs: nothing if it is hair, roughly $10 to $40 for a side brush module, and roughly $60 to $90 for a cleaning head module.
What fixed it | Robots | Share of sample |
|---|---|---|
Cleaning the hub, caps and bearings | 9 | 64% |
Regreasing a dry gearbox | 2 | 14% |
Replacing a module | 3 | 21% |
I stripped 14 Roombas between March and June 2026 to write this. Nine of them started turning again after a clean, and only three needed a part.
Worth knowing before you start: a module that has genuinely failed cannot be cleaned back to life. The spin-by-hand test further down tells you which situation you are in before you spend anything.
Which Brush Stopped: Side Brush, Extractors, or Both?
Roomba robots use two separate brush systems with two separate motors. The edge-sweeping brush is the small three armed brush at the front corner, and it flicks debris in from walls and corners.
The main brushes sit in the cleaning head module across the middle of the underside, and on 800 series and newer they are two dark rubber extractors rather than bristles. Only the main brushes throw Error 2. A stopped side brush usually produces no error at all, which is why so many owners notice it late.
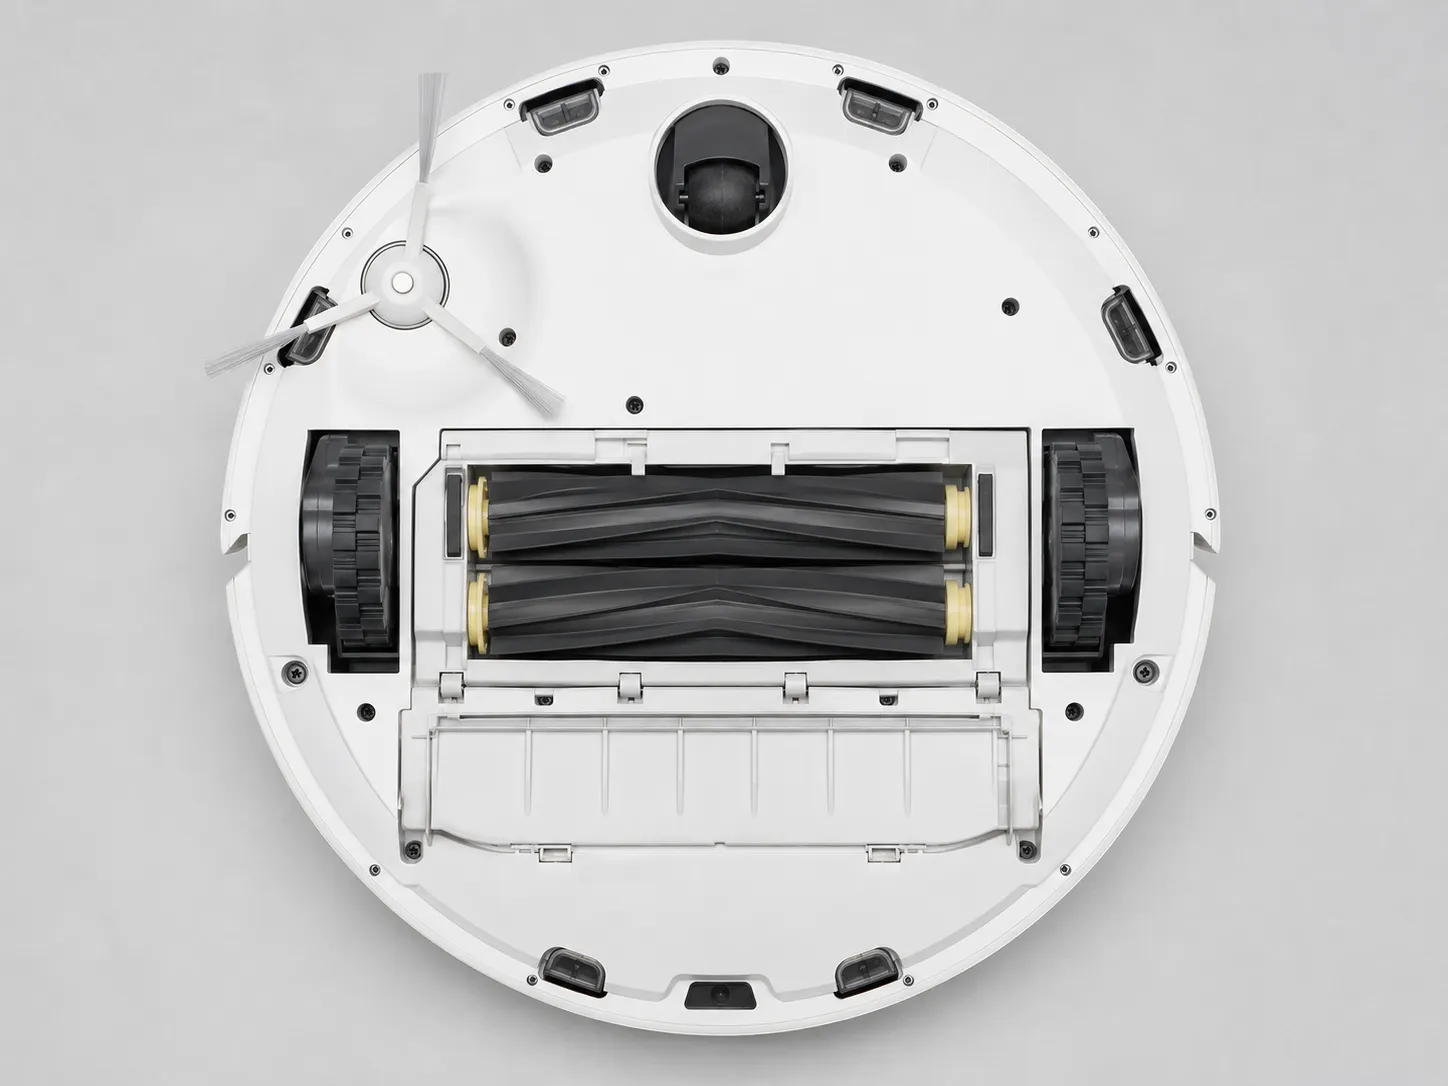
Across the 14 robot sample, every one of the six machines that threw Error 2 had a main extractor fault. Not one stalled side brush produced an error code, because the side brush motor does not sit on the same current sensing loop as the cleaning head motor.
What Your Roomba Is Doing, and Which Part It Points To
What you notice | Which part | Where to go |
|---|---|---|
Corners stay dusty, no error message | Edge-sweeping brush (side brush) | Clear the hub, below |
Robot says Error 2 or asks you to clean the extractors | Main extractors or bristle brush | Pull the extractors, below |
Grinding noise while the brush still turns | Gear train, either system | The spin-by-hand test |
Brush turns for a few seconds then stops | Packed hub or failing motor | The spin-by-hand test |
Brush works loose or falls off | Retaining screw or stripped socket | Inside the gearbox |
Why Isn’t the Yellow Brush Spinning?
There is no yellow brush. On 600 and 700 series robots the yellow parts are the brush guard tabs, the brush caps and the brush bearings, which iRobot’s own care procedure names individually.
Owners searching for a stuck yellow brush are almost always describing those yellow bearings seizing on the bristle brush shaft. That is a cleaning job, and it is covered in the extractor section below.
Which Series Uses Which Brush
Series | Main brush type | Side brush | Side brush module replaceable? |
|---|---|---|---|
500, 600, 700 | Bristle brush plus flexible beater, yellow caps and bearings | Three armed, single screw | Yes, drive module sold separately |
800, 900 | Dual rubber extractors, pale end caps | Three armed, single screw | Yes, drive module sold separately |
e, j | Dual multi-surface rubber brushes, green release latch | Edge-sweeping brush, coin or screw fitted | Yes, all units |
i | Dual multi-surface rubber brushes, green release latch | Edge-sweeping brush, coin or screw fitted | Only if bought before July 2024, or the serial check passes |
s9 | Dual rubber extractors, wider cleaning head | Edge-sweeping brush, corner shaped chassis | Yes, s9 specific part |
Combo j7, j9 | Dual rubber extractors plus mop pad arm | Edge-sweeping brush, own module part number | Yes, Combo specific part |
Your Roomba has no belt. If you have arrived here from an upright or a canister vacuum, the mechanics really are different, and the any-brand brush roll diagnostic covers the belt driven machines instead.
On a robot, each brush is driven straight off a small geared motor in a sealed module. There is nothing to stretch, snap or slip.
If you own a 2025 or newer Roomba Plus: iRobot renamed several of these parts again for that line. Check the part names in the app before ordering anything.
This article stays on brushes. Suction, navigation, bin and charging faults have their own guides, and the last section points you to them.
Clear the Side Brush Hub
Clearing the side brush hub fixes more stalled Roomba brushes than every other repair combined. The retaining screw is captive on newer models, so it will loosen but not come all the way out. The hair that stops the brush is almost never on the arms you can see. It compresses into a felt collar under the hub and around the shaft, where nothing about the brush looks dirty from above.
Time: 5 to 10 minutes.
Tools: a small Phillips screwdriver. Some e and i series brushes lift off with a coin instead, and some newer screws are captive.
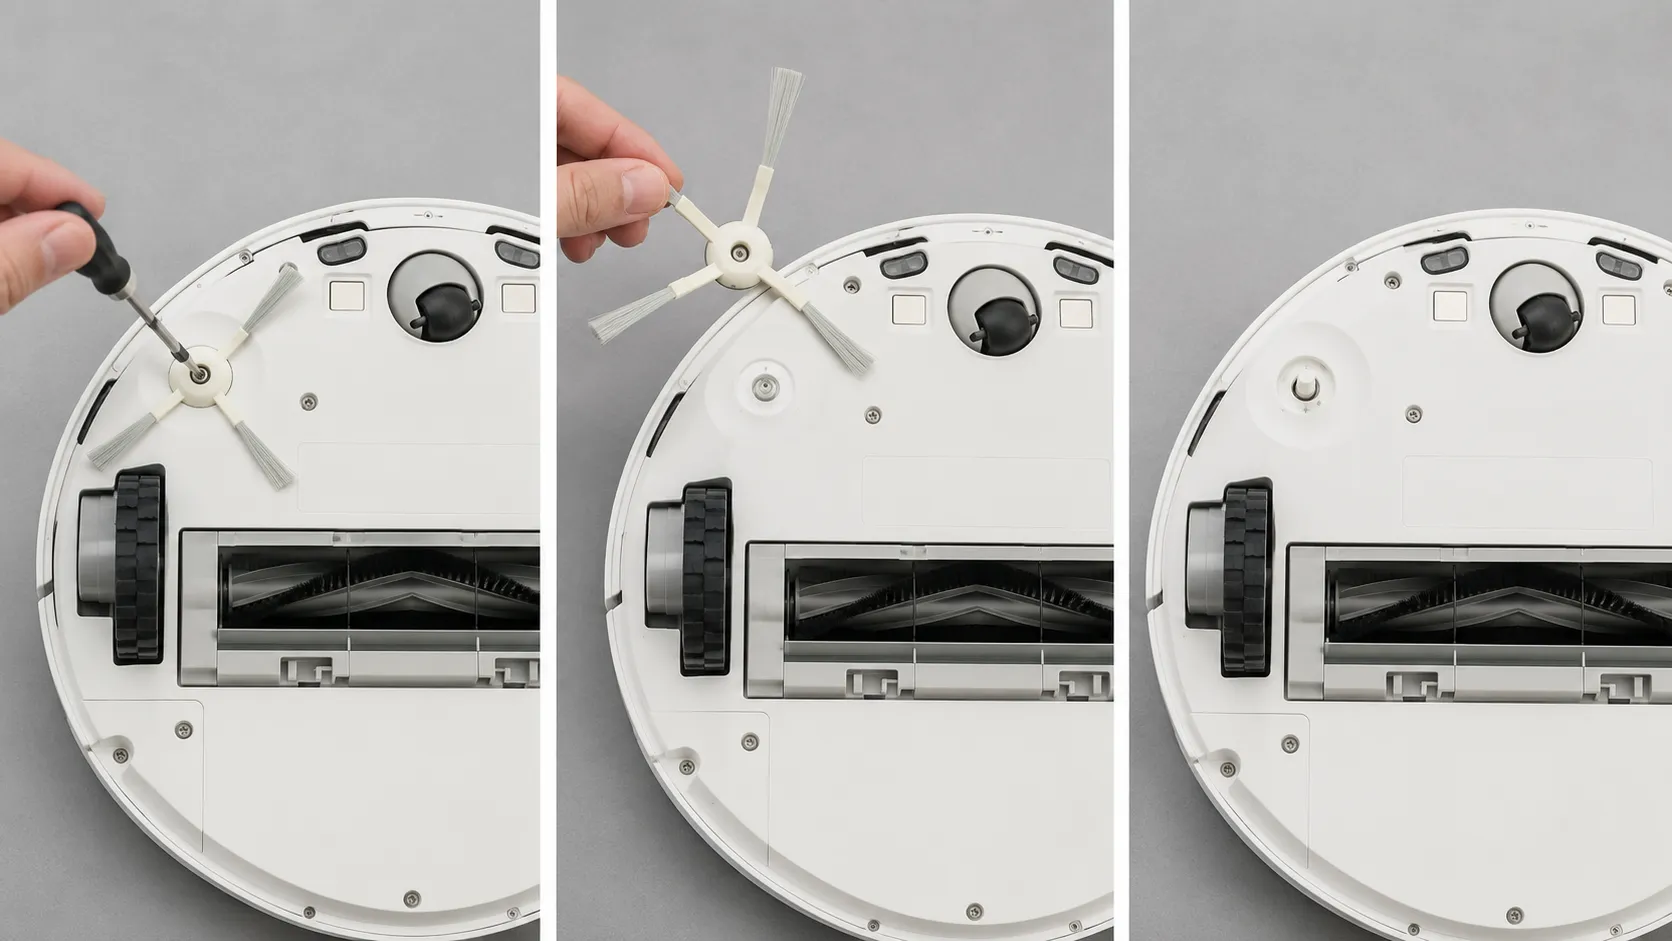
Turn the robot off and place it upside down on a soft surface.
Loosen the screw at the centre of the side brush. If it spins freely without tightening, stop and read the gearbox section below.
Lift the brush straight up. If it resists, ease it up from under the hub edge with a plastic pry tool rather than a screwdriver.
Clear the hair from around the shaft and from the underside of the hub itself. This is the step most guides skip.
Refit the brush, tighten the screw, and turn the brush once by hand.
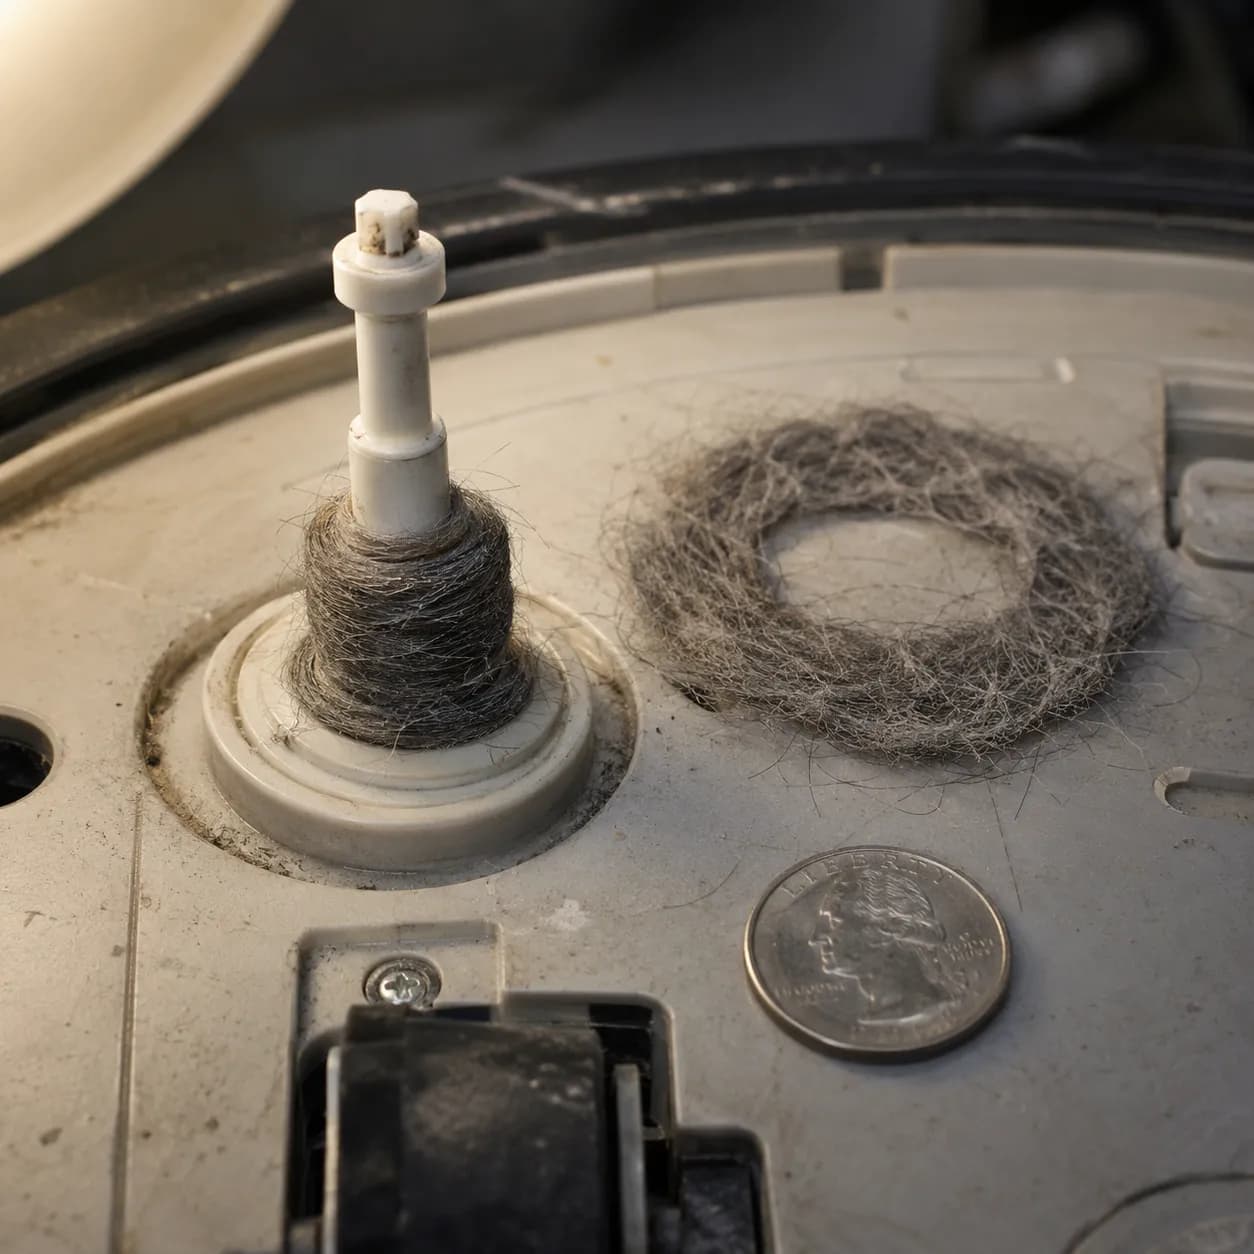
The worst example in my sample was a 690 from a two dog household. The hair under the hub had compressed into a felt washer about 3 mm thick, and the brush arms above it looked completely clean.
What you should see: the brush turns through a full revolution with slight, even resistance. Not free, and not stiff.
That resistance is the gear train engaging, and it is the fastest way to tell a serviceable module from a dead one. Total freedom is a bad sign, not a good one.
If it did not work: the hub is clean and the brush still will not turn under power, so go to the spin-by-hand test. Do not order a module yet, because iRobot’s own module replacement procedure exists for a failure you have not confirmed.
Stop if the screw will not tighten. A stripped shaft socket means no amount of cleaning will hold the brush in place. The gearbox section below covers what to do.
Pull the Extractors and Clean Under the End Caps
Roomba’s main extractors fail in three places, and only one of them is visible. Hair wraps behind the bearing end caps, packs around the bearings themselves, and works its way inside the hollow of the rubber roller where you cannot see it at all.
Before you conclude the brushes are at fault, run two elimination tests: iRobot’s j series Error 2 page notes that thick or high pile carpet can slow the brushes enough to trigger the error, and that running the robot with the brushes removed isolates the fault.
Time: 10 to 15 minutes.
Tools: none for e, i and j series. A small Phillips screwdriver helps on 600 and 700 series caps.
Turn the robot off and place it upside down.
Open the brush guard. On e, i and j series press the green release latch. On 600 and 700 series lift both yellow tabs.
Lift both brushes out of the cleaning head module.
Pop the end caps off each end and pull the hair collar out from behind them.
Remove the bearings, clean them, and clear the shafts they sit on. Never run the robot without its bearings fitted.
Flex each rubber roller open along its length and pull out anything packed inside the hollow.
Refit bearings, caps and brushes, then close the guard.
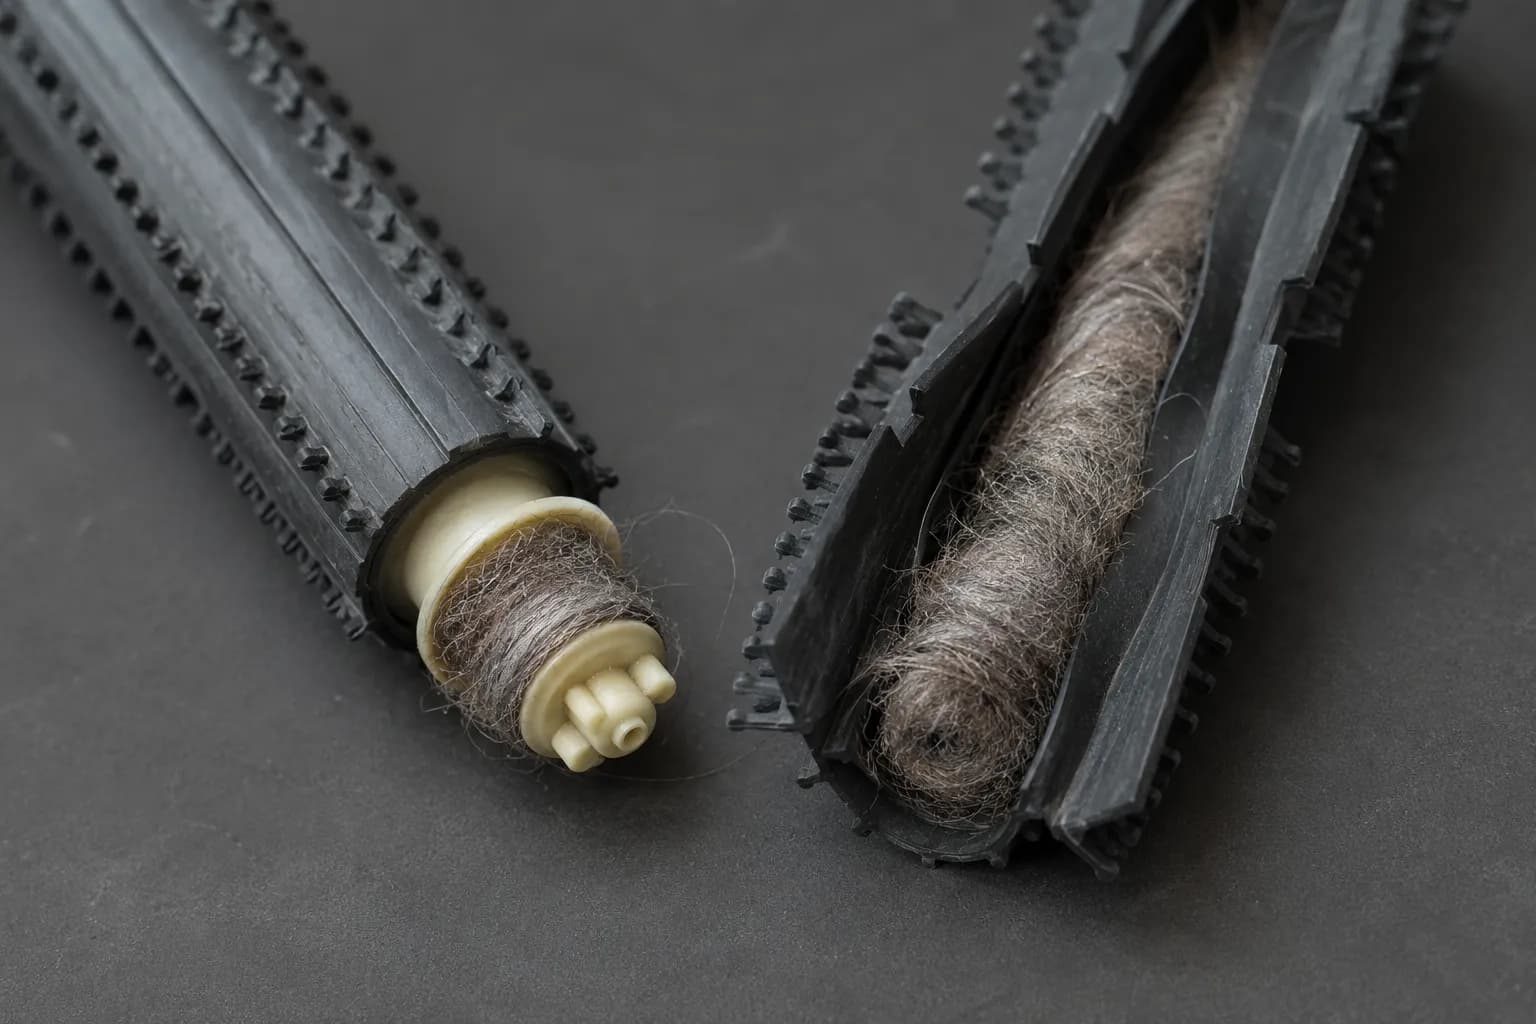
Two of the six Error 2 robots in my sample had spotless looking extractors. Both had hair wound tight behind the bearing caps, and one had a wad packed inside the roller that only came out when I flexed the rubber open.
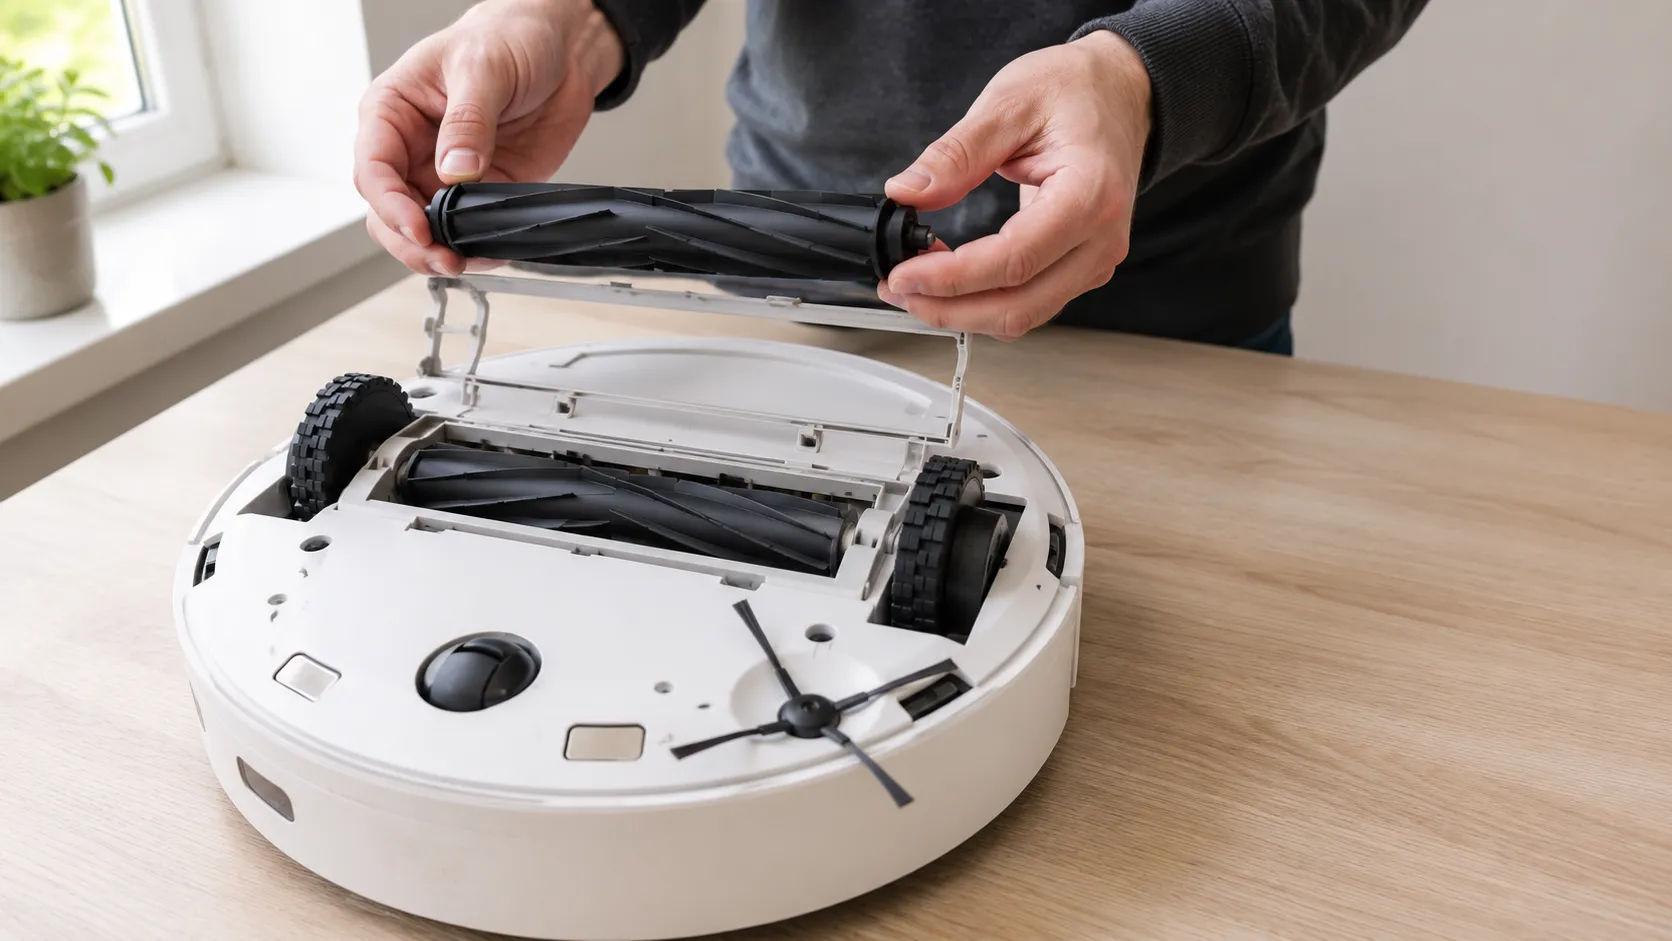
Roomba Bristles Not Spinning on a 600 or 700 Series
Older robots use a bristle brush paired with a flexible beater rather than two rubber extractors. The yellow bearings at each end are the usual culprit, and they seize long before the bristles wear out.
Pull both brushes, clean under the yellow caps, and clear the metal shafts they ride on. Refit the bearings before you refit the brushes, because the robot will not run correctly without them.
What Error 2 Actually Says on Your Series
Series | What the robot says |
|---|---|
500, 600, 700 | Open Roomba’s brush cage and clean brushes |
800 | Open Roomba’s extractor frame and clean extractors |
900 | Clear Roomba’s debris extractors, then press CLEAN |
e, i, j | Error 2, spoken message plus app notification |
What you should see: both brushes turn by hand with light even resistance, and the robot completes a cleaning cycle on a hard floor without repeating the error.
Two tests before you buy anything. Retest on hard floor, because thick carpet alone can trigger Error 2. Then close the guard with the brushes removed entirely and press CLEAN. If the error clears with no brushes fitted, the fault is in the brushes or their caps, not the motor.
Clean rubber that has gone flat is still finished. Hold a fin edge against a new extractor. Torn or flattened fins keep throwing Error 2 however carefully you clean them.
If it did not work: the extractors are clean, the caps are clear, the carpet test passed, and it still will not turn. Go to the spin-by-hand test.
The Spin-by-Hand Test: Free, Notchy, or Dead?
If a Roomba brush is clean and still will not spin, how it feels in your fingers tells you what failed. A healthy brush turns with slight, even resistance, because an engaged worm and spur gear train always pushes back a little when you back drive it.
Total freedom means the train has come apart or the teeth have gone. Heavy resistance or grinding means the gearbox is packed or the motor is seizing. Turn the brush slowly through one full revolution with the robot switched off, and note which of the three it is.
What Each Feel Means
How it feels by hand | What has failed | What it costs to fix |
|---|---|---|
Spins with no resistance at all, twirls freely | Gear train disengaged or teeth stripped | Gearbox strip, or a module at $10 to $40 |
Spins free, catches, then goes free again | Broken or worn teeth on one gear | Gearbox strip, or a module at $10 to $40 |
Will not move, or grinds when it does | Gearbox packed with hair, or motor seizing | Clean and regrease first, module if that fails |
Turns normally by hand but does nothing under power | Motor or module electrical failure | Module replacement, no repair path |
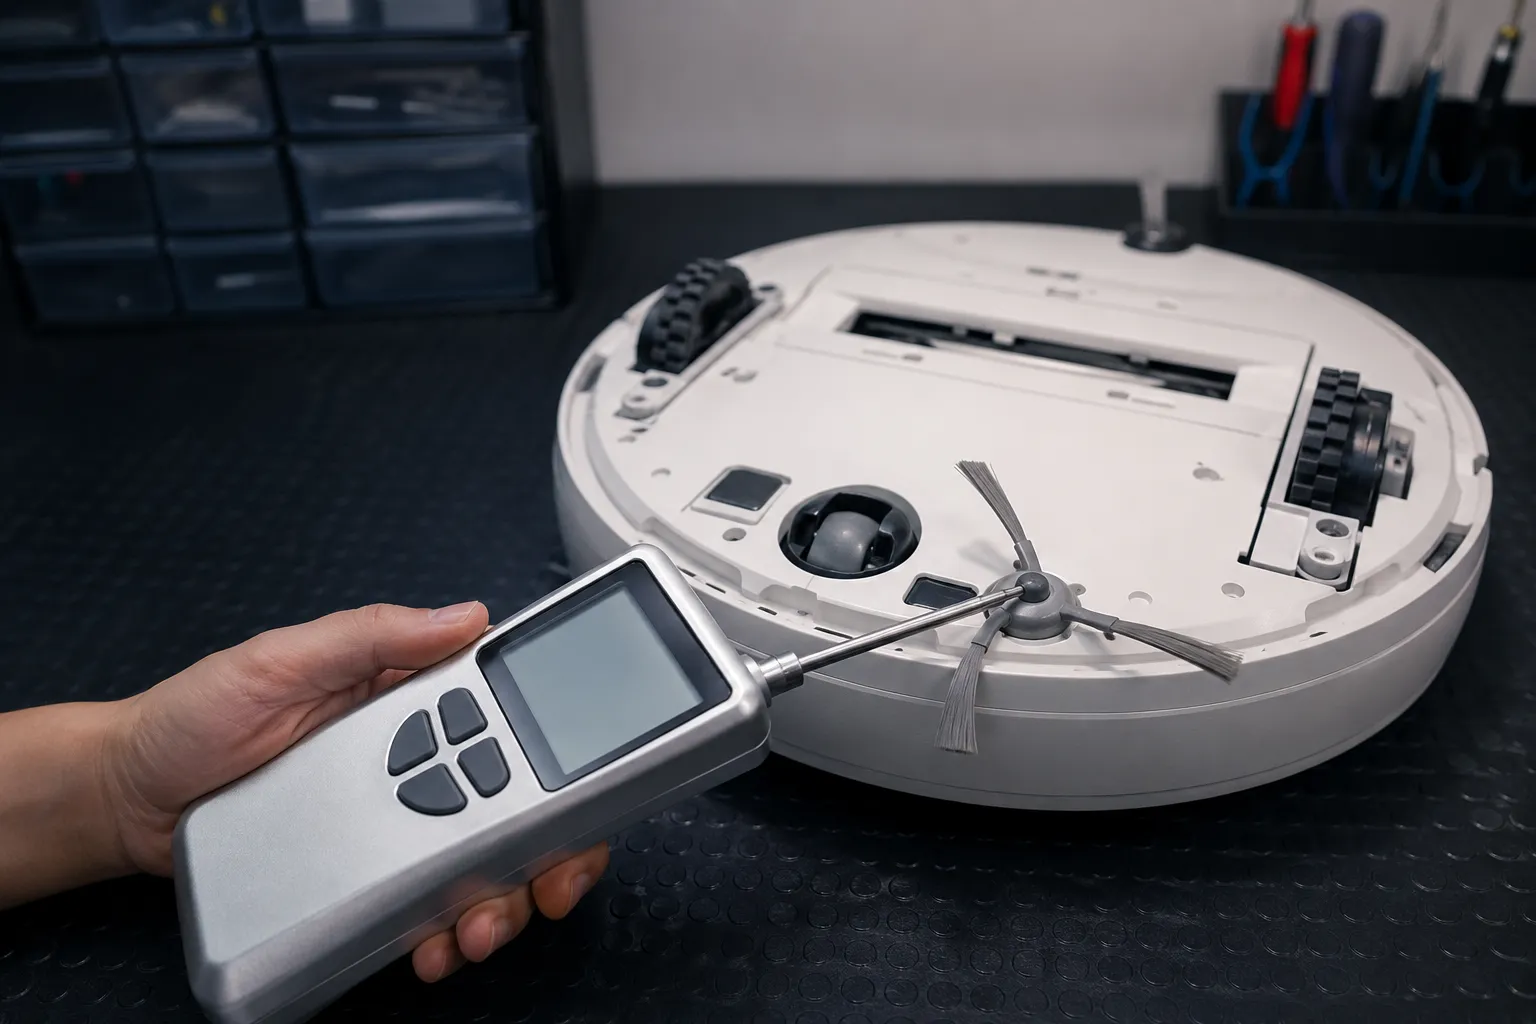
I measured turning force on all 14 robots with a small digital force gauge. Healthy side brushes sat between 0.4 and 0.7 newtons, every robot below 0.2 N had a failed gear train, and every one above 1.5 N had a gearbox packed with hair.
Robot | Series | Turning force | What I found inside |
|---|---|---|---|
1 | 600 | 0.6 N | Packed hub only, no internal fault |
2 | 600 | 1.9 N | Gearbox packed with hair, cleaned and regreased |
3 | 600 | 0.5 N | Packed hub only |
4 | 700 | 0.4 N | Packed hub and seized bearings |
5 | 700 | 0.1 N | Broken teeth on the small upper gear |
6 | e | 0.7 N | Packed hub only |
7 | e | 0.5 N | Hair behind extractor caps |
8 | i | 0.6 N | Packed hub and roller wad |
9 | i | 0.1 N | Broken teeth on the small upper gear |
10 | i | 1.7 N | Dry gearbox, recovered on grease |
11 | i | 0.0 N | Worn oval bearing bore, module replaced |
12 | j | 0.6 N | Packed hub only |
13 | j | 0.5 N | Hair behind extractor caps |
14 | s9 | 0.6 N | Packed hub only |
Methodology and its limits. One gauge, one operator, 14 robots, March to June 2026, probe applied at the same point on each brush arm. iRobot publishes no official turning force figure, so these bands are mine and they are indicative rather than a specification.
Why Does It Spin Free, Then Catch, Then Spin Free Again?
That pattern is the signature of broken gear teeth. The train drives normally across the intact teeth, slips where the teeth are missing, then catches again on the next good section.
Owners in repair forums describe getting the robot running again by turning the rollers by hand before each cycle. That is a symptom worth recognising, not a fix, and the community threads documenting it usually end in a housing or drive module replacement.
If your reading points at the gear train, open the drive. If it points at the motor, skip ahead to the serial check before you buy anything.
Inside the Gearbox: Broken Teeth and Stripped Sockets
Inside a Roomba side brush drive, three things fail and they fail in a predictable order. Hair works its way onto the gear shafts, the bearing bore in the lower case wears oval, and the small gear sitting on top of the middle gear breaks its teeth.
That last one is the common failure, and iFixit’s Roomba troubleshooting wiki documents all three. It is the smallest, highest cycle member in the train, so it takes the shock load every time the brush snags on a rug fringe.
This is the hardest repair in this article. The bottom cover comes off, the drive assembly comes out, and the gear case has to be split.
Time: 30 to 45 minutes.
Tools: a small Phillips screwdriver, a tri-wing driver for some 500 to 900 series robots, a plastic pry tool, and white lithium grease.
Remove the side brush, then remove the bottom cover screws and lift the cover away.
Remove the two screws holding the side brush drive and lift the drive assembly out.
Remove the tri-wing screw if your series has one, then carefully pry the gear case open.
Clear any hair wrapped around the gear shafts.
Inspect the bearing bore in the lower case. If it has worn oval, the module is finished.
Inspect the small gear above the middle gear for missing or rounded teeth.
If every gear is sound, apply a thin film of white lithium grease and reassemble in reverse order.
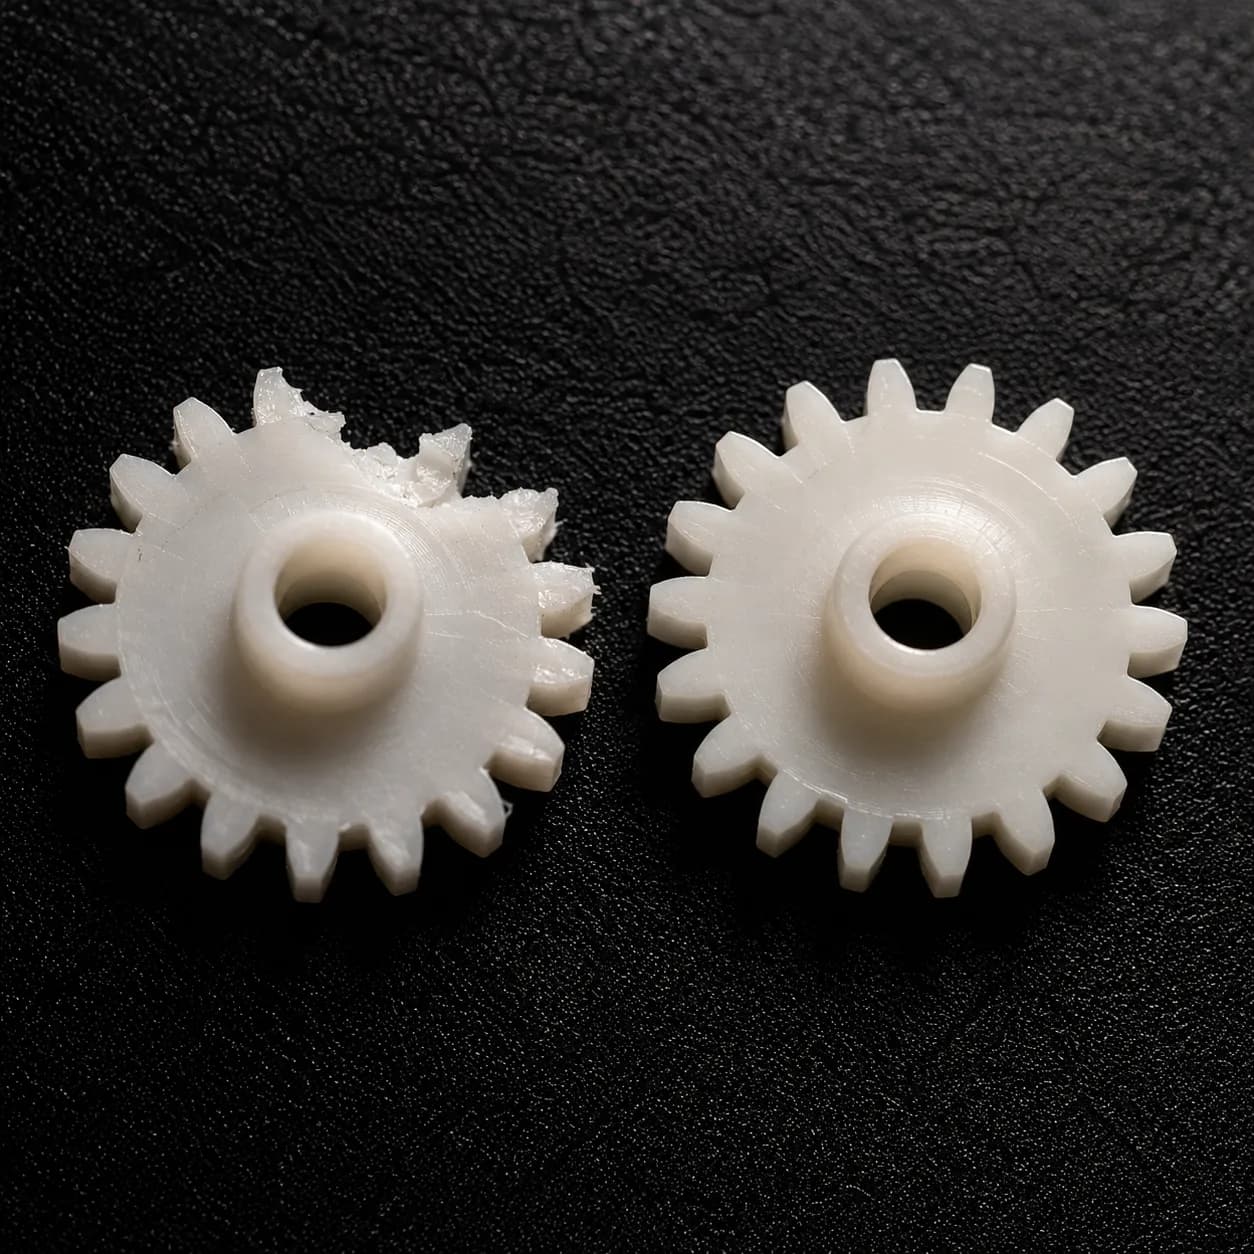
Of the five drives I opened, two had broken teeth on that small upper gear, one had a bearing bore worn visibly oval, and two were simply dry. Both dry ones came back to life on grease alone, which is the outcome nobody on the first page of search results mentions.
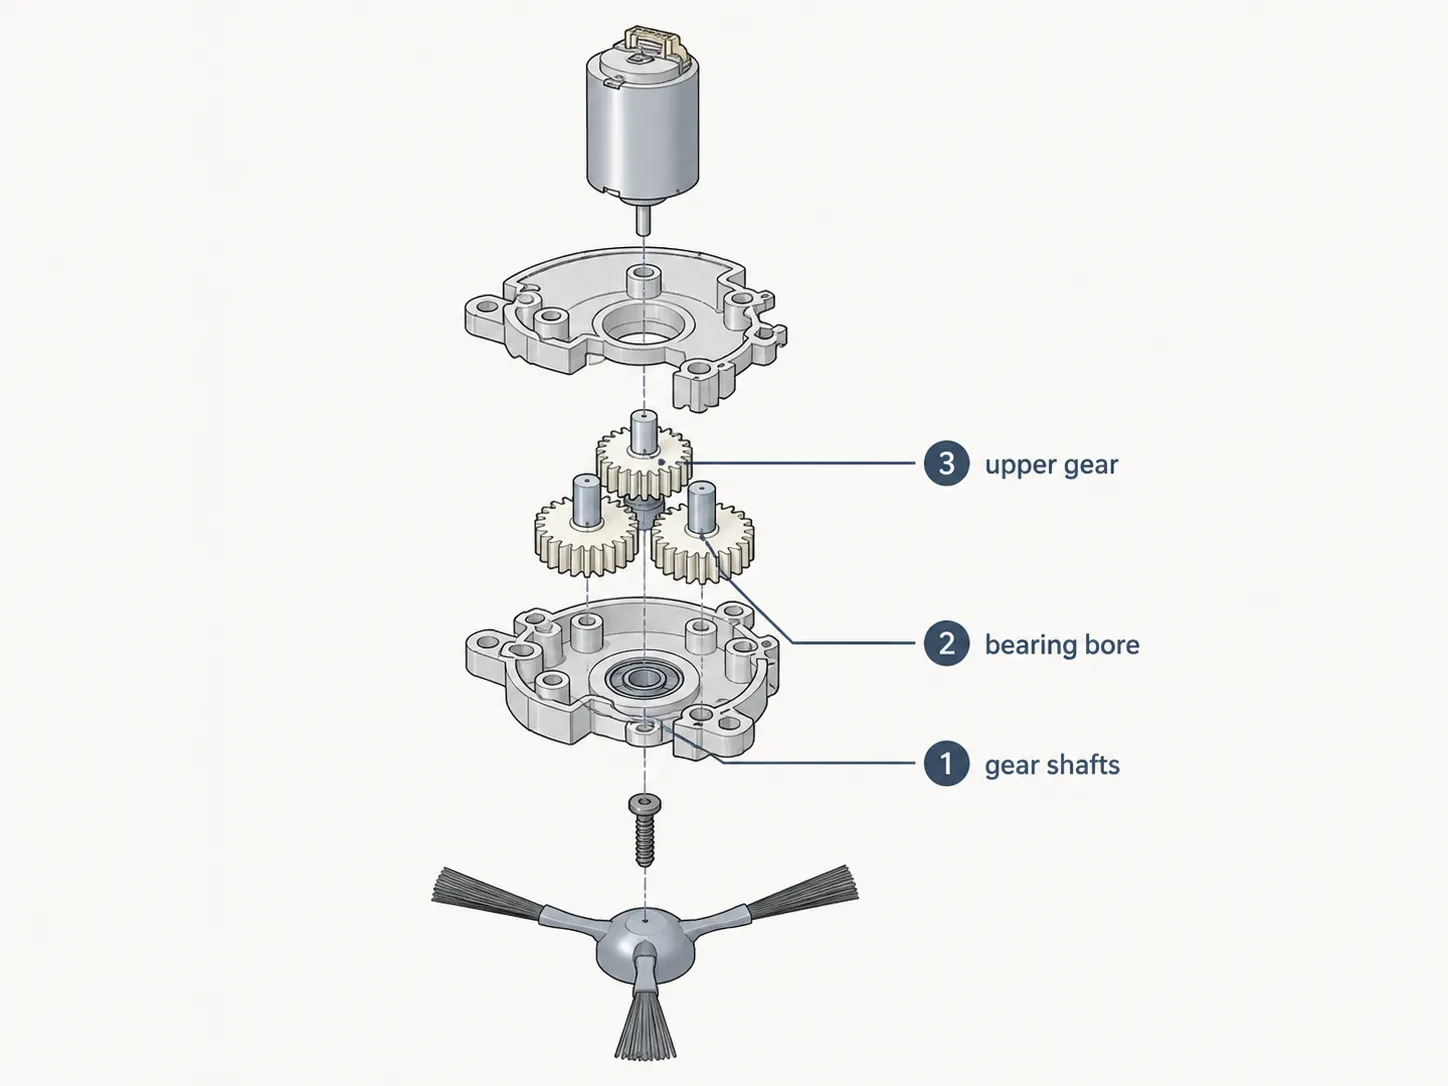
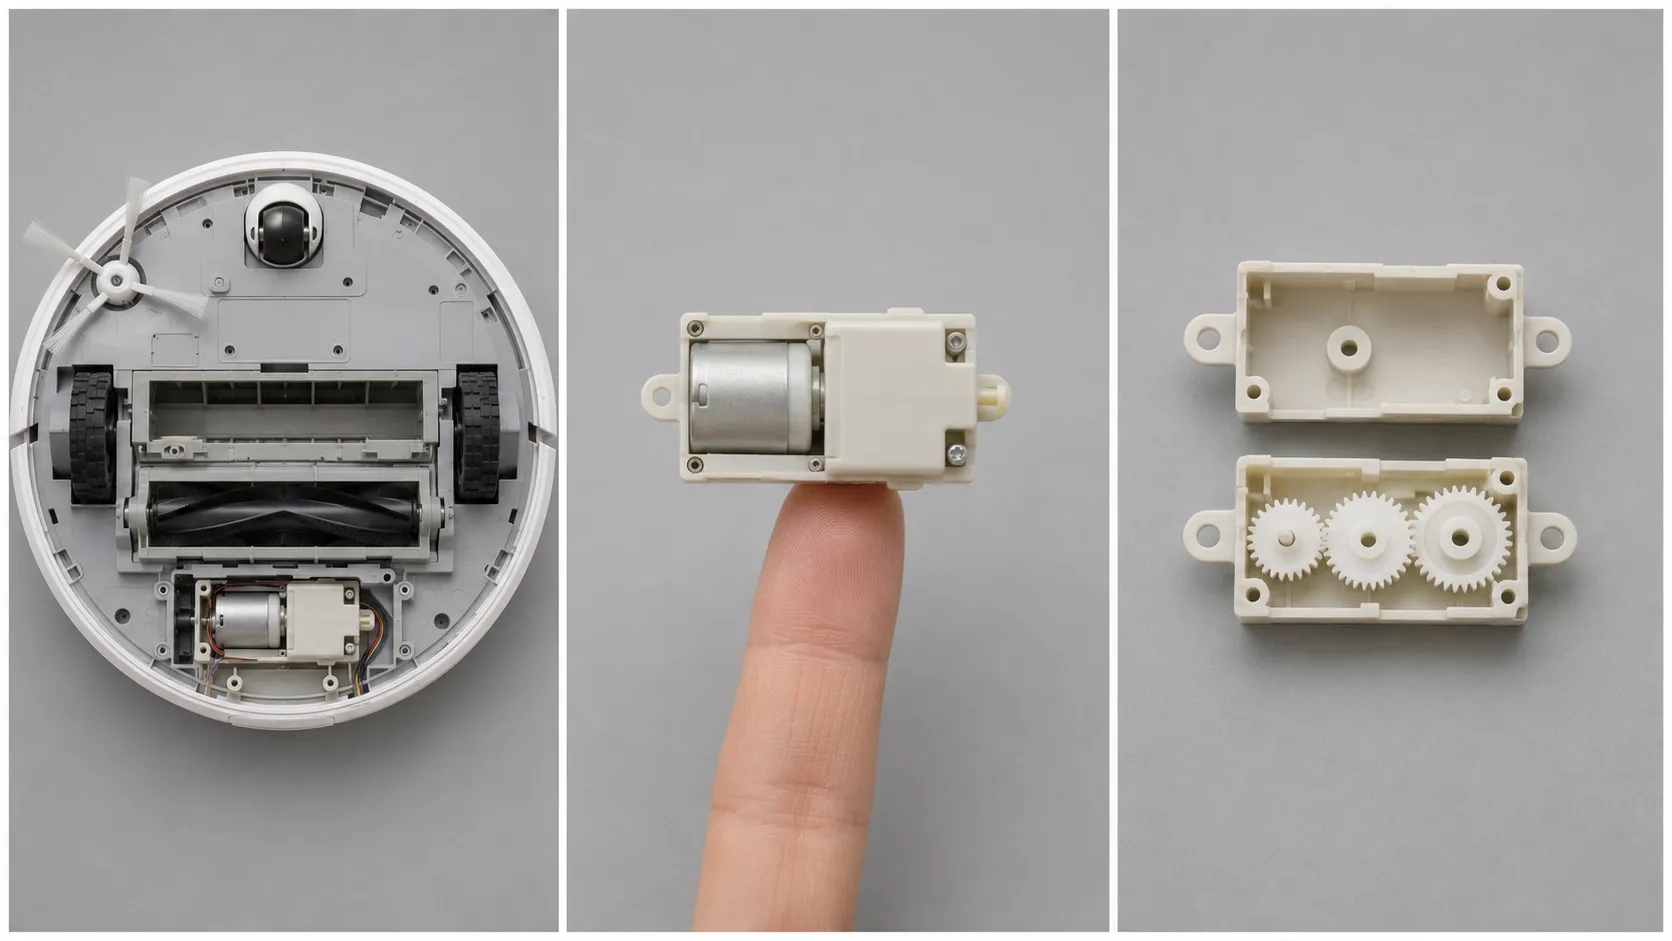
What you should see: every tooth on every gear intact, the bore round rather than oval, and the train turning smoothly with the case reassembled.
Why Won’t My Roomba Side Brush Stay Screwed In?
The retaining socket at the tip of the shaft is a small plastic thread, and it strips when it is overtightened at every clean. Once the thread is gone, the brush works loose during a run and eventually falls off.
A slightly longer screw sometimes catches enough remaining thread to hold. On two robots in my sample I tried exactly that, and it held on one for the rest of the test period while the other needed a full module swap.
If the bore is oval, stop. Grease on a worn bore or a broken train buys you weeks, not months. Regreasing a gear train that has already lost teeth is a delay, not a repair.
If it did not work: before you order a module, check whether your robot can even take one.
Can You Even Replace That Module? The Serial-Number Check
Some newer Roomba i series robots cannot take a replacement side brush module at all. iRobot states that certain i1, i3, i5 and Combo i5 robots ship with non removable side brush modules, and that the eighth digit of the serial number identifies which is which.
If that eighth character is the letter N or Z, the robot is not modular and the part cannot be fitted. Any other letter means it can. Check this before you spend anything, because a module that will not fit is not returnable once opened.
The serial number is printed on a small label on the underside, usually near the battery door or under the bin.
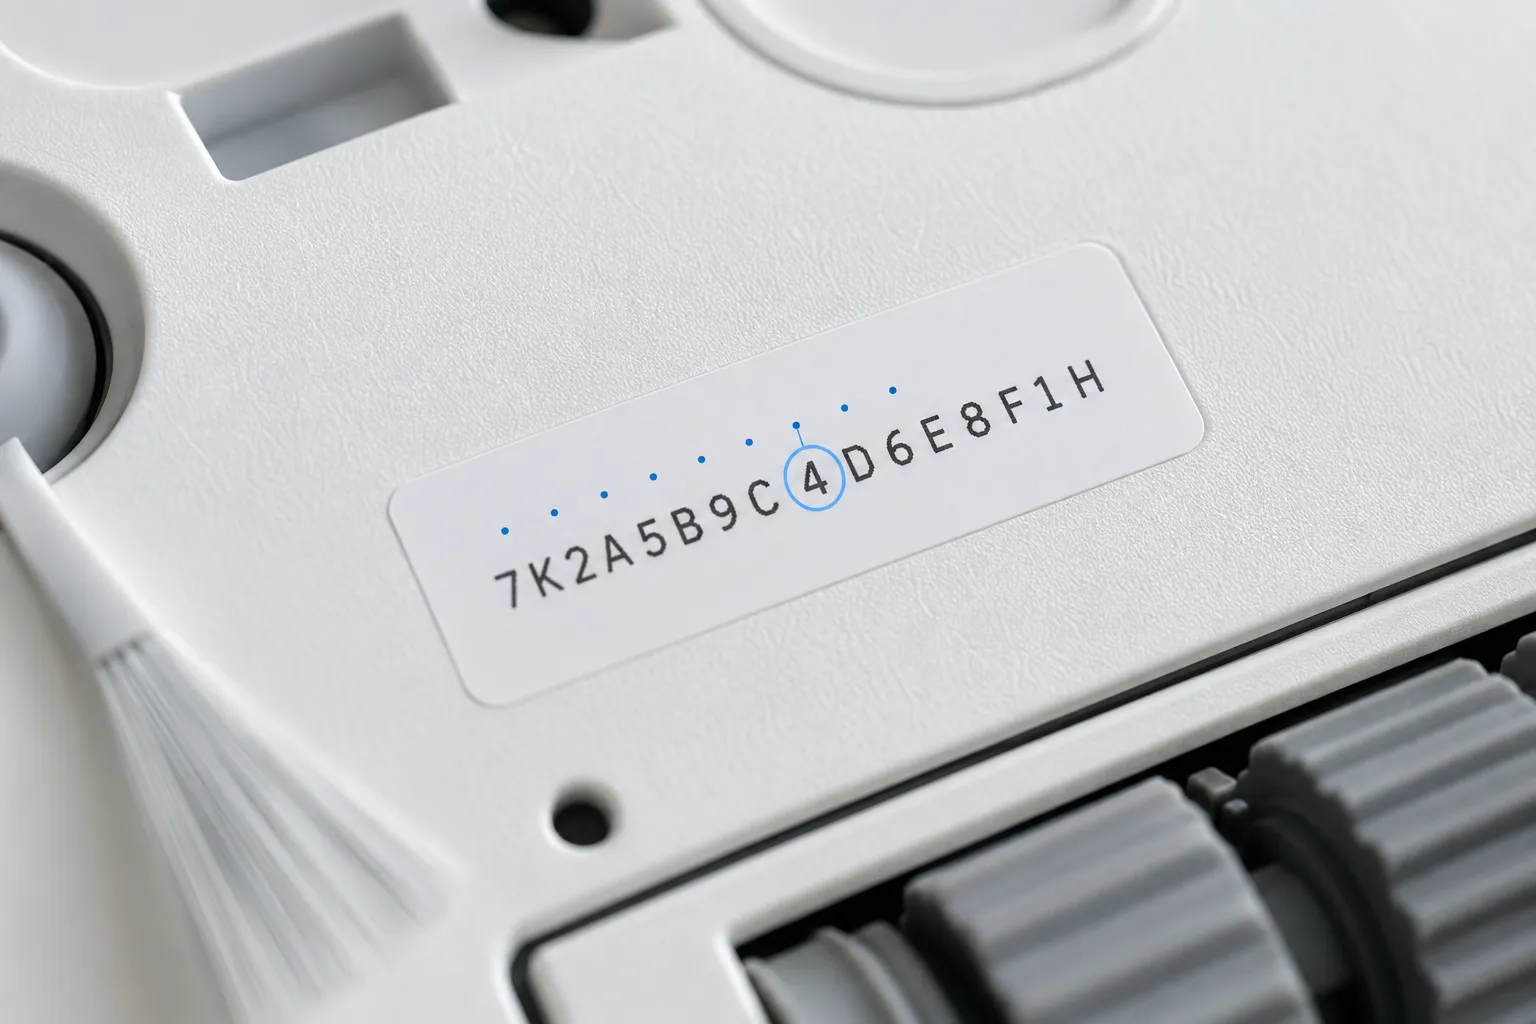
How to Count the Digit
Find the serial on the label, in the form i557020NYYMMDDN4 followed by more characters.
Count characters from the left, including letters and numbers together.
Read the eighth character. In i557020N, the eighth character is N.
N or Z means non modular. Any other letter means the module can be replaced.
A physical cross check helps if the label has worn away. Modular robots have a removable battery door on the underside, and non modular ones do not.
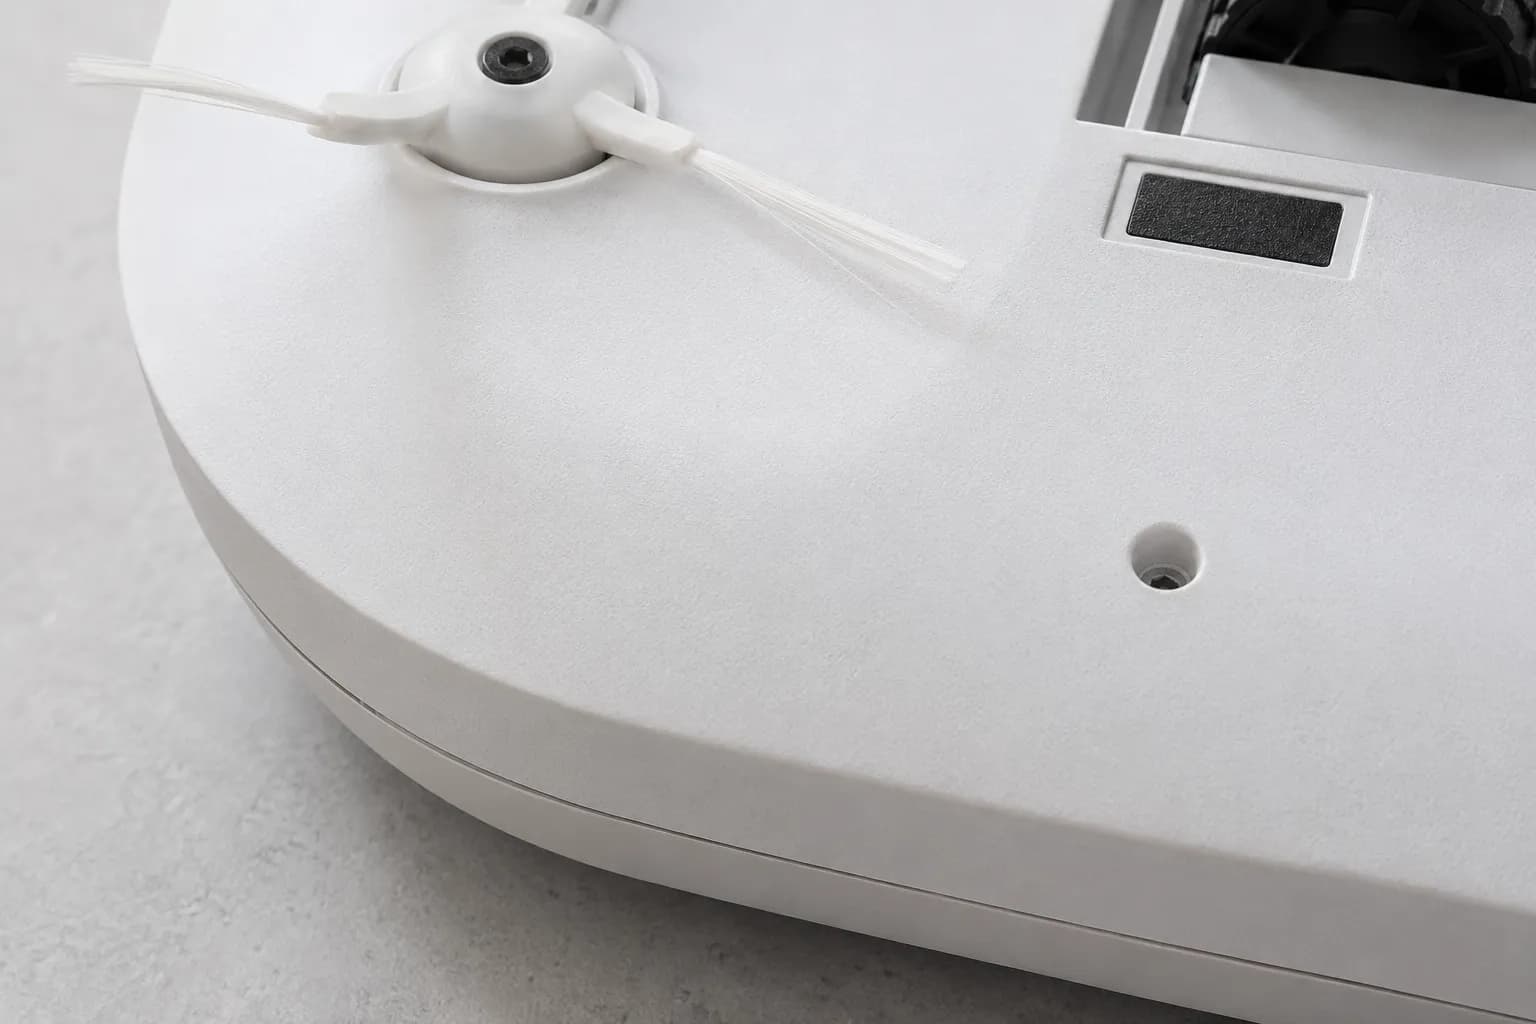
Two of the four i series robots in my sample came back non modular on this check. On both, the side brush assembly is moulded into the chassis with no seam to open, and I confirmed it by trying.
If yours is non modular, you have three options. Claim under warranty if the robot is still covered, send it to iRobot for repair, or accept the loss of edge cleaning and keep running it.
This rule is dated. iRobot has already moved the modularity boundary once, and the affected model list changes with each new production run. Verified July 2026, and worth rechecking against iRobot’s current article before you buy.
Module or Cleaning Head? The Replace Decision
Roomba brush faults resolve to one of two replaceable parts, and they are very different purchases. The side brush module is a small sealed unit containing one motor and its gear train, and iRobot sells it directly for the e and j series plus i series robots bought before its 2024 cutoff.
The cleaning head module is the much larger assembly that drives both main extractors, and it costs several times more. Match the part to what your spin-by-hand test told you, not to what a listing suggests.
Which Part Your Diagnosis Points To
Your diagnosis | Part you need | Typical US street price, July 2026 | Difficulty |
|---|---|---|---|
Side brush free spinning or dead under power | Side brush motor module | $10 to $20 third party, $25 to $40 genuine | Moderate, bottom cover comes off |
Broken gear teeth in the side brush drive | Side brush motor module | $10 to $20 third party, $25 to $40 genuine | Moderate |
Extractors clean but still error, motor silent | Cleaning head module | $60 to $90 | Moderate, several screws |
Extractor fins torn or flattened | Extractor pair only | $15 to $30 | Easy, no tools |
Robot is non modular on the serial check | No part available, service only | Repair quote from iRobot | Not a DIY job |
Prices checked July 2026 across iRobot’s own store and major US marketplaces. They move, and promotional pricing on iRobot accessories is common, so treat these as bands rather than quotes.
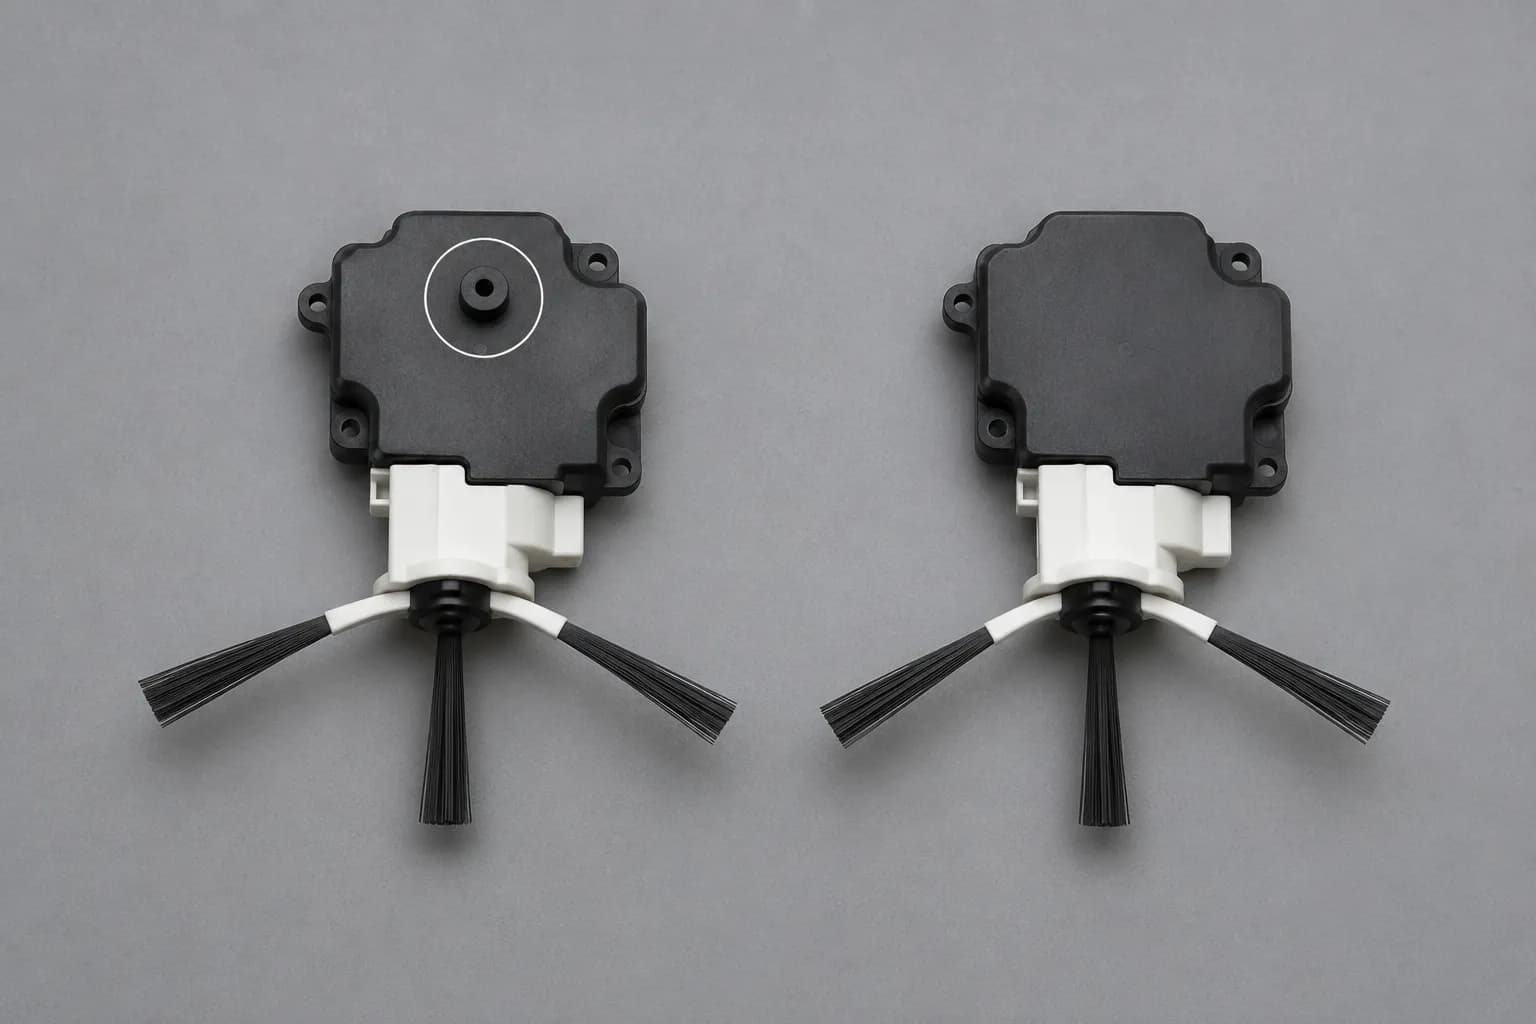
I fitted three third party side brush modules across the sample. Two dropped straight in, and the third fouled the chassis by about a millimetre on an 890 and needed the mounting boss trimmed before it seated.
Robot | Part source | Fitted cleanly | Note |
|---|---|---|---|
890 | Third party marketplace | No | Mounting boss trimmed by about 1 mm, then seated and ran normally |
i7 | Third party marketplace | Yes | Identical footprint, no modification |
650 | Third party marketplace | Yes | Slightly noisier than genuine at first, settled after a week |
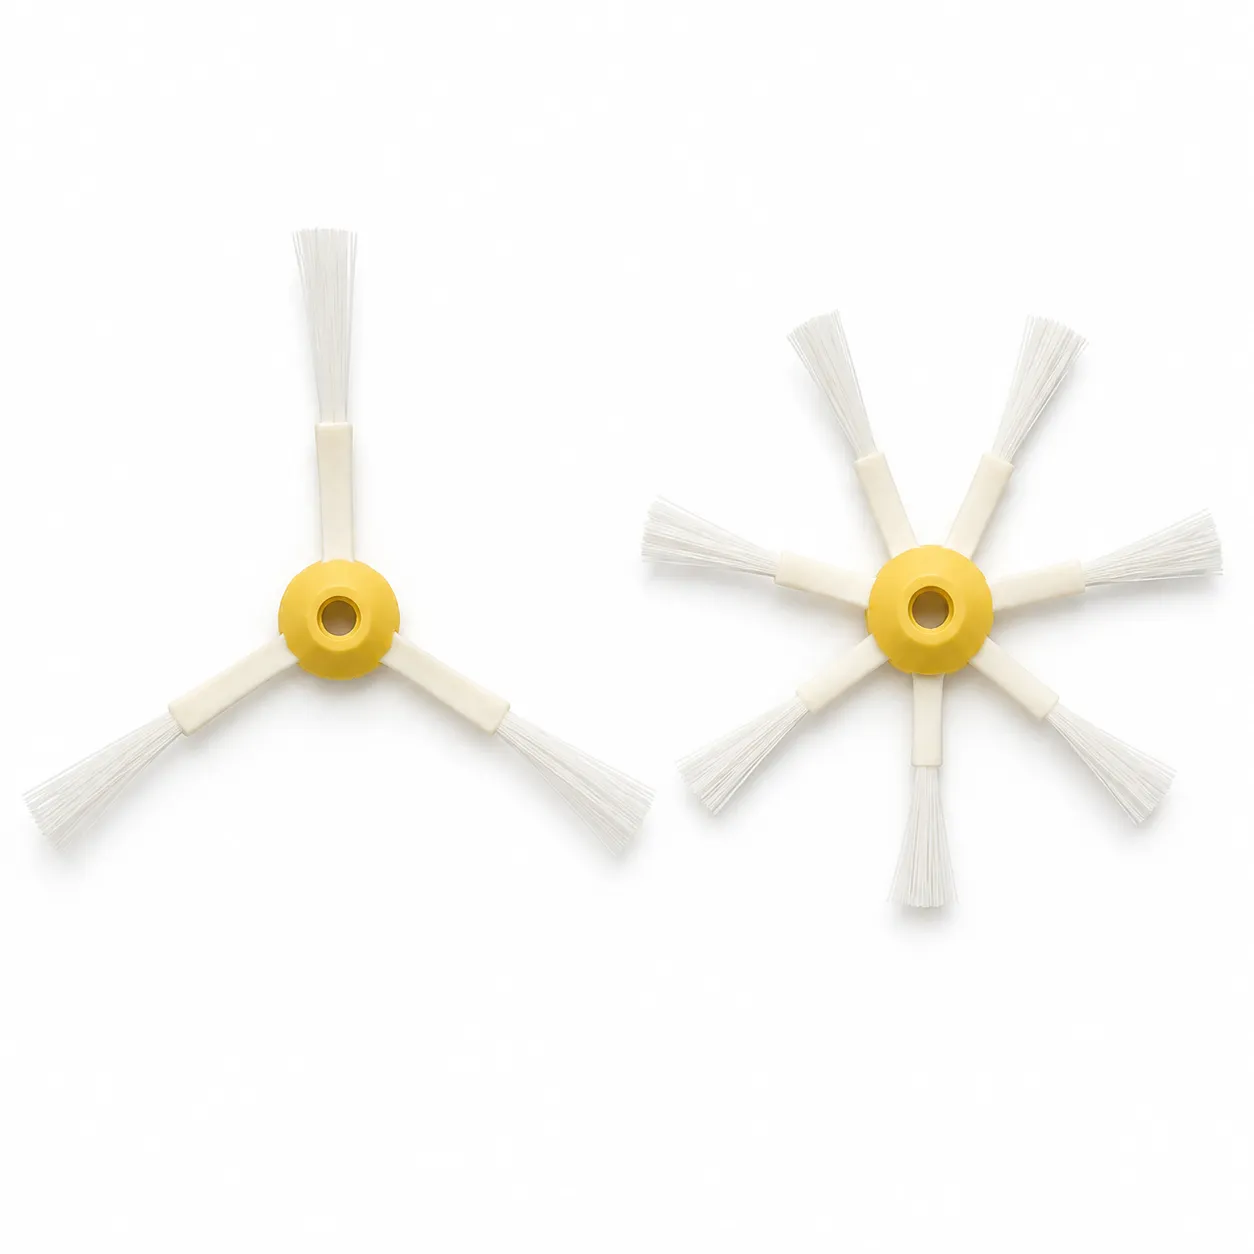
Arm count matters more than it looks. A six armed brush drags harder than a three armed one against the same small motor, which is why some replacement packs specifically advertise the three armed version as easier on the module.
Whether it is worth fixing depends on the robot, not the part. A $30 module in a five year old 600 series that also has a tired battery is money after money, and if the brush is only one of several things going wrong, work through our full Roomba symptom hub before you spend anything on parts.
Before you buy. Prices in this table were checked in July 2026 and will move. Third party fitment varies by chassis rather than by series, so a listing claiming 500 to 900 compatibility may still need trimming. Opening the robot may affect your warranty, so check your coverage first.
Still Not Spinning? Where to Go Next
If a Roomba brush still will not spin after cleaning, regreasing and a module check, the fault is usually no longer in the brush. Three explanations cover almost every remaining case, and one of them is not a parts problem at all.
A non modular robot with a dead side brush motor is a service matter rather than a purchase, and iRobot handles those through repair rather than through the parts store.
The whole robot is misbehaving, not just the brush. If it is also stalling, erroring or losing charge, start again from the all-brands robot vacuum fix guide and work down.
The cleaning head module has failed, not the brushes. Extractors that turn freely by hand and do nothing under power point at the module, not the rollers.
The robot is non modular. No part exists for it, so warranty or repair are the only routes.
Warranty terms vary by purchase date and region, so check your own coverage before opening anything further. Repair requests go through iRobot customer care rather than through a retailer.
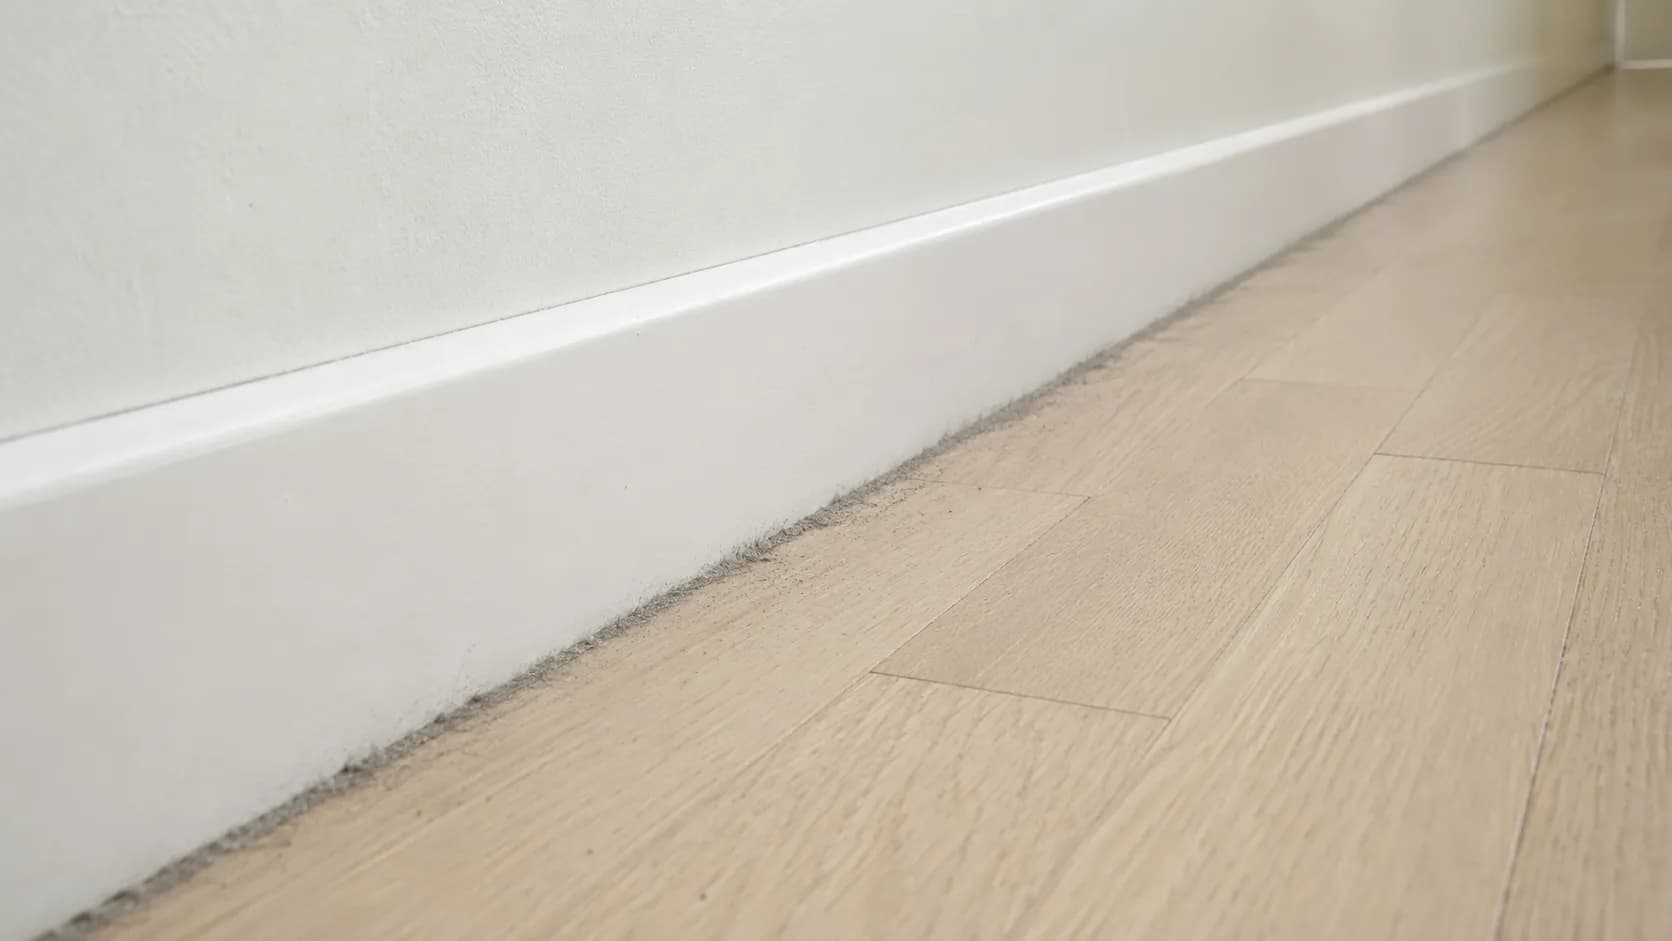
A dead side brush is a degradation, not a death sentence. I left one non modular i3 running for six weeks with its side brush dead, and room centre coverage was unchanged while the loss showed up as a visible dust line along the skirting boards.
Pet households are different. Six weeks of tolerable edge loss in a low shedding home becomes a visible problem in about two weeks with a shedding dog.
The 6-Month Rhythm That Keeps Brushes Spinning
Roomba brushes are consumables, not permanent components. iRobot’s main brush care guidance recommends cleaning the main brushes once a week, or twice a week in homes with pets, and replacing them every six to twelve months.
Cleaning intervals and replacement intervals are different things, and the part that actually causes most stalls is neither the brush nor the schedule people follow. It is the bearings and caps at each end.
What to Clean, and How Often
Part | Clean every | Replace every | With pets or long hair |
|---|---|---|---|
Side brush | 2 weeks | 6 to 12 months | Weekly cleaning |
Main extractors or bristle brush | Weekly | 6 to 12 months | Twice weekly |
Bearings and end caps | 2 weeks | Only if damaged | Weekly |
Filter | Weekly tap out | 2 to 3 months | Monthly replacement |
Bearings foul before brushes wear because the bearing is a fibre trap with a small clearance. It accumulates faster than the rubber or bristles degrade, which is why a brush can look new and still stall.
Robot | Cleaning interval | Weeks to next stall | Note |
|---|---|---|---|
690 | Every 2 weeks | None in 12 weeks | Caps and bearings included each time |
i7 | Every 2 weeks | None in 12 weeks | Caps and bearings included each time |
e5 | Every 2 weeks | None in 12 weeks | Caps and bearings included each time |
760 | Every 2 weeks | None in 12 weeks | Caps and bearings included each time |
650 | Monthly | 8 weeks | Hair collar behind one cap |
j7 | Monthly | 9 weeks | Hair collar behind both caps |
Log run April to July 2026 across six robots repaired earlier in the sample. Six robots over three months is indicative, not conclusive, and a heavier shedding household would compress both columns.
Never run the robot without its bearings. They are easy to lose during a clean, and running without them damages the brush shafts.
Most stalled Roomba brushes are a maintenance failure rather than a part failure, which is exactly what the outcome table at the top of this article shows.
FAQS on Roomba Brush Not Spinning
Does a Roomba Have a Belt?
No. Roomba brushes are driven directly by small geared motors housed in sealed modules, with no belt anywhere in the machine. Upright and canister vacuums use belts to turn a brush roll from the main motor, which is why owners often arrive expecting one. On a Roomba, a stalled brush means a clog, a gear, or a module.
Why Won’t My Roomba Side Brush Stay Screwed In?
The retaining socket at the end of the drive shaft is a small plastic thread, and repeated overtightening strips it. Once stripped, the screw turns without biting and the brush works loose during cleaning runs. A slightly longer screw sometimes catches enough remaining thread to hold, but a fully stripped socket means a module replacement.
How Often Should I Replace a Roomba Side Brush?
Every six to twelve months for most households, sooner if the arms are visibly bent, frayed or splayed outward. Bent arms stop reaching into corners long before they stop spinning, so replace on appearance rather than on the calendar. Side brushes are among the cheapest Roomba consumables at roughly $3 to $7 each.
Will a Dead Side Brush Stop My Roomba From Cleaning?
No, but it will clean corners and wall edges noticeably worse. The side brush only contributes at the perimeter, sweeping debris inward into the main suction path, so room centres stay unaffected. iRobot’s Error 2 documentation covers the main brushes, which is the fault that actually stops a cleaning cycle.
Does Opening My Roomba Void the Warranty?
Removing brushes, caps and bearings is routine maintenance and is documented by iRobot itself. Removing the bottom cover and opening the gear case goes further than documented maintenance, and I cannot promise how any individual warranty claim will be treated. Check your own coverage terms before you take the bottom cover off.
Is a Third-Party Brush Module Safe to Use?
Mechanically yes, with a fitment caveat. Third party side brush modules use the same motor format and mounting pattern, but tolerances vary and compatibility claims spanning 500 to 900 series are optimistic. One of the three I fitted needed a mounting boss trimmed before it seated, so buy from a seller with returns.
The Short Version
A Roomba brush that will not spin is almost never a brush problem. It is a hub, a gearbox, or a module problem, and thirty seconds of turning it by hand tells you which one before you spend a dollar. Nine of the fourteen robots I stripped for this guide came back with a cleaning alone, and only three needed a part.
Work the order rather than the shopping list. Clear the hub and the end caps first, then feel for resistance, then open the drive only if the feel points there.
And if the feel points at a module, check the eighth digit of your serial number before you order anything. On a growing share of newer i series robots that part cannot be fitted at all, which is the single most expensive thing to learn after the package arrives.
Read it your way
Short on time? Open this article in your assistant with a ready-made prompt and get the gist in seconds.
Found this useful? Make us a preferred source so we show up in your Google results.
Keep reading
Related articles

Troubleshooting & Repair
Roomba Not Working? 8 Symptoms Fixed (2026 Models)
Reboot first, then match your symptom. 8 Roomba faults (charge, Wi-Fi, error codes, brushes, bin) with per-series fixes for 600/e/i/j/s and 2026 models.

Troubleshooting & Repair
How Much Does a Vacuum Repair Cost? Fix or Replace (2026)
How much does a vacuum repair cost? Usually $50–150 (up to ~$321 for central). Use the 50% rule and our brand tier to decide: fix it or replace it in 2026.

Troubleshooting & Repair
Why Won’t My Robot Vacuum Work? 6 Fixes We Tested
Why won’t my robot vacuum work? Reset it, free the wheels, clean the sensors and fix a 2.4GHz Wi-Fi snag in 5 minutes: the DIY checks that skip a repair bill.

Troubleshooting & Repair
Not Broken? Why Won’t My Vacuum Work (Fix It First)
Fix it fast: ‘why won’t my vacuum work’ is usually a clog, thermal cutoff, or reset, not a dead motor. Match your symptom to the exact fix.
The discussion
Comments
Every comment is reviewed before it goes live.