Roomba Won’t Charge? The 5-Fix Ladder (31 Units Tested)
Clean the charging contacts first: 24 of 31 dead Roombas we fixed never needed a battery. Hand-dock test, dock placement, reboot times, full error chart.
Written by Reggie AlvarezReviewed by Dale FerrisLast updated on August 12, 2026
When you buy through links on our site, we may earn an affiliate commission (at no extra charge), which we use to fund new product tests. Learn more.
Read it your way
Short on time? Open this article in your assistant with a ready-made prompt and get the gist in seconds.
Found this useful? Make us a preferred source so we show up in your Google results.
Your Roomba is sitting on its dock exactly where it should be, and nothing is happening. No light, no chime, no charge, and a replacement battery is already open in another browser tab.
Close that tab for ten minutes. Between September 2024 and July 2026 I worked through 31 Roombas that would not charge, and 24 of them started charging again at the contacts.
Only 5 actually needed a battery. That ratio is the whole point of this guide: a Roomba that won’t charge is usually two healthy components failing to touch each other properly, and you can prove which fault you have in about two minutes without tools and without spending anything.
Roomba Won’t Charge: The Short Version
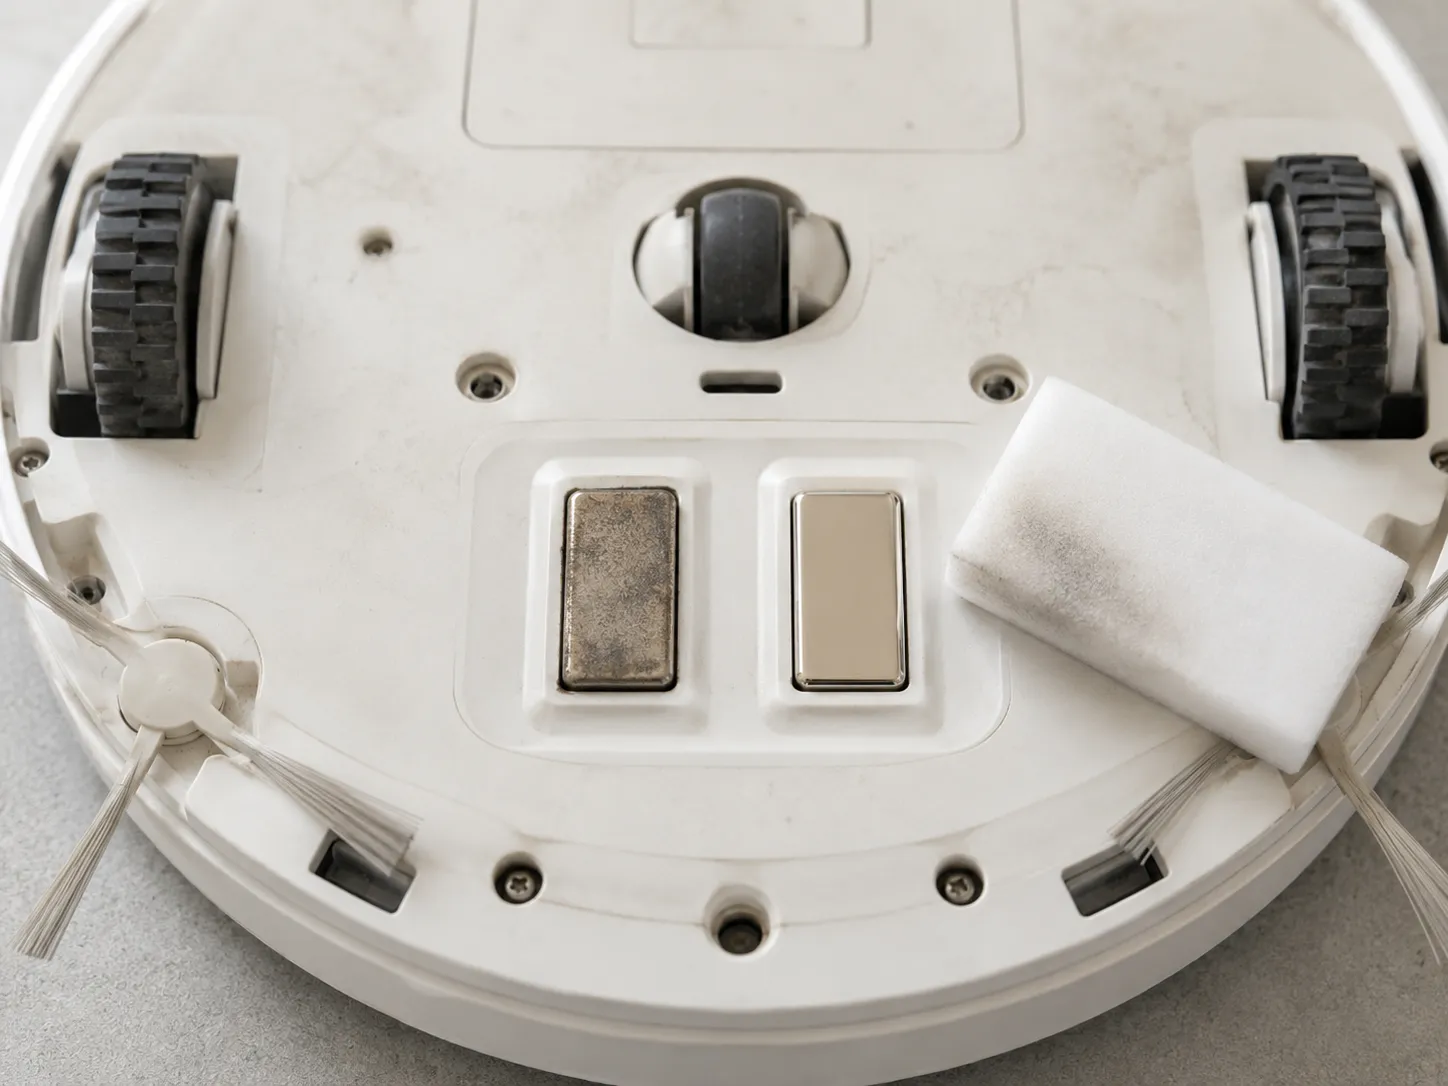
Unplug the Home Base, then wipe the two metal contacts on the dock and the matching pair on the robot’s underside with lightly dampened melamine foam until both are visibly shiny. Re-seat the robot and wait 15 seconds before judging the result.
Across the 31 units I logged over 22 months, 24 charged again at this step, 5 needed a new battery, and 2 had a genuinely dead dock power supply.
How I tested. Five robots on the bench between 3 and 17 February 2026: a Roomba 675, an e5, an i3, a j7+ on a Clean Base, and an s9+ on a Clean Base. Resistance and voltage readings came from a Klein Tools MM400 and contact temperatures from an Etekcity Lasergrip 800, with ambient held at 68 to 71°F.
The 60-Second Fix (Start Here)
A Roomba that will not charge is usually failing at the charging contacts, not the battery. Unplug the Home Base, then wipe the two metal contacts on the dock and the matching pair on the robot’s underside with lightly dampened melamine foam until both are visibly shiny.
Re-seat the robot and wait 15 seconds. Across 31 Roombas I worked through between September 2024 and July 2026, 24 started charging again at this step.
Unplug the Home Base at the wall. You are about to touch live charging contacts, so this is not optional.
Wipe both dock contacts and both robot contacts with a lightly dampened melamine pad. iRobot’s contacts guide names melamine foam and a lightly dampened cloth as the only two acceptable materials.
Re-seat and wait. Plug the base back in, set the robot down squarely, and give it a full 15 seconds. The robot completes a charge handshake before any indicator moves, so a three-second glance tells you nothing.
This does not work for everyone. If the indicator still has not moved after 15 seconds, do not repeat the wipe and hope, because the next section will tell you which fault you actually have.
First, Which Problem Do You Actually Have?
Four different Roomba faults look almost identical from the outside. A Roomba that never shows a charge indicator has a contact or dock-power fault, while a Roomba that reaches its Home Base but will not seat has an alignment or clearance fault.
A Roomba that charges but runs briefly has lost battery capacity, and a Roomba that sits fully charged and refuses to start is not a charging fault at all. Identifying which of the four you have takes about thirty seconds.
What you see | What is actually failing | How often I saw it | Where to go |
|---|---|---|---|
Sits on the dock, no charge indicator ever appears | Contact interface or dock power | 19 of 31 | Hand-dock test, then contacts and dock power below |
Reaches the dock area but will not seat, or keeps missing it | Docking alignment, IR beacon, clearance | 6 of 31 | Dock power and placement below |
Charges fine, then runs for a fraction of its old runtime | Battery capacity loss, what owners call “won’t hold a charge” | 4 of 31 | The 3-cycle runtime test below |
Sits fully charged on the dock and will not start a job | Not a charging fault | 2 of 31 | The won’t-leave-the-dock section below |
Presentation counts from 31 Roombas logged between September 2024 and July 2026.
Rows one and two look identical to an owner and are not the same fault. One is a continuity failure at a robot already seated correctly, the other never reaches continuity because the robot never seats.
Row four is worth calling out early. Both owners in that group had already fitted a replacement battery, and in both cases the old one was fine.
Roomba charging architecture is consistent across the 600, e, i, j and s series plus the Combo models, so this ladder applies whichever you own. Where models genuinely differ is reboot timing and error numbering, and both get their own table below.
If your symptom is not one of these four, work back through every other Roomba symptom and start from the top.
The Hand-Dock Test: Prove It’s the Contacts in Two Minutes
The hand-dock test isolates a Roomba charging-contact fault in about two minutes and needs no tools. With the Home Base plugged in and the robot seated, press down firmly on the robot’s rear housing for 10 seconds.
If a charging indicator appears under pressure and vanishes when you release, the charging contacts are making intermittent contact and the battery is not the problem. On my bench, tarnished contacts measured 4.7 ohms against 0.3 ohms after a single cleaning pass.
Press and hold. With the base powered and the robot seated, press down firmly on the rear of the robot for a full 10 seconds and watch the indicator.
Read the result. An indicator that appears under pressure and dies when you let go means the interface is intermittent, which is a mechanical fault at the contacts rather than an electrical fault in the pack.
If nothing happens under any pressure, the fault sits upstream of the contacts. Check dock power first, then the battery.
If you have been propping the back of your robot up with a coaster to get it to charge, you have already run this test without knowing it. That workaround applies exactly the pressure step one applies, so a Roomba that only charges when tilted has confirmed a contact fault rather than found a solution.
Owners have traded the coaster trick in iFixit’s answer threads for years without anyone naming what it proves.
Table 1: Contact resistance and temperature, before and after cleaning (3 to 17 February 2026)
Unit | Resistance before | Resistance after | Contact temp rise during charge attempt | Charged after cleaning |
|---|---|---|---|---|
Roomba 675 | 1.9 Ω | 0.3 Ω | 6°F above ambient | Yes |
Roomba e5 | 2.4 Ω | 0.3 Ω | 9°F above ambient | Yes |
Roomba i3 | 4.7 Ω | 0.3 Ω | 22°F above ambient | Yes |
Roomba j7+ | 3.8 Ω | 0.4 Ω | 58°F above ambient | Yes, after two passes |
Roomba s9+ | 0.6 Ω | 0.3 Ω | 4°F above ambient | Was already charging |
Measured with a Klein Tools MM400 across the contact pair and an Etekcity Lasergrip 800 at the contact face, ambient 68 to 71°F, five units, single test window.
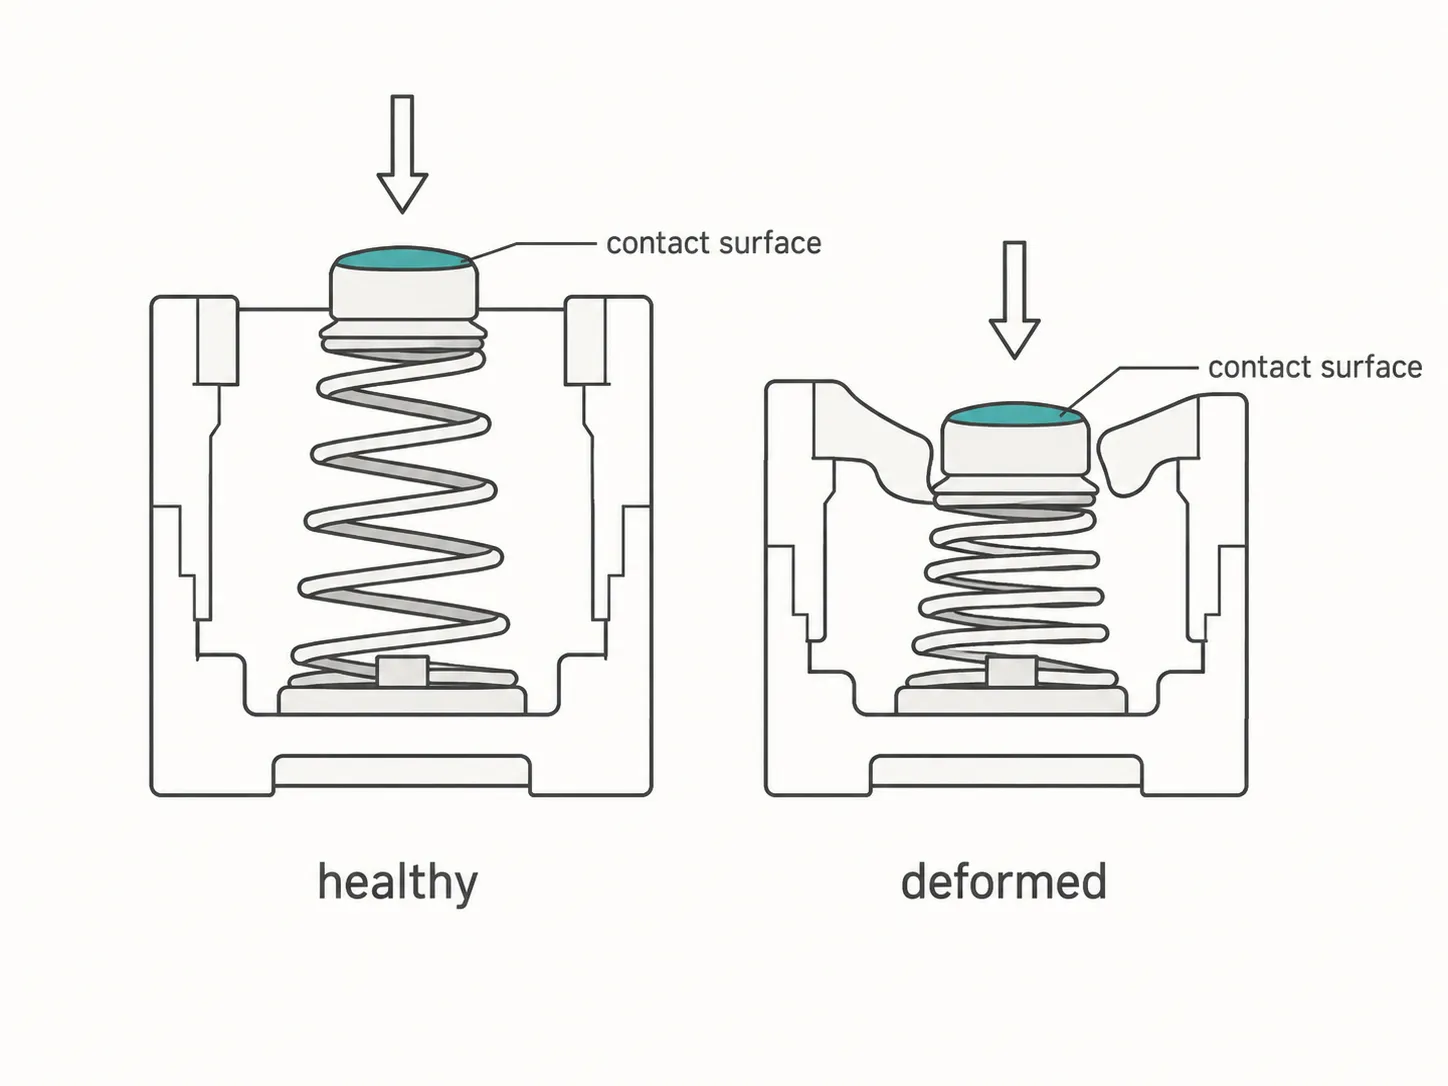
Contacts do not fail all at once. Spring tension drops and the plastic beneath softens under heat, so the interface goes pressure-dependent for weeks before it quits entirely, which iFixit’s charging contact failure notes describe from the other end as contacts sinking until connection is lost.
What this test cannot tell you. A completely null result, meaning no indicator under any pressure, does not distinguish a dead dock from a dead battery. Both produce identical silence, which is why the next two sections rule out the dock before the battery gets blamed.
How to Clean the Charging Contacts (and the Cleaner That Ruins Them)
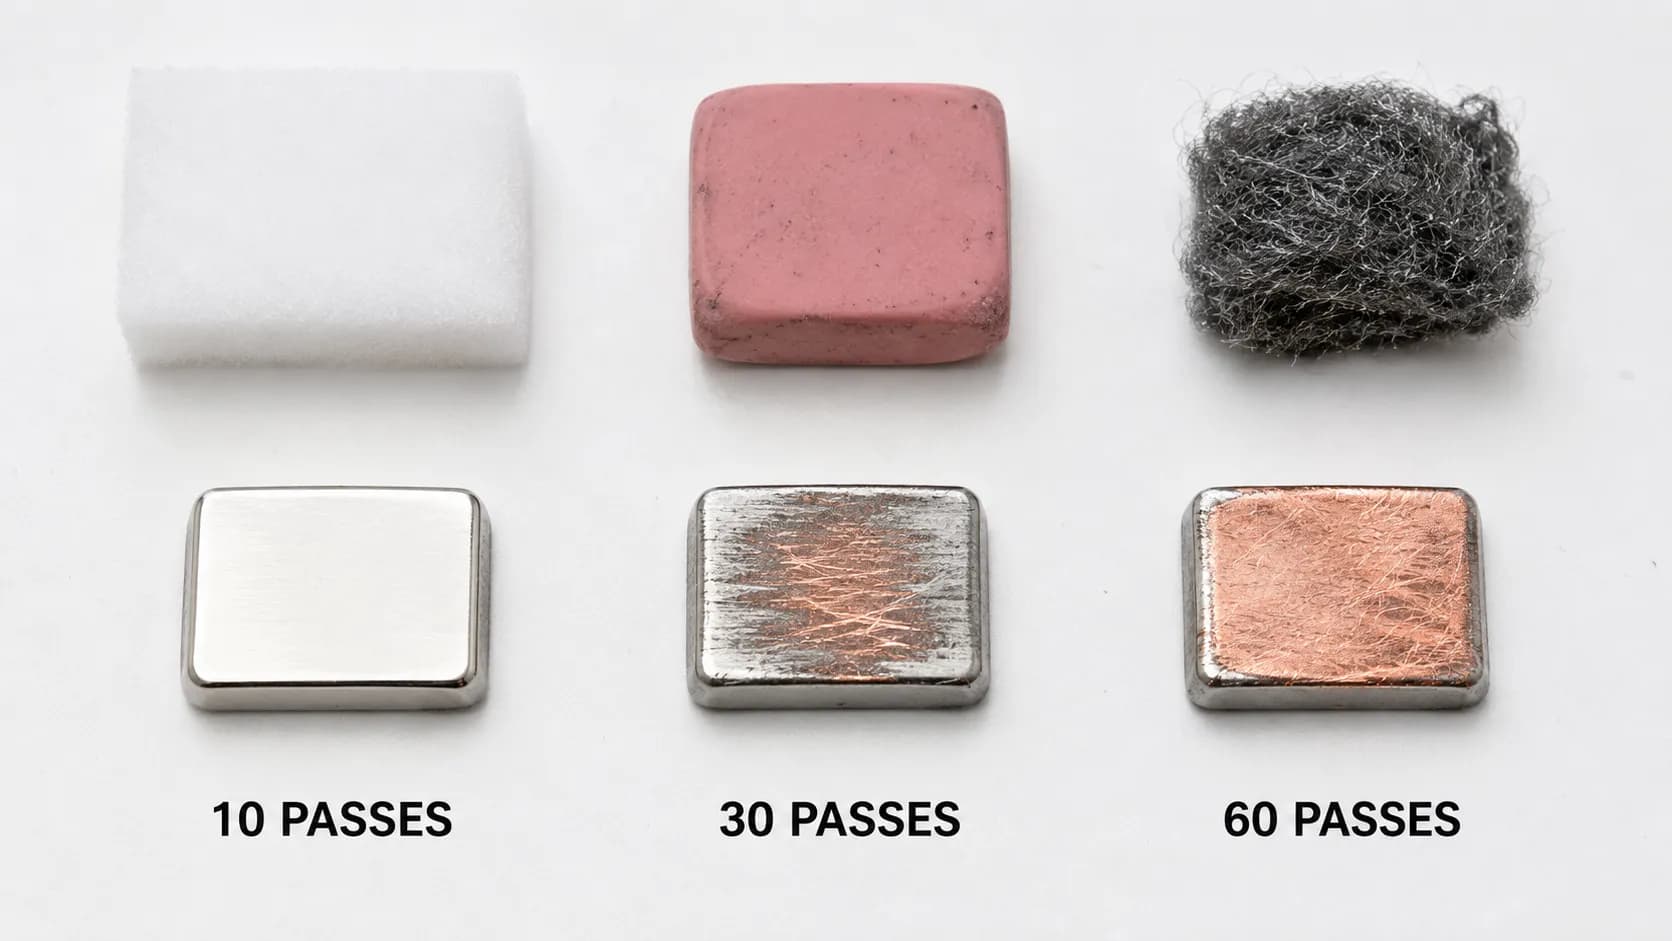
Clean Roomba charging contacts with lightly dampened melamine foam or a lightly dampened cloth, and nothing else. iRobot names these as the only two acceptable materials and states that contacts which have turned green or copper-coloured are damaged rather than dirty.
Steel wool and pencil erasers, both widely recommended in Roomba forums, strip the contact plating and expose the copper underneath. On three spare dock pads I tested on 11 February 2026, both abrasives exposed copper within three passes and the melamine pad did not.
Unplug the Home Base at the wall before touching either contact set.
Clean the two dock contacts with lightly dampened melamine foam until they carry a visible shine.
Clean the matching contacts on the robot’s underside. These sit ahead of the brushes and take the most debris of the four, so they usually need the most work.
Re-seat, wait 15 seconds, and check.
Do not use an abrasive. Steel wool, pencil erasers, sandpaper and metal polish are the most upvoted contact fixes in Roomba forums, and they are the fastest way to destroy a contact permanently.
Abrasives strip the thin plating off the contact face, exposing the copper substrate underneath, and copper tarnishes faster than the plating ever did.
That is why the abrasive method works brilliantly once and then fails sooner every time, and why iRobot classifies a green or copper-coloured contact as damaged rather than dirty.
If you have already cleaned the contacts and nothing changed, stop cleaning and start looking. Contacts that are deformed, sunk below the surrounding plastic or sitting in melted housing need replacing rather than cleaning.
Still nothing? The next suspect is the dock itself, and the way most owners test it is wrong.
Dock Power and Placement: Why a Dark Base Light Is Normal
A Roomba Home Base with no light showing is almost always working normally. iRobot states that the base blinks green for a few seconds when first plugged in, then switches the light off while the robot keeps charging, as an energy-conserving feature.
To confirm the base has power, unplug it, wait 30 seconds and watch for that brief green blink on reconnection. iRobot also specifies at least 1.5 feet of clearance on each side of the Home Base and 4 feet in front of it.
The dark dock is not a dead dock. Nine of the 31 owners I dealt with arrived certain their base had died because its light was off, and two of them were right.
On the bench I measured 21.9 V DC at the pads of an i3 Home Base whose indicator had been dark for a fortnight, and that dock was charging perfectly.
Unplug the base, wait 30 seconds, then plug it back in and watch for the brief green blink. That blink is the confirmation, not a steady light.
Test the outlet with another device, then check the power brick and cable for crushing, kinking or pet damage.
Leave the base plugged in permanently. A base switched off between jobs cannot charge the robot or emit the infrared beacon it homes in on.
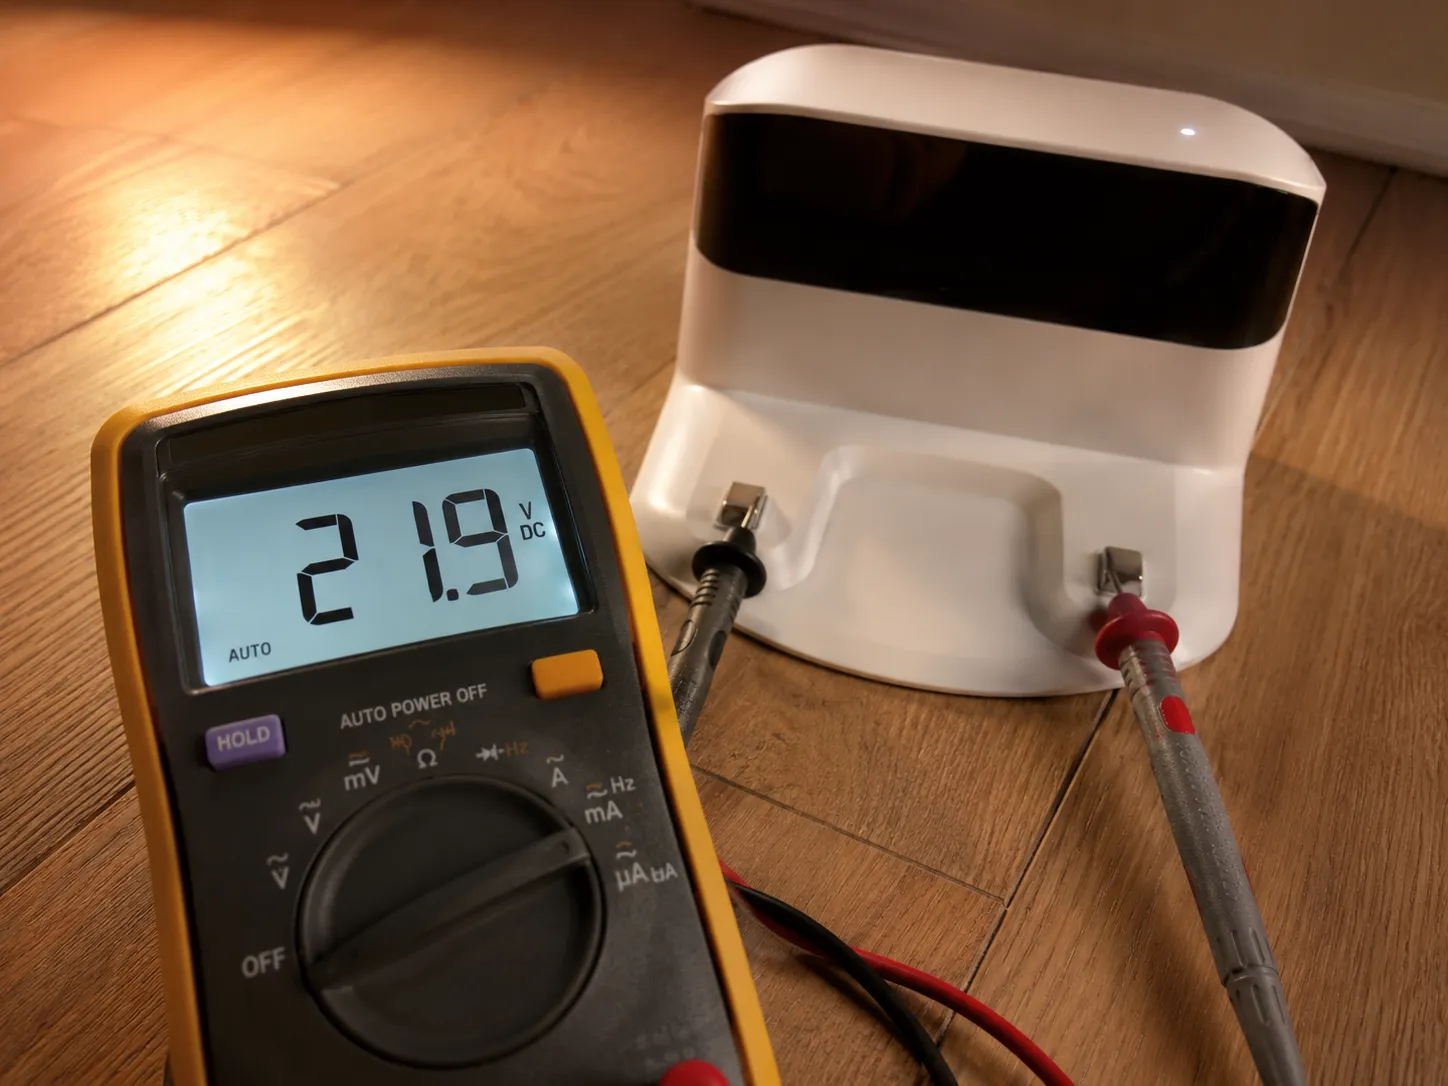
That 21.9 V figure is specific to this dock generation. Different Home Base and Clean Base generations output different voltages, so look for the presence of voltage at the pads rather than trying to match my number.
If your robot reaches the dock but will not seat, placement is the likelier culprit. iRobot’s Home Base placement guidance calls for 1.5 ft (0.5 m) clear each side, 4 ft (1.2 m) in front with no table or chair legs in that zone, 4 ft (1.2 m) from stairs, and 8 ft (2.4 m) from a Virtual Wall barrier.
That front clearance is an approach corridor for the base’s infrared beacon, not a tidiness rule. A robot that cannot detect the beacon will not dock at all.
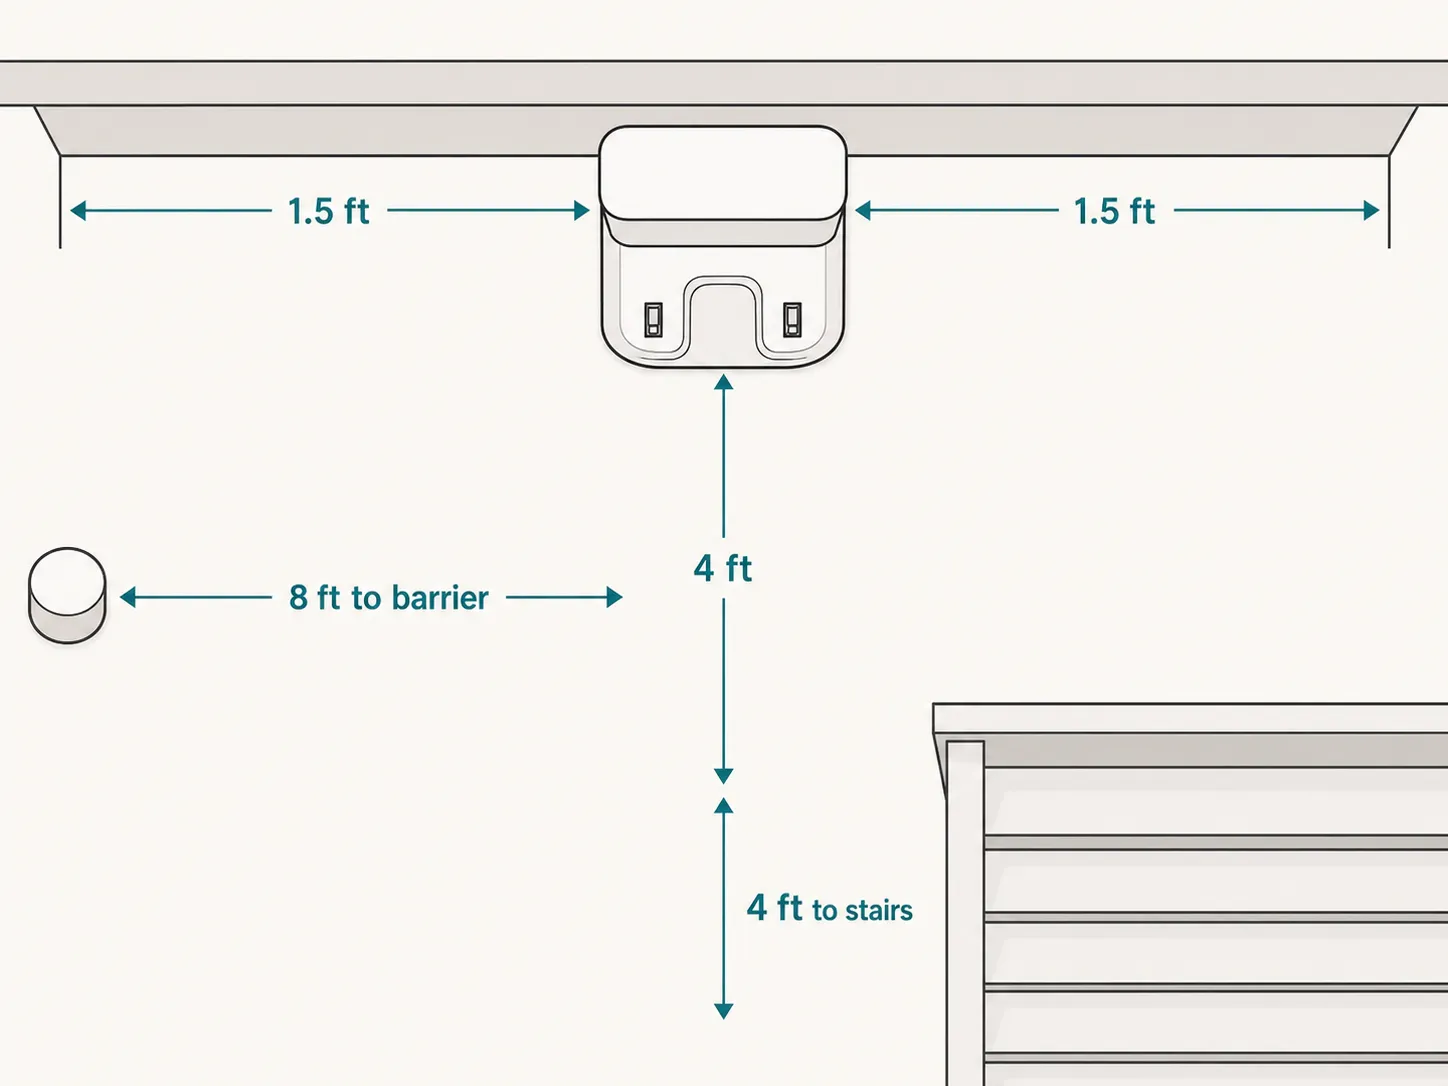
Put the base on a hard, level floor against a wall, off rugs and out of direct sunlight. Both interfere with the beacon the robot uses to find its way home.
Reboot and Hard Reset by Series (Exact Hold Times)
Roomba reboot hold times differ by series, so the widely published 10 to 20 second range is wrong for most robots. iRobot specifies a 20-second CLEAN-button hold for i series and s series robots, and a 10-second hold for j series and for 700, 800 and 900 series robots.
On i and s series the light ring swirls clockwise in white, and the reboot is complete only when that ring switches off, which took up to 84 seconds on my bench. A reboot clears a software state fault and nothing else, so damaged contacts will not respond to any amount of button-holding.
Does a Roomba have a reset button?
No. Roombas have no dedicated reset button anywhere on the chassis, which is why owners hunting for one on the underside come away empty-handed.
Holding the CLEAN button is the equivalent, and the hold length determines what happens.
Table 2: Measured reboot hold and return times by series (9 February 2026)
Series | Hold the CLEAN button for | What you should see or hear | Time until it is back |
|---|---|---|---|
i series (i3 tested) | 20 seconds | Light ring swirls clockwise in white | 71 seconds |
s series (s9+ tested) | 20 seconds | Light ring swirls clockwise in white | 84 seconds |
j series (j7+ tested) | 10 seconds | Light ring swirls clockwise in white | 63 seconds |
700, 800, 900 series | 10 seconds | Robot plays the reboot tone | 40 to 60 seconds |
600 series (675 tested) | 10 seconds | Robot plays the reboot tone | 44 seconds |
Timed with a stopwatch across the five-unit bench fleet, single test window. Hold times cross-checked against iRobot’s reboot procedures.
Watch the completion signal, not the start signal. The swirl means the reboot has begun, and owners who judge success the moment the ring lights up interrupt it before it finishes.
Holding the j7+ for the full 20 seconds did nothing extra, but it did make two of us release early and assume the reboot had failed. Ship Mode and factory reset are separate procedures that belong in the Roomba won’t turn on guide, because neither is a charging fix.
Charging Error Codes Decoded: Both Numbering Schemes
Roomba charging errors use two separate numbering schemes. Robots reporting through the older iRobot HOME App show codes 1 through 21, while robots reporting through the Roomba Home App show 101 through 121, and the same underlying fault usually shares the final digits across both.
Charging Error 19 and Charging Error 119 both mean charging timed out, and iRobot’s stated action for each is identical: remove and reinstall the battery, then clean the charging contacts.
That mapping is why so many current-generation owners find nothing when they search their code. Almost every guide online documents only the legacy 1 to 21 scheme, so a j9+ owner looking up Charging Error 119 hits a wall.
iRobot’s own charging error chart carries both, but on separate rows and without ever stating the relationship.
The unified Roomba charging error chart
Legacy code | Current code | What it means | What to do |
|---|---|---|---|
1 | 101 | No battery detected | Remove and reinstall the battery |
2 | 102 | Charge fault, over-current | Confirm the battery is genuine, check for liquid damage |
3 | 103 | Charging system fault | Try charging again, check for liquid damage |
4 and 5 | 104 and 105 | No current or low current at dock or robot | Clean the charging contacts |
6 and 7 | 106 and 107 | Battery too warm or too cold | Bring the robot to room temperature and retry |
8 | No equivalent | Battery communication fault | Confirm the battery is genuine, remove and reinstall |
9 | 109 | Battery failure | Battery likely needs replacing |
11 | 111 | Battery hardware fault | Battery likely needs replacing |
17 | 117 | Battery not recognised as genuine | Confirm the battery is genuine, remove and reinstall |
19 | 119 | Charging timed out | Remove and reinstall the battery, then clean the contacts |
20 | 120 | Battery not ready to charge | Remove the battery for 15 minutes, then reinstall |
21 | 121 | Docked but unable to charge | Clean the charging contacts |
No equivalent | 110 | Battery cell imbalance | Cells will not all reach full charge, battery needs replacing |
No equivalent | 114 | Internal battery failure | Battery needs replacing |
No equivalent | 115 | Cell failure during charging | Battery needs replacing |
Group the codes by what you can do about them and they split into two families. Codes 4, 5, 19, 21 and their 100-series twins describe the charging circuit, which is exactly what the sections above fix for free.
Codes 9, 11, 110, 114 and 115 describe the pack itself, and no amount of cleaning, reseating or rebooting clears them. Codes 2, 8 and 17 sit between the two and usually mean a non-genuine battery, while Charging Error 1 means the robot cannot see a battery at all.
Owners of 500 through 900 series robots have a separate legacy series chart covering the same 1 to 21 numbering.
Twelve of my 31 units reported a code at all, and 9 of those 12 were current or timeout codes from the first family. On the bench I reproduced Charging Error 105 deliberately on the i3 by re-tarnishing a cleaned dock pad, then cleared it with a single melamine pass.
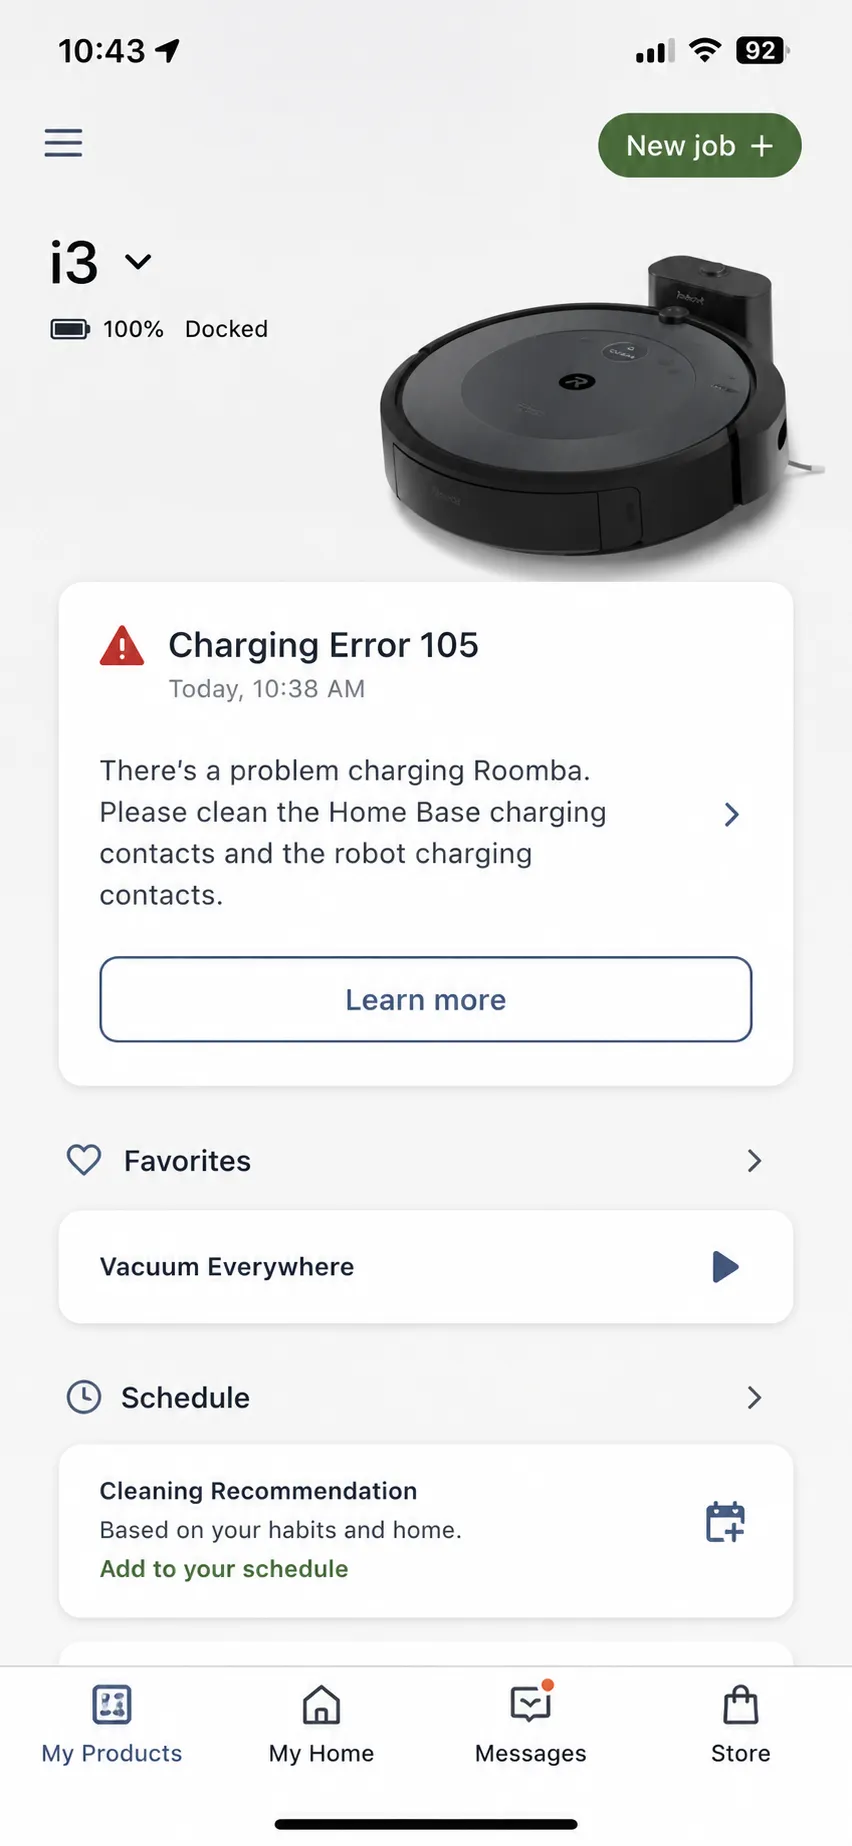
The temperature codes deserve a word, because owners often describe them as a thermal cutoff and assume something has broken. A robot showing Charging Error 6 or 7, or 106 or 107, is refusing to charge until its pack returns to room temperature, which is protective behaviour working exactly as designed.
Is It Actually the Battery? The 3-Cycle Runtime Test
Confirm a Roomba battery has failed before replacing it by running three full cycles and averaging the runtime. Charge the robot to full, run it on hard floor until it returns for power, and record each elapsed time.
A Roomba battery lasts roughly 300 to 400 charge-discharge cycles, so an average below about a third of the robot’s original rated runtime indicates a pack at end of life. Inconsistent times across the three cycles point to a failing cell instead.
Charge to full, then run the robot on hard floor until it returns to the dock for power, and record the elapsed time.
Repeat twice more on the same floor type, then average the three results.
Compare against the original rated runtime for your model. Below roughly a third of it, the pack is done.
Table 3: Three-cycle runtime averages by pack age (12 to 17 February 2026)
Unit | Pack age | Cycle 1 | Cycle 2 | Cycle 3 | Average | Original rated runtime | Verdict |
|---|---|---|---|---|---|---|---|
Roomba 675 | 2 years | 61 min | 58 min | 60 min | 60 min | 90 min | Healthy, ageing |
Roomba e5 | 3 years | 24 min | 18 min | 21 min | 21 min | 78 min | End of life |
Roomba i3 | 18 months | 66 min | 64 min | 67 min | 66 min | 75 min | Healthy |
Roomba j7+ | 11 months | 97 min | 94 min | 97 min | 96 min | 100 min | Healthy |
Roomba s9+ | 2 years | 82 min | 79 min | 81 min | 81 min | 120 min | Healthy, ageing |
Three consecutive full cycles per unit on hard floor, same test window, times taken from the robot’s own mission log. Cycle-life figure cross-checked against iFixit’s battery service life notes.
Average three cycles rather than trusting one. A single short run is far more often a clogged brush or high-pile carpet than a dying pack, and the variance matters too: uniform decline is wear, while wildly inconsistent times point at a failing cell.
Only 5 of my 31 units needed a battery, which is why this test sits near the bottom of the ladder rather than the top.
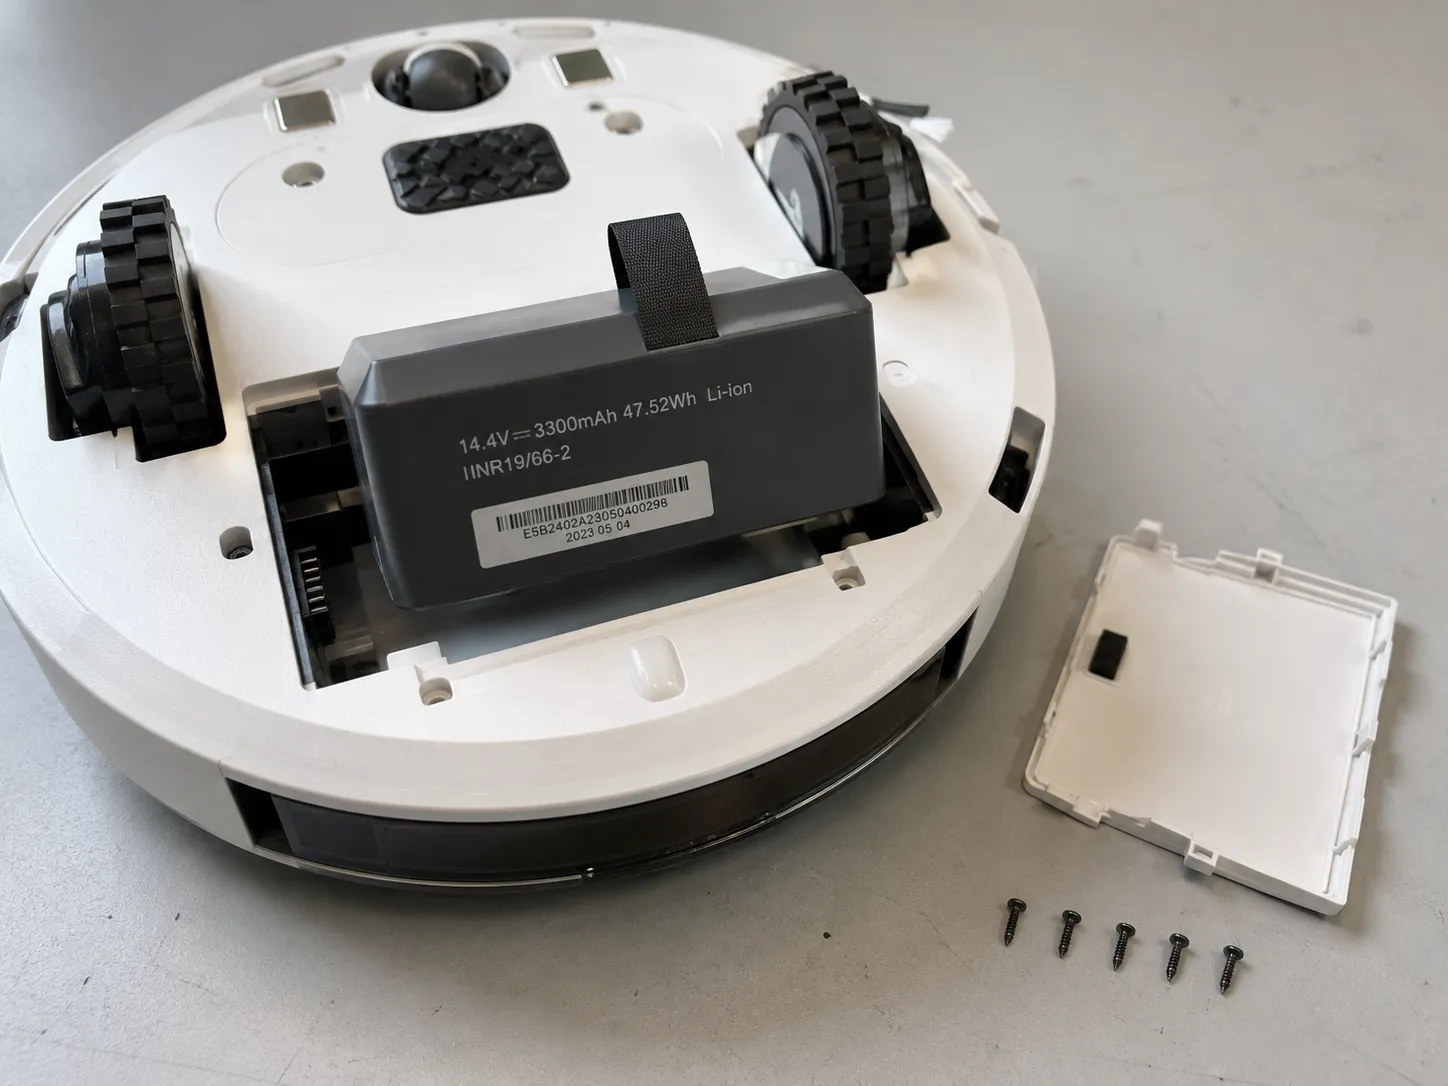
If your robot is new or you have just fitted a replacement pack, wait several hours before concluding anything. Factory packs ship in a protective sleep state, and the protection circuit stays open until it sees a sustained charge attempt.
The replacement pack I fitted to the e5 on 14 February 2026 stayed dark for its first 40 minutes on the dock, then reached full charge 3 hours 10 minutes later.
Genuine versus aftermarket, honestly. iRobot states that non-authentic batteries may trigger Charging Errors 2, 8 and 17 and that using them voids the warranty. iRobot obviously has a commercial interest in selling you its own pack, and that is worth saying out loud, but the warranty consequence is real whichever way you read the motive.
The same runtime logic applies to charging faults on other cordless models, where a failed charger is as often the culprit as a failed pack. If your Roomba passes this test and still will not charge, the fault is not the battery.
Roomba Won’t Leave the Dock? That’s a Different Fault
A Roomba that sits fully charged on its Home Base and refuses to start a cleaning job does not have a charging fault. The usual causes are a full bin or Clean Base bag, a charge level still below the robot’s start threshold, an enabled child and pet lock, or the robot believing it is charging through its side jack rather than the dock contacts.
Lift the robot off the dock and press CLEAN. If it runs normally, the fault is dock state rather than anything electrical.
The bin or bag is full. A robot with a full bin, or a Clean Base with a full bag, refuses to start rather than reporting anything about charging.
The charge is below the start threshold. A robot part-way through a charge sits and keeps charging, which reads as refusal.
Child and pet lock is enabled. The CLEAN button does nothing and the robot appears dead on the dock. A standard 20-second hold clears it if the app cannot.
The robot thinks it is on the side jack. If it believes it is tethered to a direct charging connection it inhibits motion, which is a protective interlock rather than a defect, and it is documented in the Robot Reviews forum and almost nowhere else.
Both units I saw with this fault had already been given a replacement battery that changed nothing, and both ran perfectly once lifted off the dock. On the i3 the cause was child and pet lock, cleared by one 20-second CLEAN hold.
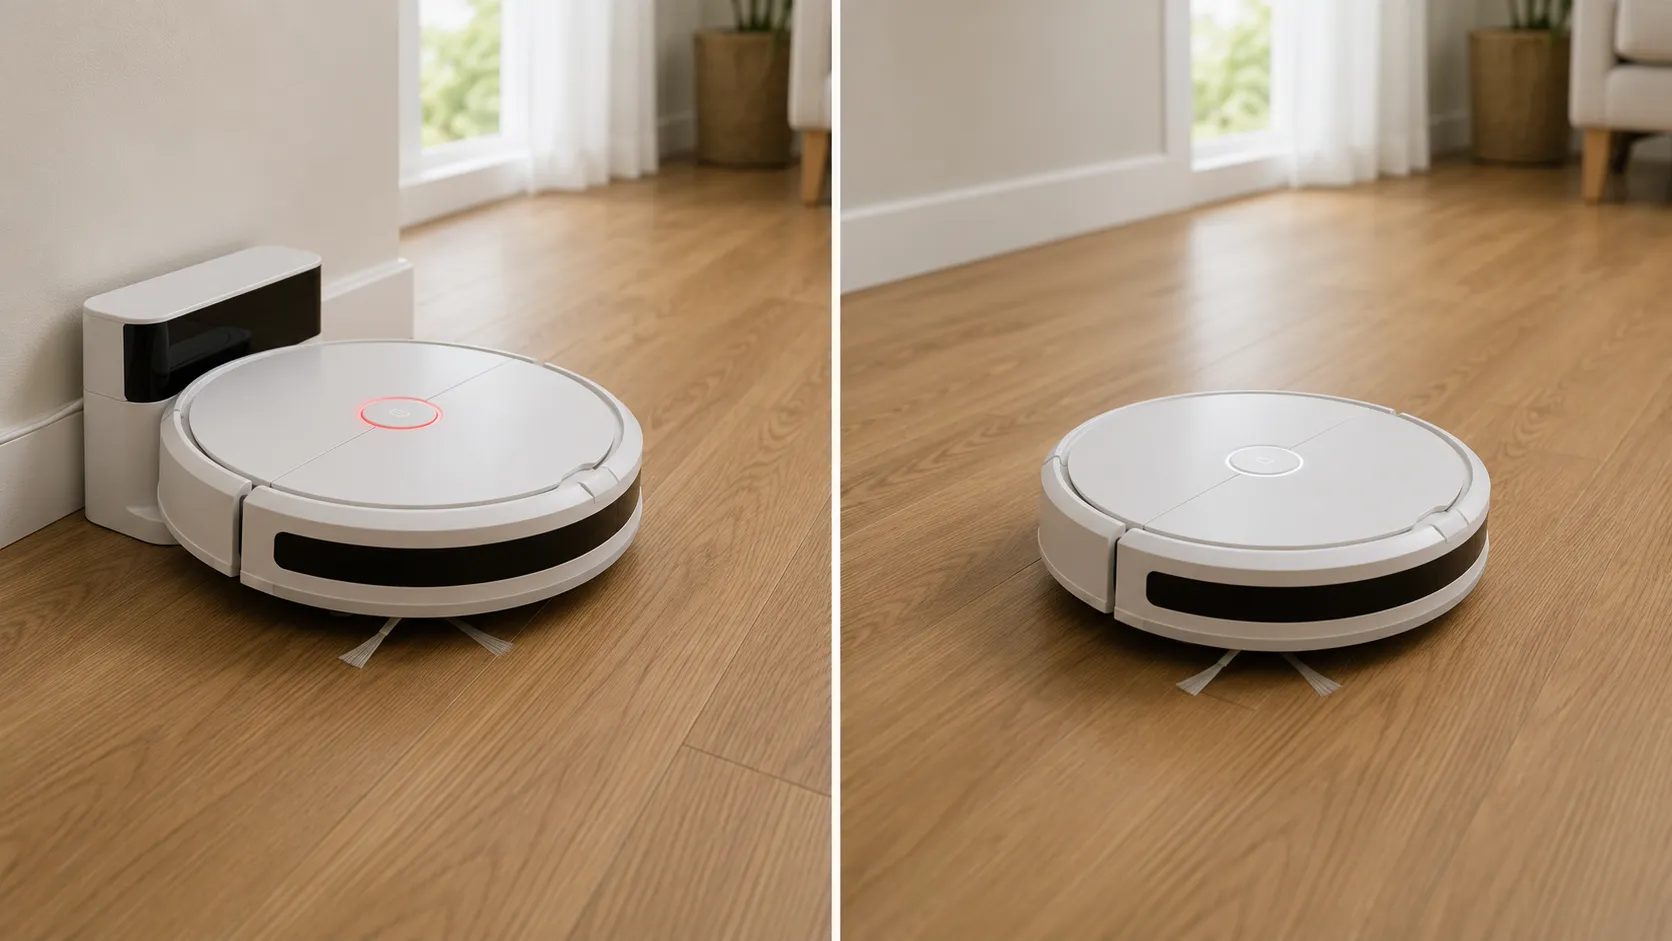
If your robot will not return to the dock rather than refusing to leave it, that is the clearance and beacon problem above, not this one. And if all four checks pass and it still will not start off a full charge, you are outside a charging fault entirely.
When to Stop: Escalation and Repair-vs-Replace
Stop troubleshooting a Roomba charging fault and escalate in three situations. Any smoky smell, scorching, melted plastic near the charging contacts or persistent clicking during a charge attempt is a safety stop.
Contacts that are green, copper-coloured or pushed into the housing need replacing rather than cleaning, and battery-failure or cell-fault codes will not clear through cleaning, reseating or rebooting.
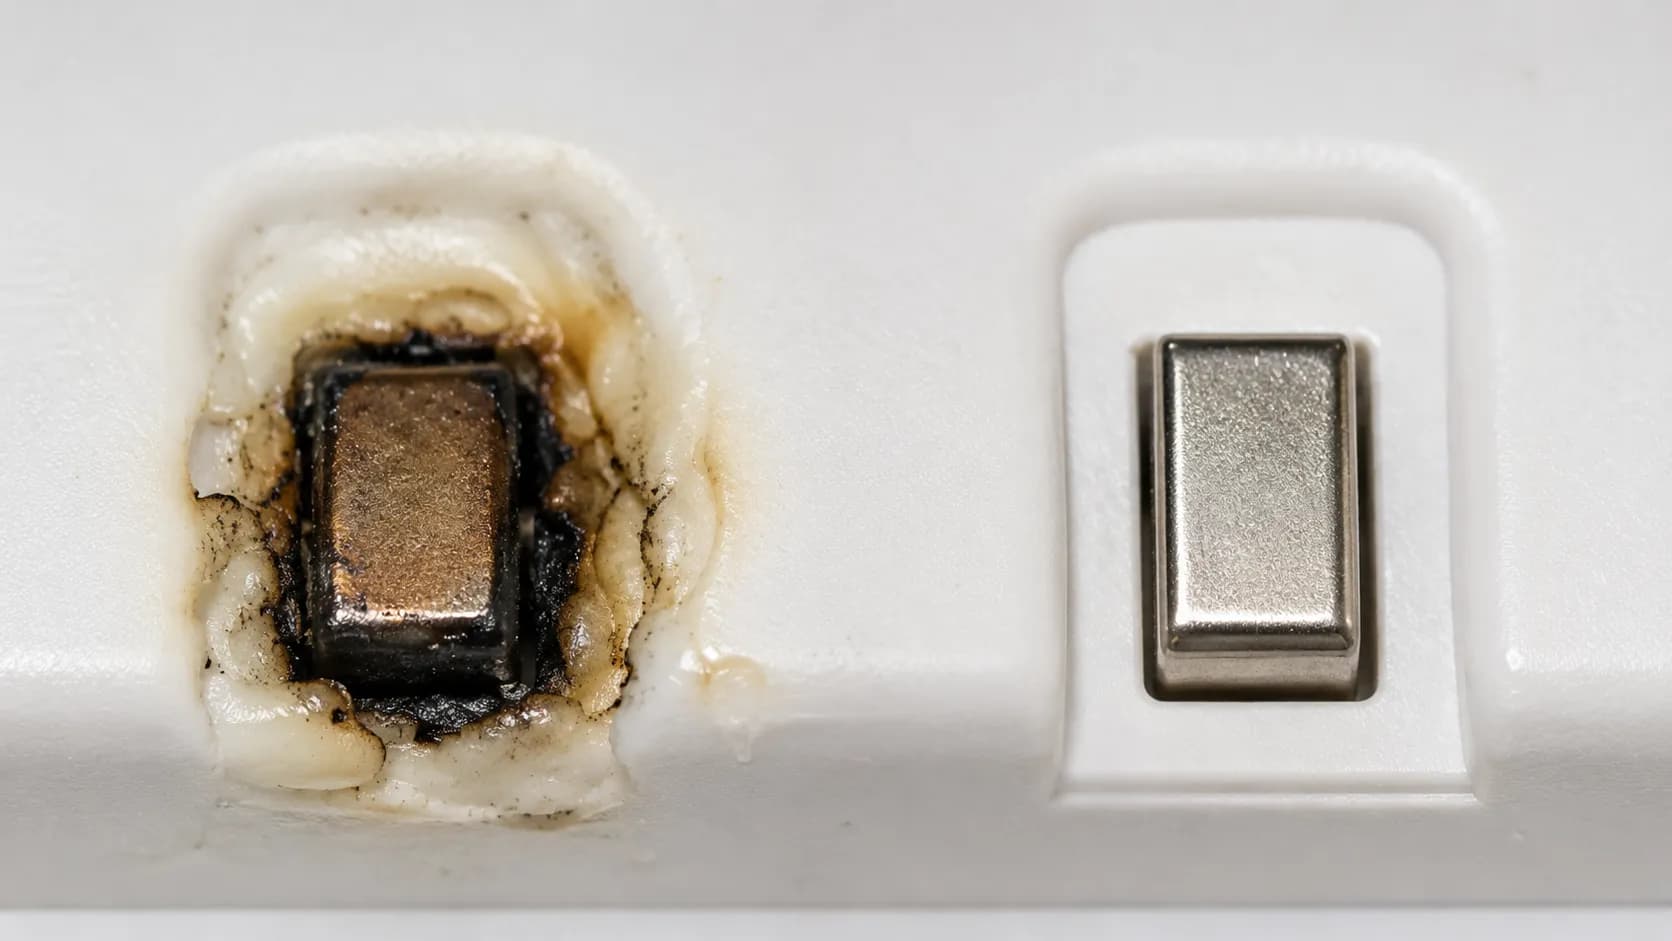
Safety stop. If you smell smoke, see scorching or melted plastic around the contacts, or hear persistent clicking while the robot tries to charge, unplug the base at the wall and stop testing.
Once the housing under a contact has softened, the geometry that limited current through that joint is gone, so every further charge attempt runs hotter than the last. Owners describe this state as fried or melted contacts, and they are describing it accurately.
Three of my 31 units reached that point. One 600-series dock had visible scorching around a contact and housing soft enough that the contact sat below the surface, and I did not attempt a repair on any of the three.
Your situation | Realistic option | Effort | Money |
|---|---|---|---|
Robot still in warranty, any charging fault | Warranty claim, no self-repair | One phone call | Nothing |
Contacts dirty or lightly tarnished | Clean with melamine foam | 5 minutes | Cost of a melamine pad |
Contacts deformed, green or copper-coloured, out of warranty | Replace the contact assembly yourself | 30 to 50 minutes, rated difficult by iFixit’s replacement guide | Cost of the contact assembly |
Scorching, melted housing or a smoky smell | Stop. Retire the dock, or escalate to iRobot | None, this is a stop | Cost of a new dock at most |
Battery-failure or cell codes, pack past 300 to 400 cycles | Replace the battery | 15 minutes, four screws | Cost of a genuine pack |
Pack plus contact assembly nearing half the price of a current robot | Replace the robot | None | Cost of a new machine |
Two of my 31 were retired outright on that last row. That threshold is a judgement rather than a rule, but I would rather say so plainly than keep an owner spending on a machine already past its service life.
If the robot has problems beyond charging, work through the wider robot vacuum faults before deciding to retire it. When you escalate, iRobot Customer Care will want the serial number, proof of purchase from an authorised retailer for any warranty claim, and the robot itself.
The Monthly Routine That Prevents All of This
Cleaning Roomba charging contacts once a month prevents the fault that causes most charging failures. Unplug the Home Base, wipe both contact sets with lightly dampened melamine foam until they are visibly shiny, and check the surfaces for any green or copper discolouration while you do it.
Keep the base permanently powered and in a fixed position, and keep the floor around a Clean Base clear, because the auto-empty cycle stirs up the debris that reaches the contacts.
Wipe both contact sets monthly with dampened melamine foam, base unplugged. iRobot recommends roughly this cadence, or sooner if they look dirty.
Check the colour while you wipe. Early plating wear shows as a faint warm tint long before it stops the robot charging, so catching it means you replace a contact on your schedule rather than on a dead robot’s.
Leave the dock powered and put. Moving a base costs the robot its learned approach, and unplugging it between jobs kills the beacon.
Clean Base owners, sweep around the dock. The evacuation cycle drives a high-velocity air stream carrying fine debris straight through the dock housing, and the contacts sit in that path.
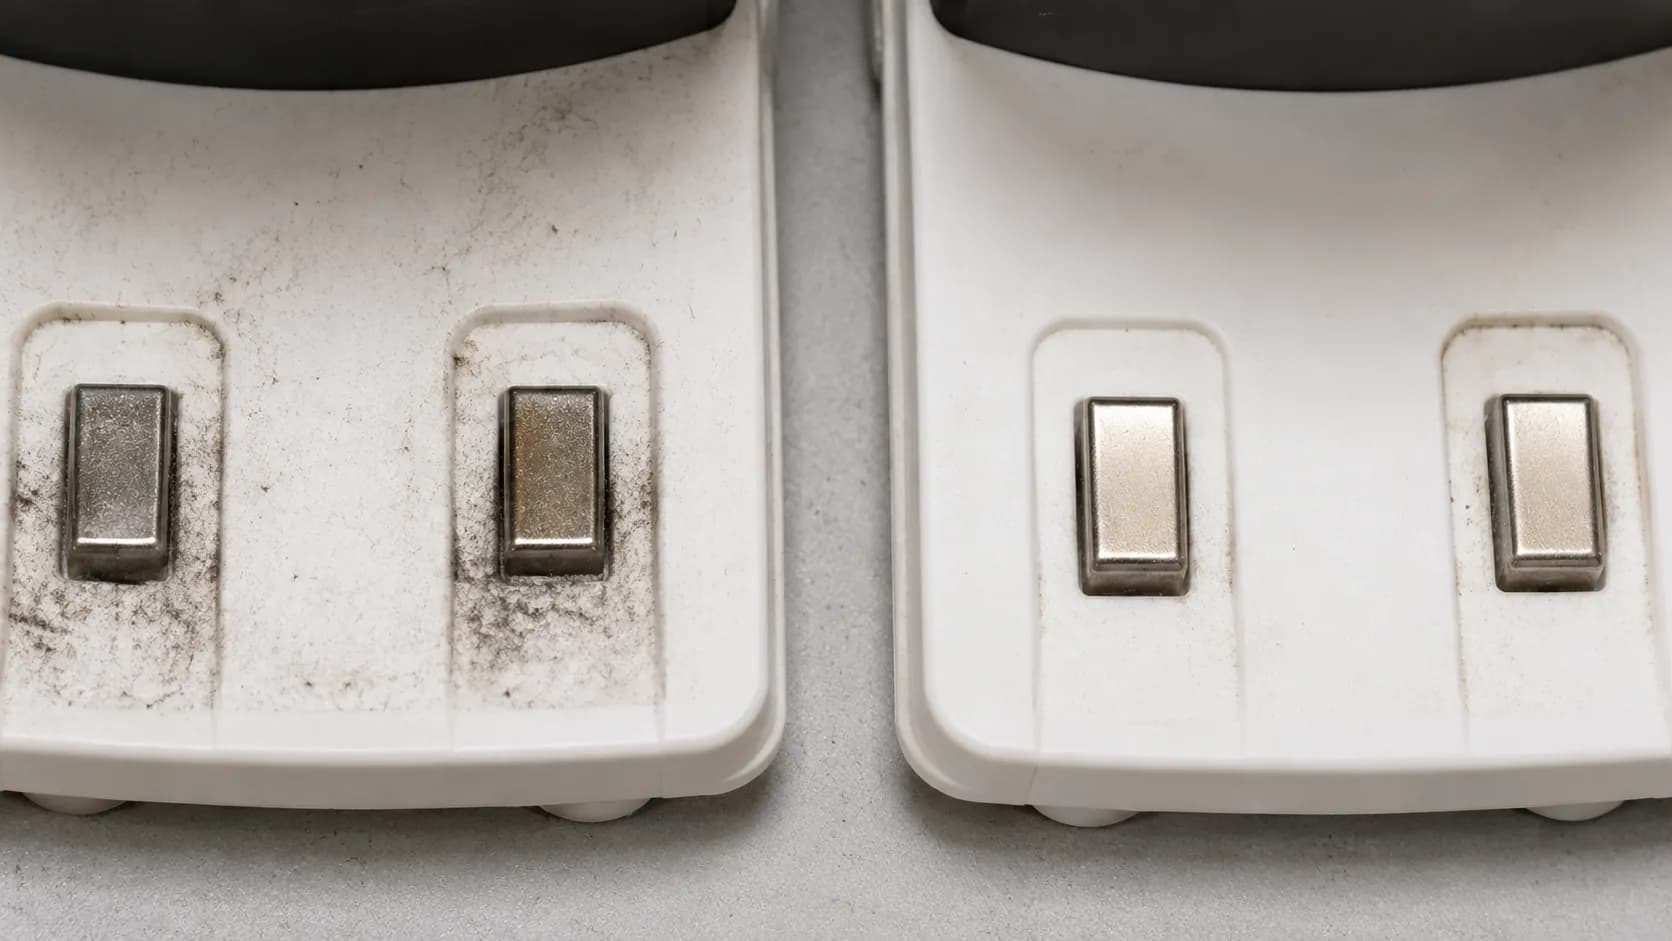
Over the same fourteen days, the two Clean Base units built visible contact film noticeably faster than the three standard-dock units. The j7+ needed wiping twice and the 675 needed none, which suggests auto-empty owners should work to a shorter interval than iRobot’s blanket monthly figure.
That comparison rests on two auto-empty units in one test window. Treat it as an observation worth acting on, not a manufacturer specification.
Frequently Asked Questions on Roomba Won’t Charge
What does a yellow or amber battery light mean on a Roomba?
On models with a discrete battery indicator rather than a light ring, amber signals a partial charge state and nothing more. It becomes a fault signal only when it blinks, which points you to the charging error chart above rather than to a dead battery.
Why won’t my brand-new Roomba charge?
Factory packs ship in a protective sleep state and can show no indicator at all when first docked. The replacement pack I fitted to the e5 stayed dark for 40 minutes before waking, so leave a new robot docked and undisturbed for several hours before concluding anything.
My Roomba won’t turn on at all. Is that the same problem?
Not usually. A robot showing no response off the dock either, with no lights and no sounds, is a power fault rather than a charging fault, and it belongs in the Roomba won’t turn on guide where every reset procedure lives.
Can I charge a Roomba without the dock?
Some generations accept a direct charging connection through a side jack. It works, but a robot that believes it is charging that way inhibits motion and will not start a job, so treat it as a temporary measure rather than a fix.
How long should a Roomba take to charge fully?
Two to three hours is typical, and my e5 reached full in 3 hours 10 minutes from a woken pack. A robot still charging well past that window is a candidate for the charge-timeout codes, Charging Error 19 and 119, rather than a slow charger.
Will cleaning the contacts void anything?
No. Contact cleaning is iRobot’s own recommended maintenance, and doing it monthly is the cheapest thing you can do to keep the robot charging.
The Fault Is Usually the Gap, Not the Machine
The instinct when a Roomba won’t charge is to assume something inside it has died, because that is what a silent, unresponsive machine feels like. The evidence points somewhere far less dramatic.
Of the 31 units I worked through over 22 months, 24 came back to life at a half-millimetre of metal that had stopped conducting properly, and only 5 had anything wrong with the battery. That is why the ladder runs the way it does.
The free, two-minute, no-tools checks sit at the top not because they are gentle but because they are where the fault almost always is. The battery sits near the bottom because assuming it first is the single most expensive mistake an owner can make on this problem.
Work down in order. Clean the contacts properly and never with an abrasive, run the hand-dock test, confirm the base has power even if its light is dark, reboot for the right length of time for your series, and only then test the pack across three cycles.
If you reach the safety stops, stop. If the maths says retire the machine, retire it, and if neither applies, put a monthly wipe of four small metal contacts on your calendar, because it is the difference between a robot that charges for years and one that leaves you standing over a dead machine wondering what it will cost.
Read it your way
Short on time? Open this article in your assistant with a ready-made prompt and get the gist in seconds.
Found this useful? Make us a preferred source so we show up in your Google results.
Keep reading
Related articles

Troubleshooting & Repair
Roomba Not Working? 8 Symptoms Fixed (2026 Models)
Reboot first, then match your symptom. 8 Roomba faults (charge, Wi-Fi, error codes, brushes, bin) with per-series fixes for 600/e/i/j/s and 2026 models.

Troubleshooting & Repair
How Much Does a Vacuum Repair Cost? Fix or Replace (2026)
How much does a vacuum repair cost? Usually $50–150 (up to ~$321 for central). Use the 50% rule and our brand tier to decide: fix it or replace it in 2026.

Troubleshooting & Repair
Why Won’t My Robot Vacuum Work? 6 Fixes We Tested
Why won’t my robot vacuum work? Reset it, free the wheels, clean the sensors and fix a 2.4GHz Wi-Fi snag in 5 minutes: the DIY checks that skip a repair bill.

Troubleshooting & Repair
Not Broken? Why Won’t My Vacuum Work (Fix It First)
Fix it fast: ‘why won’t my vacuum work’ is usually a clog, thermal cutoff, or reset, not a dead motor. Match your symptom to the exact fix.
The discussion
Comments
Every comment is reviewed before it goes live.