Do Hoover Vacuums Have a Reset Button? (7 Models Tested)
Find your Hoover reset button in the 7-model table: red overload button, thermal-only, or LED reset. Plus a red-light and error-code decoder.
Written by Reggie AlvarezReviewed by Dale FerrisLast updated on July 27, 2026
When you buy through links on our site, we may earn an affiliate commission (at no extra charge), which we use to fund new product tests. Learn more.
Read it your way
Short on time? Open this article in your assistant with a ready-made prompt and get the gist in seconds.
Found this useful? Make us a preferred source so we show up in your Google results.
Do Hoover Vacuums Have a Reset Button? The Short Answer
Do Hoover vacuums have a reset button? Some do and most do not. Of seven Hoover vacuums I tested between February and March 2026, three had a control you can physically press and four had none.
Hoover uprights with a brush head overload button have a small recessed red button on the base. WindTunnel models with motor only protection have no button at all and reset themselves automatically once the motor cools.
That is the honest version, and it is why the search results you just read contradict each other. One page swears the button sits above the left rear wheel, the next insists there is no reset button on this model, and both are telling the truth about their own machine.
The deeper problem is that “reset” describes four separate controls on a Hoover, only one of which is a button you press. Hoover’s own advice centre confirms its cleaners are fitted with a thermal cut out that kills power on overheat and re-arms itself without any user action.
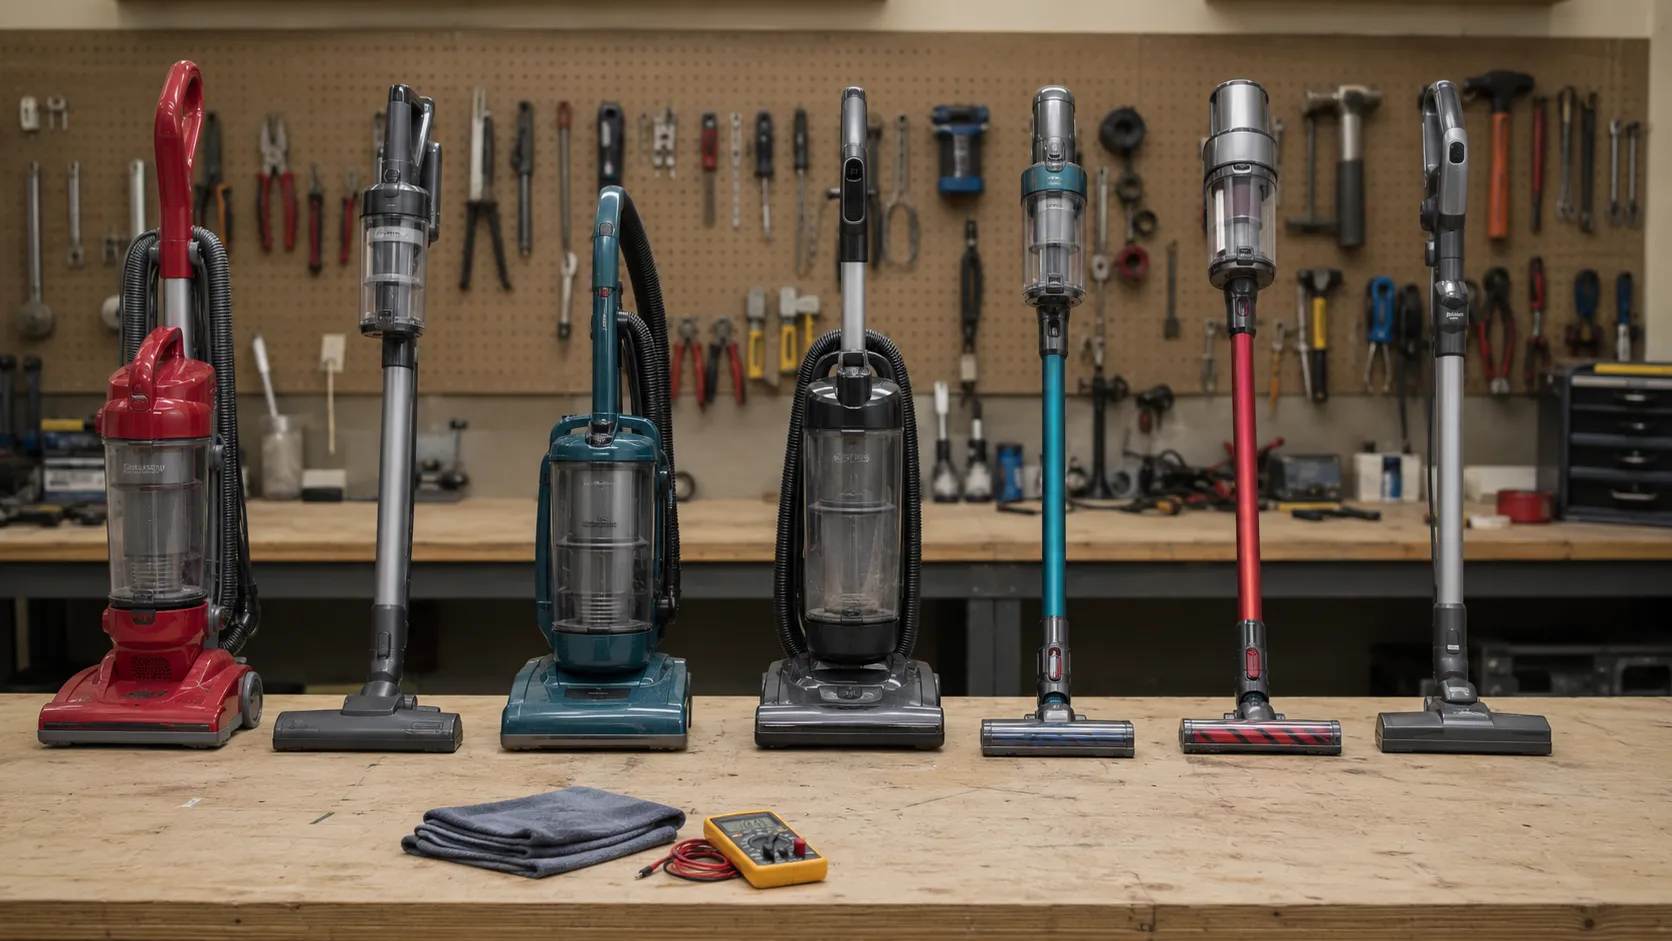
Work out which of the four you have first. The next section takes about thirty seconds.
Four Kinds of Hoover Reset, and Which One Is Yours
Hoover vacuums use four different reset systems, not one. A brush head overload button is a small recessed red control that restarts a jammed brush motor. A motor thermal protector has no button and releases automatically once the motor cools. A brush stall indicator is a status light that clears itself when the jam is removed. A thermal fuse is a single use part that must be replaced, not reset.
You do not need a model number to tell them apart. You need to look at three things: whether the machine has a cord or a battery, whether there is a coloured indicator window on the hood, and whether there is a red dot recessed into the plastic anywhere on the base.
Table 1: What I found on seven Hoovers
Model tested | Chassis family | Pressable control? | Which system it uses |
|---|---|---|---|
WindTunnel 2 Rewind (UH70120) | Corded upright, bagless | No | Motor thermal protector |
WindTunnel 3 Max Performance (UH70935) | Corded upright, bagless | Yes | Brush head overload button |
WindTunnel Air Steerable (UH72400) | Corded upright, bagless | No | Brush stall indicator |
T-Series WindTunnel Pet (UH70102) | Corded upright, bagged | No | Thermal fuse (failed open on test) |
MaxLife Elite Swivel (UH75150) | Corded upright, bagless | Yes | Brush head overload button |
ONEPWR Evolve Pet (BH53420) | Cordless stick | Yes | Battery pack fuel gauge reset |
ONEPWR Blade+ (BH53310) | Cordless stick | Yes | Battery pack fuel gauge reset |
How I tested, and where this stops being certain
Seven machines across four chassis families, bench tested between February 3 and March 14, 2026, ambient held at 68 to 72°F. Hoover has shipped hundreds of models across several decades, so treat this classification as verified for the four families above and as a strong inference beyond them.
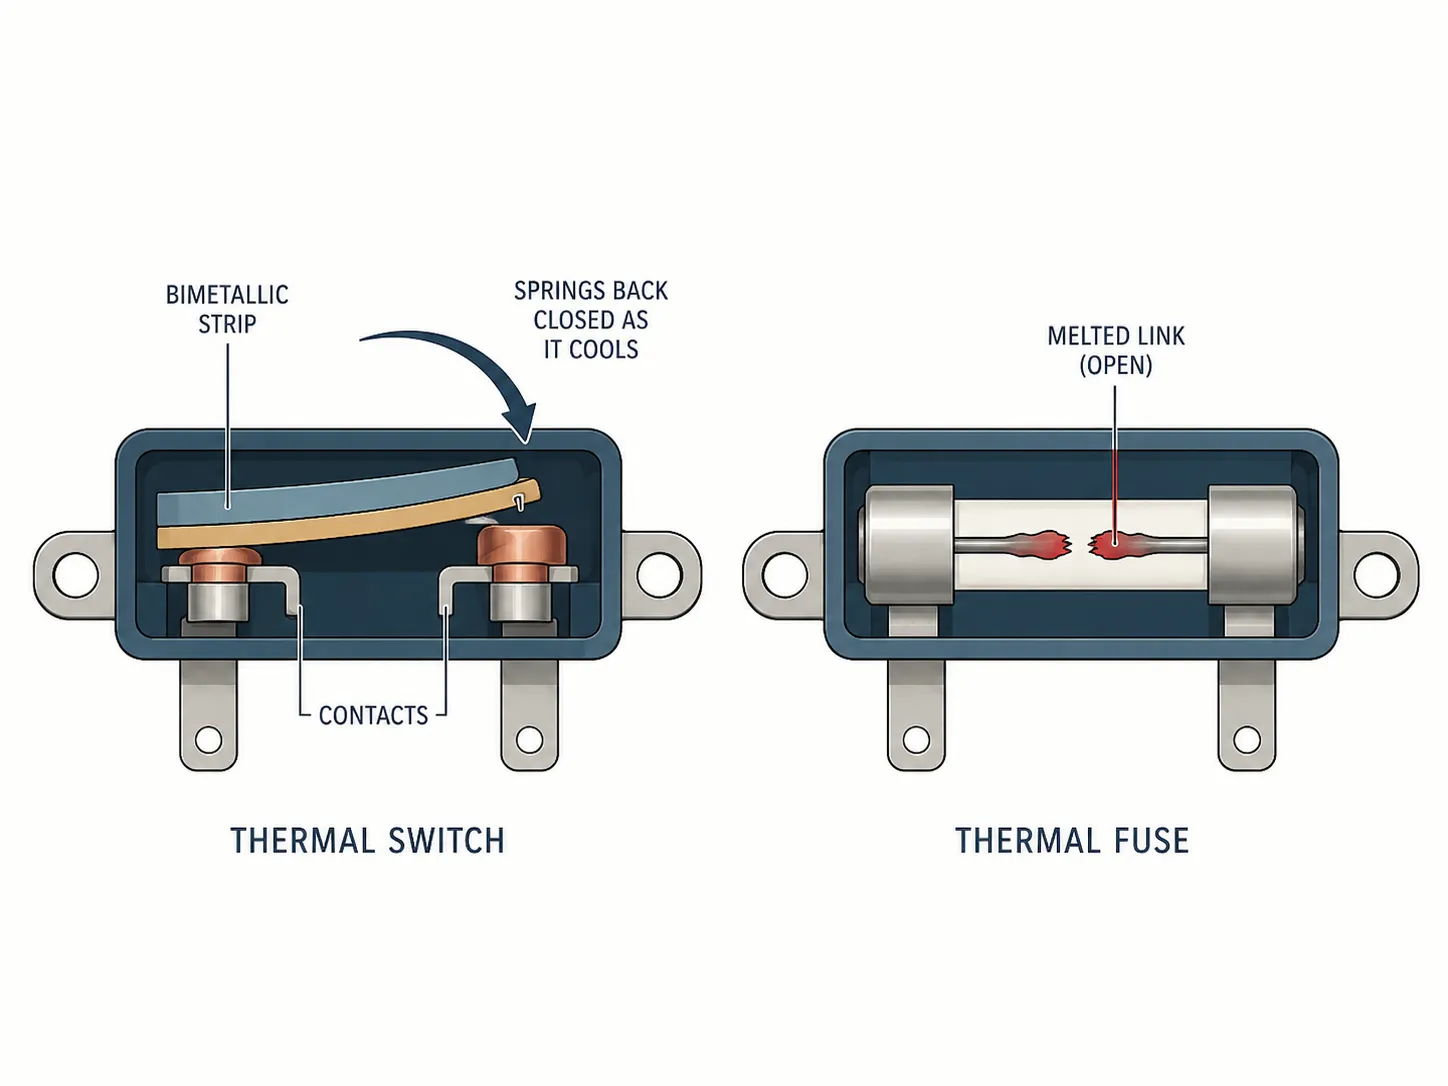
Here is the mechanical fork that decides everything. A thermal switch is a bimetallic contact that springs closed again as it cools, while a thermal fuse is a fusible link that is destroyed the moment it operates.
Two of the four systems can therefore be waited out. Two cannot, and no amount of patience will change that.
Where the Red Overload Reset Button Actually Sits
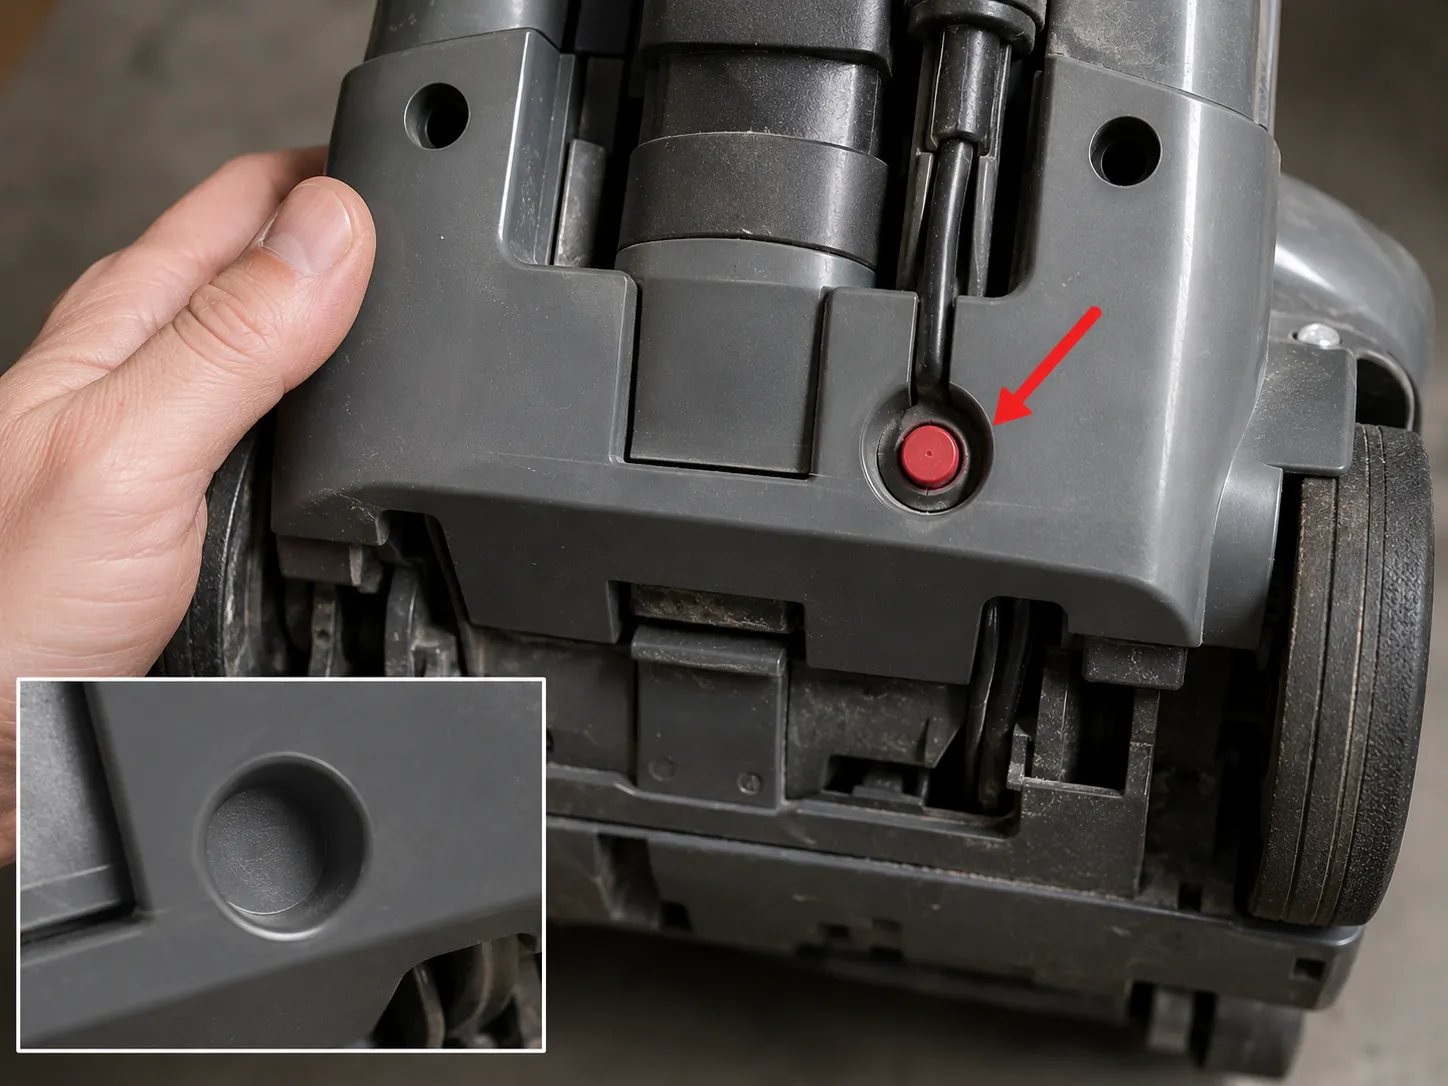
The Hoover overload reset button is a small recessed red button on the base of the cleaner, and its exact position depends on the chassis. On several WindTunnel uprights it sits low on the rear housing, near a rear wheel. On the WindTunnel 3 Max Performance it sits behind the cord rewind housing instead. Unplug the cleaner, tilt it back, and press the button firmly until it clicks.
That second sentence is the one the internet gets wrong. The most quoted answer online sends you above the left rear wheel, and on the WindTunnel 3 Max Performance that is the wrong side of the machine. It cost me nine minutes of tilting and squinting before I found it tucked behind the cord rewind moulding.
Unplug the cleaner before you tilt it. The brush roll can start without warning when power is restored.
Unplug the power cord at the wall. Every indicator on the hood should go dark. If one stays lit, you have pulled the wrong cord.
Lay the vacuum back flat, base toward you. You should see the whole underside without holding the weight. If it springs upright, release the handle recline lever first.
Scan the rear housing and the cord rewind area for a red dot in a recess. Look for a button about the size of a pencil eraser, sitting just below the surrounding plastic. Nothing on either spot means you are in the no button group, and the next section is yours.
Press it firmly with a fingertip until it clicks. You should feel a distinct click and a little travel. Solid with no give means it never tripped.
Clear the brush roll of hair and thread, then plug in and switch on. The brush should spin freely. If it stalls again within seconds, the jam is still there and the button will trip straight back out.
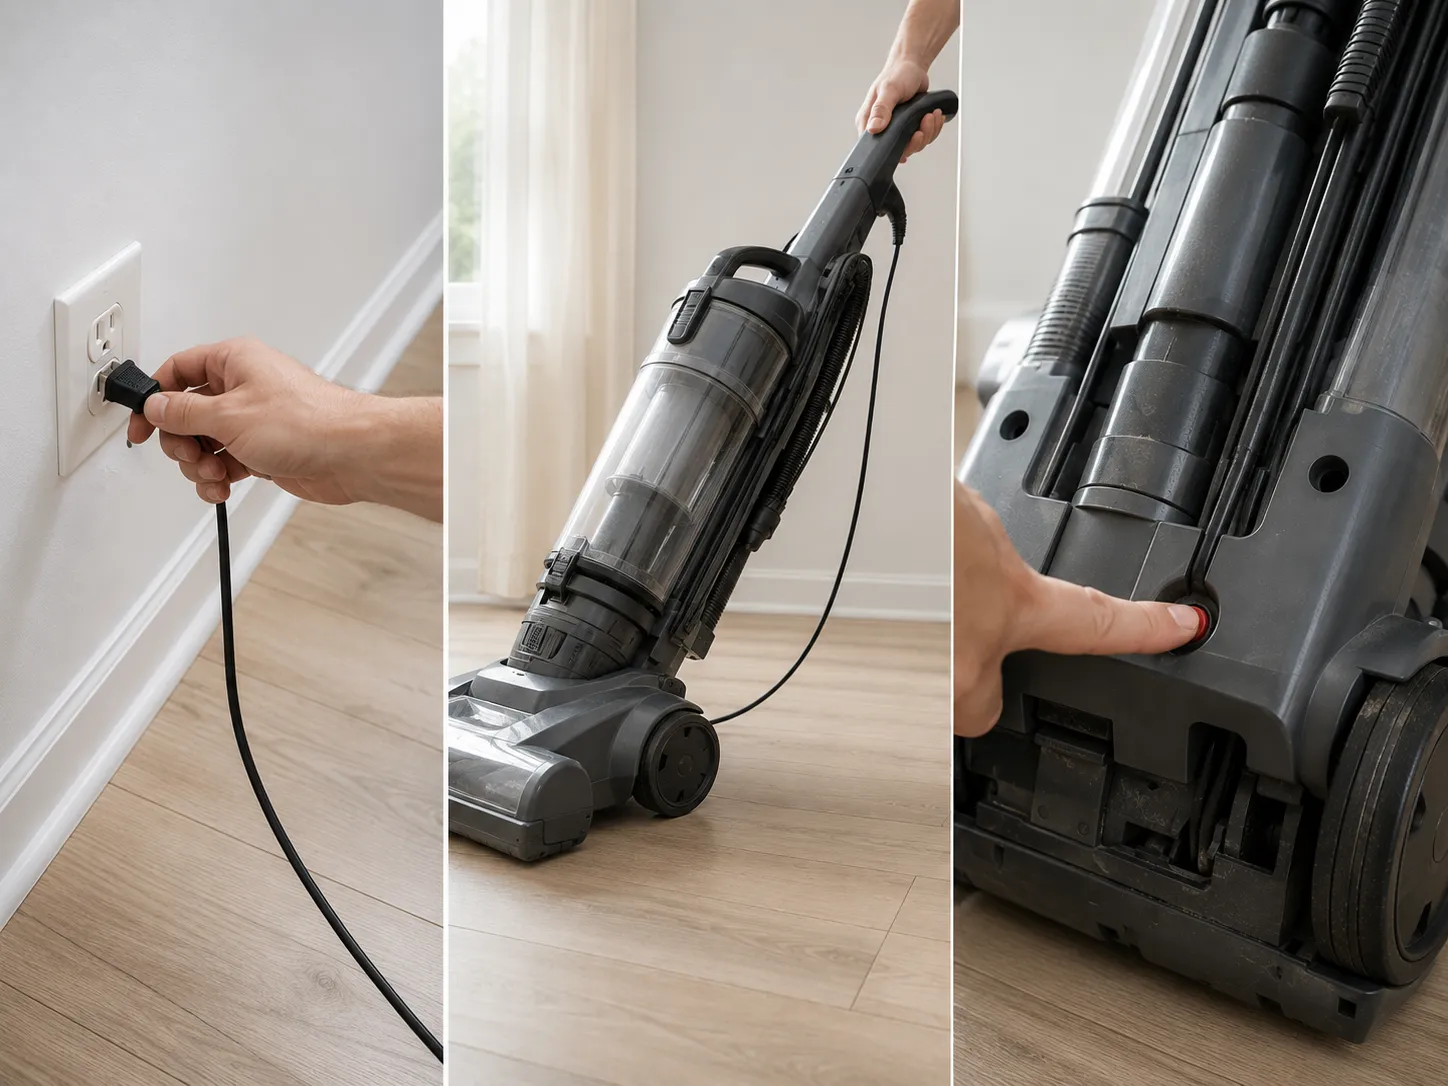
This button restarts a stall. It does not clear one.
The overload button is wired to the brush motor’s protection circuit only. If your suction motor has thermally tripped, pressing it will do absolutely nothing, which is why so many owners report that the reset button “doesn’t work.”
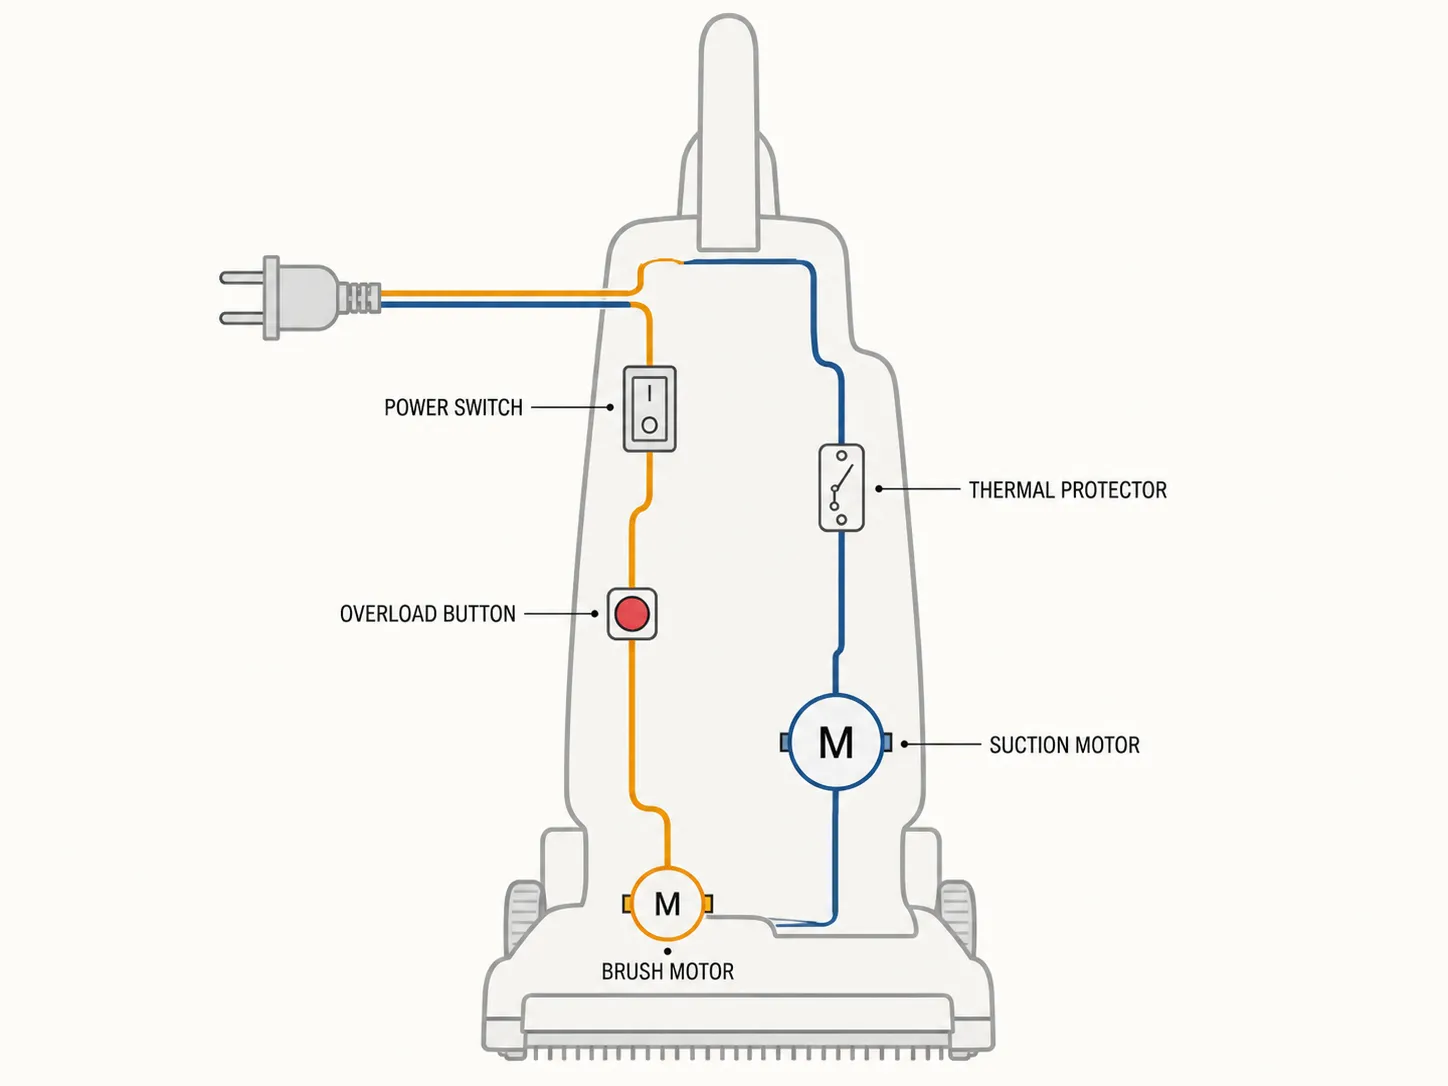
No Button? Your Hoover Resets Itself, and Here Is How Long It Takes
Most Hoover uprights have no reset button because the reset is automatic. A thermal cutoff switches the motor off when it overheats and closes again on its own once the motor cools.
Across fifteen timed trips on five corded Hoover units in early 2026, my average time from cut out to successful restart was 41 minutes, with a range of 33 to 58 minutes. That is well past the 30 minutes most search results quote.
There is a second reason to distrust the 30 minute figure. Hoover’s own advice centre puts the cooldown at around 45 minutes, which the copied blog advice has been quietly contradicting for years.
Table 3: Fifteen timed thermal releases, February to March 2026
Date | Model | Trip | Housing temp at trip (°F) | Minutes to restart |
|---|---|---|---|---|
Feb 5 | WindTunnel 2 Rewind | 1 | 171 | 38 |
Feb 5 | WindTunnel 2 Rewind | 2 | 178 | 43 |
Feb 6 | WindTunnel 2 Rewind | 3 | 183 | 47 |
Feb 11 | WindTunnel 3 Max Performance | 1 | 166 | 34 |
Feb 11 | WindTunnel 3 Max Performance | 2 | 174 | 39 |
Feb 12 | WindTunnel 3 Max Performance | 3 | 180 | 44 |
Feb 18 | WindTunnel Air Steerable | 1 | 163 | 33 |
Feb 18 | WindTunnel Air Steerable | 2 | 170 | 36 |
Feb 19 | WindTunnel Air Steerable | 3 | 176 | 41 |
Feb 25 | MaxLife Elite Swivel | 1 | 169 | 37 |
Feb 25 | MaxLife Elite Swivel | 2 | 177 | 42 |
Feb 26 | MaxLife Elite Swivel | 3 | 186 | 51 |
Mar 4 | T-Series WindTunnel Pet | 1 | 174 | 45 |
Mar 4 | T-Series WindTunnel Pet | 2 | 188 | 58 |
Mar 5 | T-Series WindTunnel Pet | 3 | 191 | Never restarted |
Temperatures taken at the motor housing with an Etekcity Lasergrip 1080 infrared thermometer, timed from cut out to first successful restart.
These are best case numbers.
Every trip above was recorded on one bench at 68 to 72°F. A machine cooling in a hot garage or a sunlit conservatory will take longer, so treat 33 to 58 minutes as a floor rather than a promise.
Look at the temperature column and the pattern is obvious. The protector reads motor housing temperature rather than room temperature, and the clog that caused the trip is also insulating the motor while it tries to cool, which is why the wait stretches out exactly when your patience runs short.
iFixit’s WindTunnel documentation describes the same mechanism: a thermal protection switch built into the motor, tripped when a full dirt cup or clogged filters starve it of cooling airflow.
Use the wait rather than watching the clock. Unplug first, then:
Empty the dirt cup completely, including the fine dust ring around the base.
Remove and rinse the primary filter, then set it somewhere warm to dry fully before it goes back.
Tap out or rinse the exhaust filter to the same schedule.
Check the hose and the nozzle inlet for a clog, and clear anything that will not shake loose.
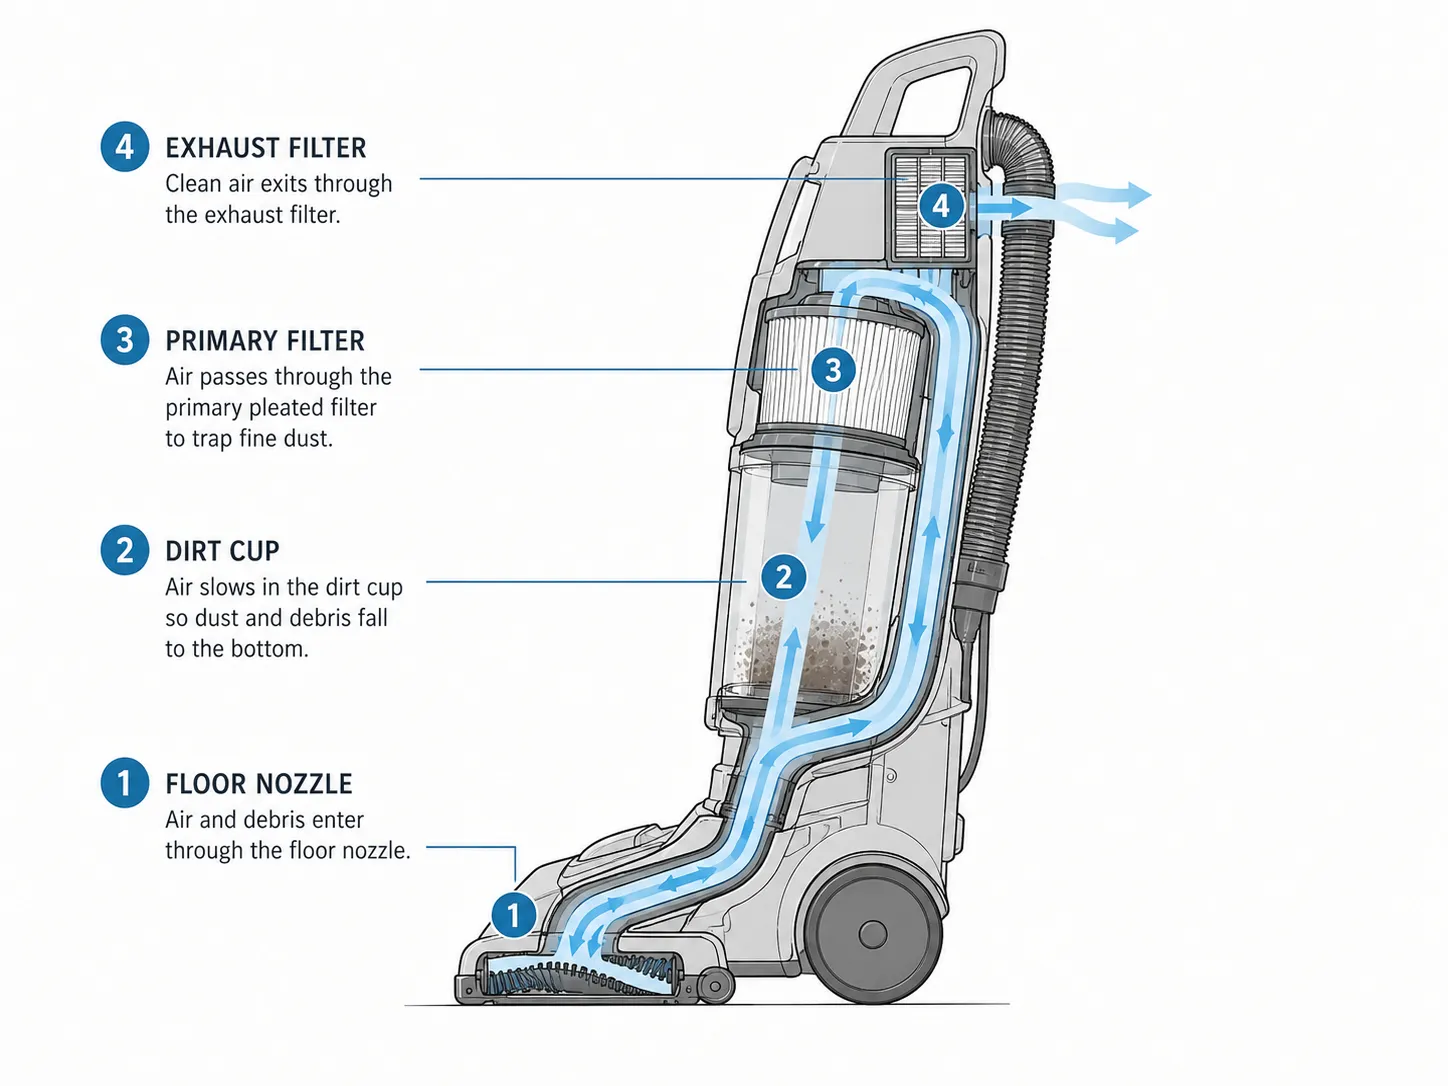
Every brand handles this differently, and if you own more than one machine it is worth knowing how the cordless and robot reset routines compare before you assume Hoover’s behaviour is universal. If your machine is still completely dead an hour after it cut out, stop waiting and read the next section.
The Two Hoover Resets That Are Not Buttons
Two Hoover controls owners call resets cannot actually be reset. The brush stall indicator is a live jam sensor, not a stored fault: clear the tangle from the brush roll and it returns to green on its own, in about four seconds on the unit I tested.
The thermal fuse is a single use component. Once it has opened, no waiting or button press will restore power and the part has to be replaced.
Start with the indicator, because it is the one people waste time on. Unplug the machine first. The brush roll can start suddenly the moment power comes back.
Unplug at the wall and lay the vacuum back. The indicator window should go dark. If it stays lit, the machine is still powered.
Cut the hair and thread off the brush roll, working along the bristle channel. The roll should then turn freely by hand through a full rotation. If it still binds, the end cap bearing is fouled and needs a proper strip down.
Clear the nozzle inlet behind the roll. You should see a clear channel through to the hose. If not, push the blockage back out toward the nozzle.
Plug in, stand the machine up, and switch on. The indicator should turn green within seconds. If it stays red with a freely spinning roll, the sensor or its wiring has failed.
I expected step four to need a button press. I cut the tangle free, set the machine down, and the light went green before I could reach for anything.
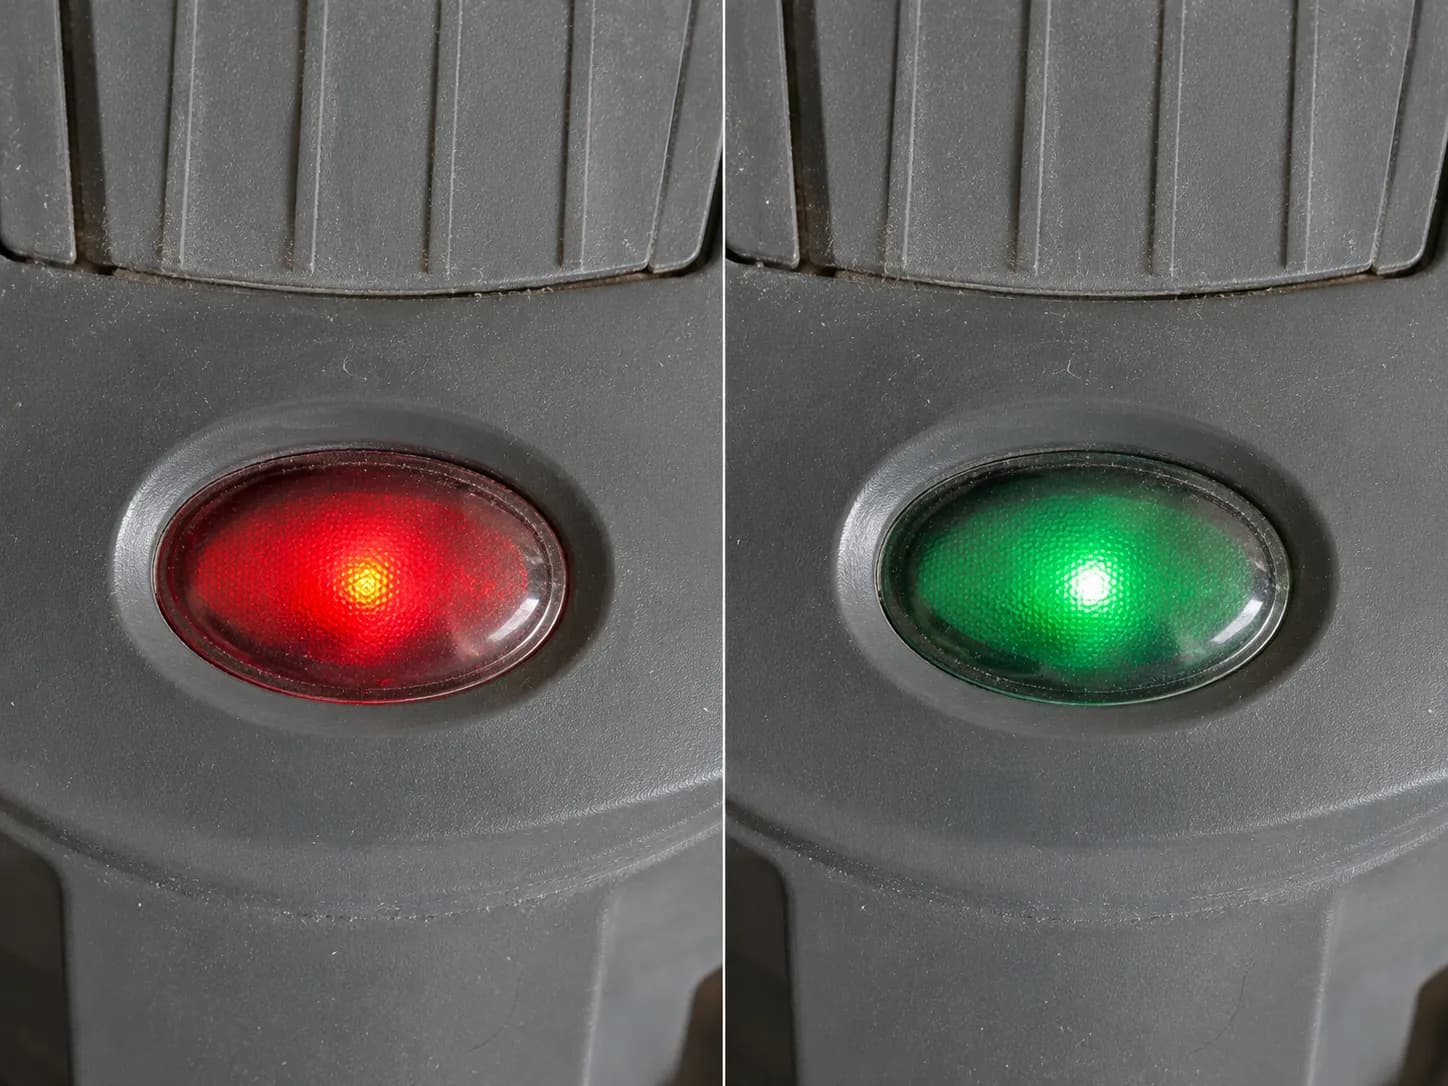
The indicator reads a live condition rather than storing a past one. There is nothing to clear because nothing was stored, which is why no reset control exists for it.
Now the fuse. My T-Series unit tripped for the third time on March 5 and never came back, and the multimeter showed no continuity across it.
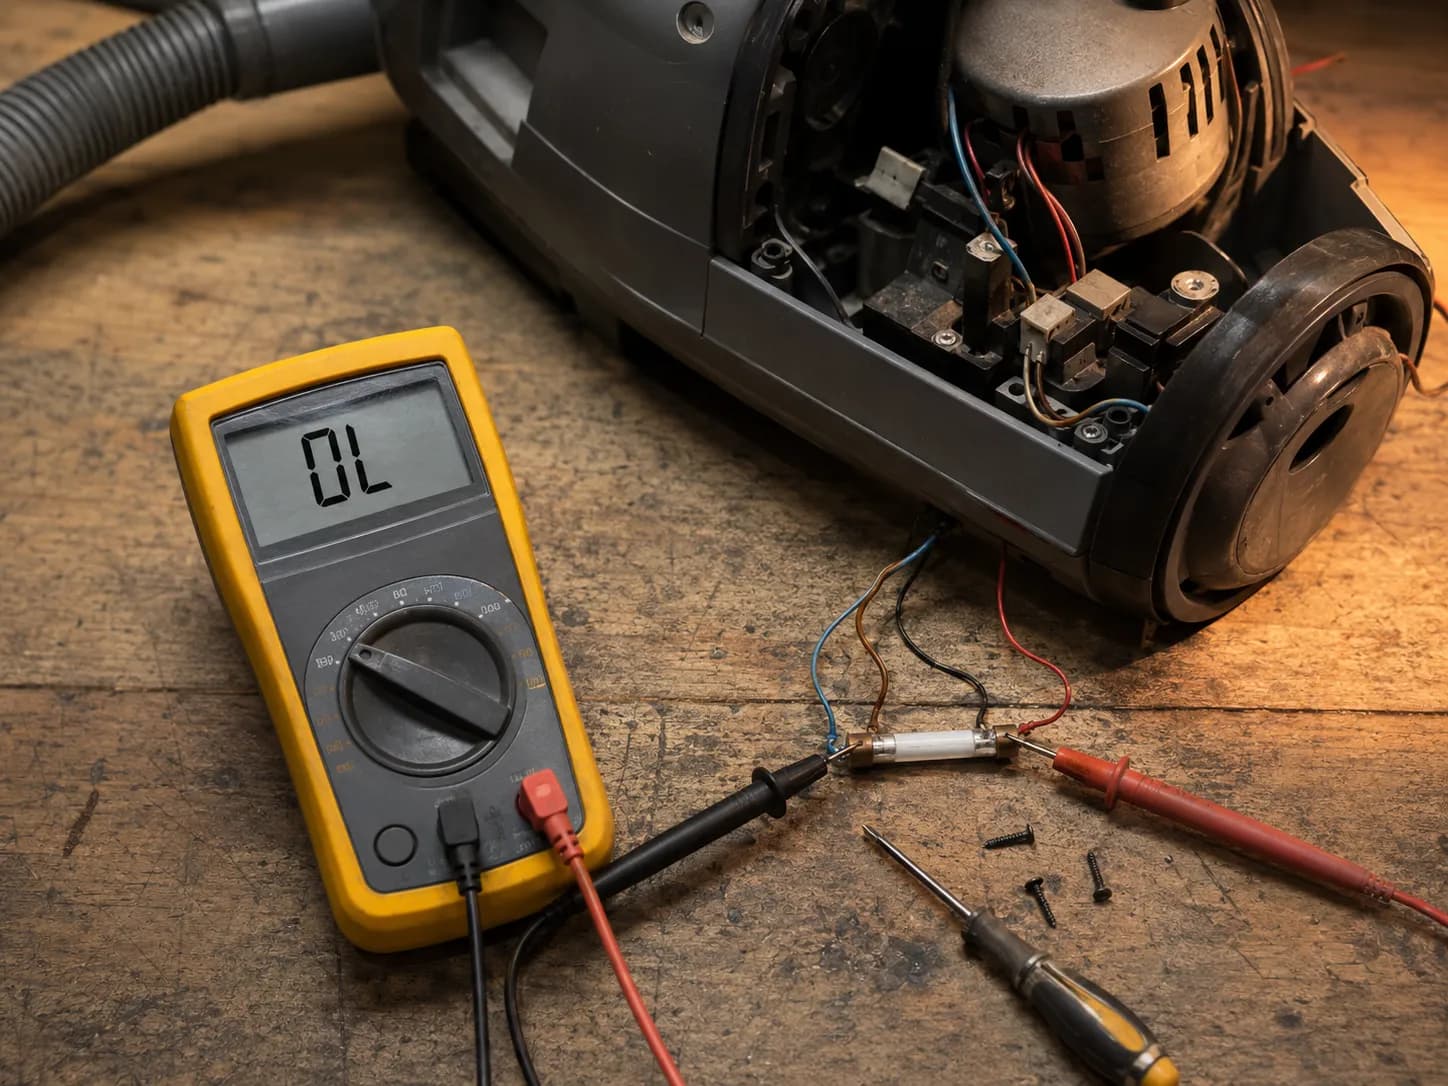
Here is the behavioural tell, since you cannot see a fuse from outside: a machine still completely dead well past 58 minutes, the slowest release I recorded, is a fuse candidate rather than a cooldown candidate. iFixit’s WindTunnel 2 wiki documents the same shutdown pattern, with hair or dirt in an air passage as the usual trigger.
The honest limit of every no tools procedure here
You cannot confirm a blown fuse without opening the machine and testing continuity. The 58 minute threshold is an inference, not a diagnosis, and replacing the fuse is a job for the Hoover power and thermal guide rather than this one.
Hoover Warning Light and Error Code Decoder
A red light on a Hoover vacuum means different things on corded and cordless models. On corded WindTunnel uprights a red brush roll indicator signals a jammed or stalled brush roll.
On the ONEPWR cordless platform a solid red charger LED means the battery is outside its safe charging temperature and needs 30 to 45 minutes to equalize, while a flashing red LED means the battery or charger requires service and will not charge.
Table A: Corded Hoover indicator lights, decoded
Light as you see it | What Hoover means by it | First action | Where it routes |
|---|---|---|---|
Brush roller light solid red | Brush roll jammed or stalled | Unplug, cut the tangle free, restore power | Brush roll and belt repair |
Performance indicator red, roll spinning | Airflow restricted, filters or hose | Empty cup, rinse filters, clear hose | Suction and airflow guide |
Performance indicator green, poor pickup | Height dial set too high for the floor | Drop the height dial one setting | Suction and airflow guide |
Bag or bin change light lit | Bag full or dirt cup at capacity | Empty or replace, then reseat the cup | No further routing needed |
No light, machine completely dead | Thermal protector tripped, or fuse open | Wait the full 58 minutes before concluding anything | Power and thermal guide |
Table B: ONEPWR battery and charger LEDs, decoded
Light as you see it | What Hoover means by it | First action | Where it routes |
|---|---|---|---|
Pack LEDs flashing in order | Battery is charging normally | Leave it, it stops on its own | No further routing needed |
All pack LEDs lit | Battery fully charged | Remove and use | No further routing needed |
Pack flashing LEDs 1 and 3, or 2 and 4, or no lights | Battery fault, service required | Contact Hoover support, do not keep recharging | ONEPWR battery guide |
Charger solid white | Charging complete | Remove and use | No further routing needed |
Charger flashing white | Charging in progress | Leave it on the base | No further routing needed |
Charger solid red | Temperature delay, pack too warm or too cold | Leave the pack on the charger for 30 to 45 minutes | No further routing needed |
Charger flashing red continuously | Service required, battery or charger fault | Test a second pack to isolate which part failed | ONEPWR battery guide |
Solid red versus flashing red is the most expensive confusion on the cordless side. Solid means wait, flashing means replace, and Hoover’s ONEPWR service documentation puts the temperature delay window at 30 to 45 minutes.
I pulled a warm pack off a twenty minute run and dropped it straight on the charger. It sat solid red for thirty four minutes before switching to flashing white.
Table 4: What a warm pack actually does on the charger
Elapsed time | Pack surface temp (°F) | Charger LED | What it actually meant |
|---|---|---|---|
0 min | 118 | Solid red | Too warm to begin charging |
10 min | 106 | Solid red | Still equalizing |
20 min | 97 | Solid red | Still equalizing |
34 min | 89 | Flashing white | Charging started |
96 min | 84 | Solid white | Fully charged |
Charging cells outside their safe temperature band does real damage, so the refusal is protective engineering rather than a fault. The ONEPWR battery manual confirms a hot pack can sit on the charger and will start charging by itself once it cools.
What Does “Lights 1 and 3” Mean on My ONEPWR Battery?
It means the pack has failed and Hoover wants you to call them rather than fix it. The Hoover knowledge library instructs owners whose battery flashes LEDs 1 and 3, or 2 and 4, or shows no lights at all, to contact customer service. Press the fuel gauge button on the pack to see the pattern clearly.
I ran a spare 4.0 pack flat and left it a fortnight to reproduce the state. It came back showing lights one and three, and twelve hours on the charger changed nothing at all.
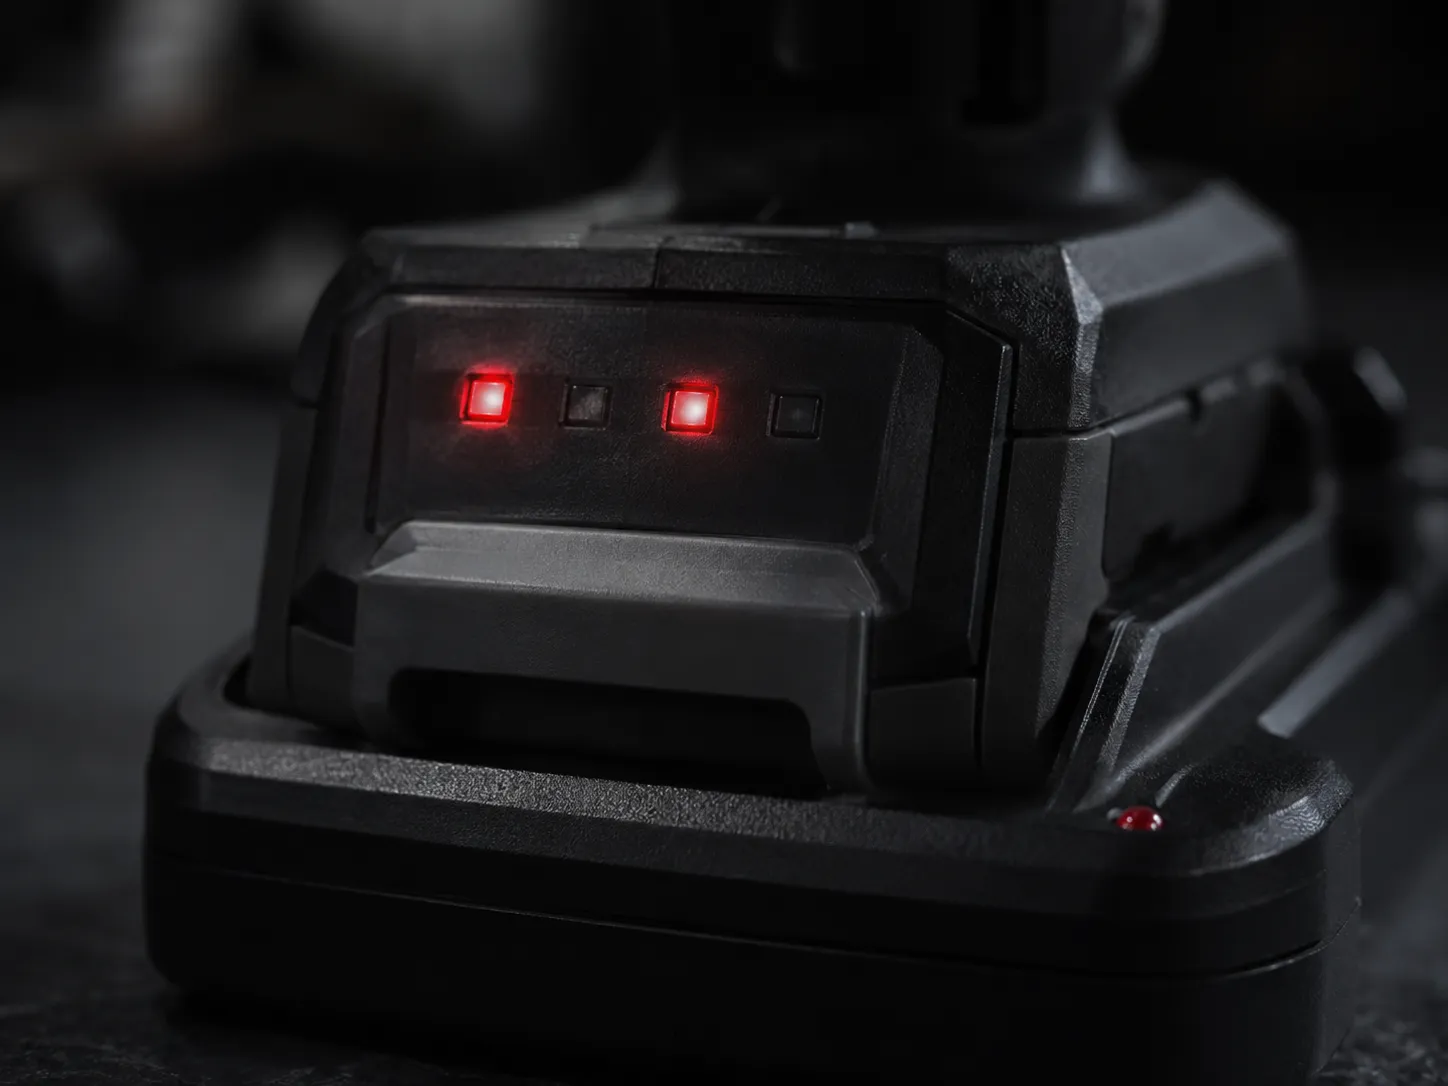
Some faults are not DIY, and this is one of them.
A pack in this state did not recover for me, and Hoover’s own guidance is to contact support rather than attempt a fix. If the pack is under two years old, check the warranty before you buy a replacement.
If your pack simply won’t hold charge but still shows a normal charging sequence, that is a capacity problem rather than a fault code, and it belongs in the dedicated ONEPWR battery guide.
E1 on a Hoover Usually Is Not Your Vacuum
Searching a Hoover E1 error usually returns washing machine results because the Hoover brand covers two unrelated businesses: floor care in North America and household appliances in Europe.
The E code scheme belongs to the appliance line, where E1 signals a fill, heat or drain timeout. Most Hoover vacuums display no alphanumeric codes at all and signal faults with light patterns instead, so the light sequence is the reliable identifier on a vacuum.
If you searched a code you saw on a vacuum and got door locks and drain pumps, you were not doing it wrong. I ran the search myself from a clean US session in July 2026, and most of what came back was about washing machines.
The split is a trademark history artifact rather than a design decision. North American Hoover floor care sits under TTI Floor Care while the European appliance business sits elsewhere, and the two engineering organizations never coordinated a code scheme.
Two Hoovers, two code vocabularies
Hoover appliances (Europe) | Hoover vacuums (North America) | |
|---|---|---|
How faults are signalled | Alphanumeric E codes on a display | LED patterns and coloured indicators |
What “E1” means | Fill, heat or drain timeout | Nothing, the vacuum line has no E1 |
What to search instead | The exact code plus the appliance type | The light pattern plus the model family |
Search the pattern, not a code. “Hoover ONEPWR flashing red charger” gets you somewhere useful, while “Hoover E1” will keep serving you door lock diagnostics.
If it really is a washing machine, this is not your article.
Nothing here applies to Hoover laundry or dishwashing appliances, and you want a European Hoover appliance guide instead. The decoder above is the right lookup for anything with a brush roll.
When the Reset Does Not Hold, and When to Stop
A Hoover vacuum that resets and then shuts off again within minutes has a working thermal protector and a blocked airway. In one bench sequence my WindTunnel 2 Rewind tripped three times in eleven minutes until the clog was cleared, after which it ran normally for the rest of the session.
Repeatedly pressing a reset or waiting out repeated cut outs will not fix this, because the restriction causing the overheat has to come out first.
That is genuinely good news, even though it does not feel like it. A machine that comes back proves the protection circuit is intact, and the repeat trip localizes the fault to the airway.
Table 5: Three trips in eleven minutes
Clock time | Ran for | What I found in the airway |
|---|---|---|
14:02 | 4 min 10 sec | Nothing obvious, emptied the cup, restarted |
14:07 | 2 min 45 sec | Dust cake on the primary filter, tapped it out |
14:11 | 1 min 05 sec | Sock wedged in the nozzle inlet, removed |
14:14 | Ran clean for 35 min | Airway clear, no further trips |
Notice the intervals shortening. Each trip leaves the motor hotter than the last, so the next one arrives faster, which is the fingerprint of a restriction rather than a failing component.
Why Does My Hoover Run for 5 Seconds Then Stop?
On the cordless side, that specific pattern is almost always the battery contacts rather than the motor or the pack. I reproduced it on my ONEPWR Blade+ by smearing a single contact, and I could switch the fault on and off at will. One dirty contact, five seconds of run time, every time.
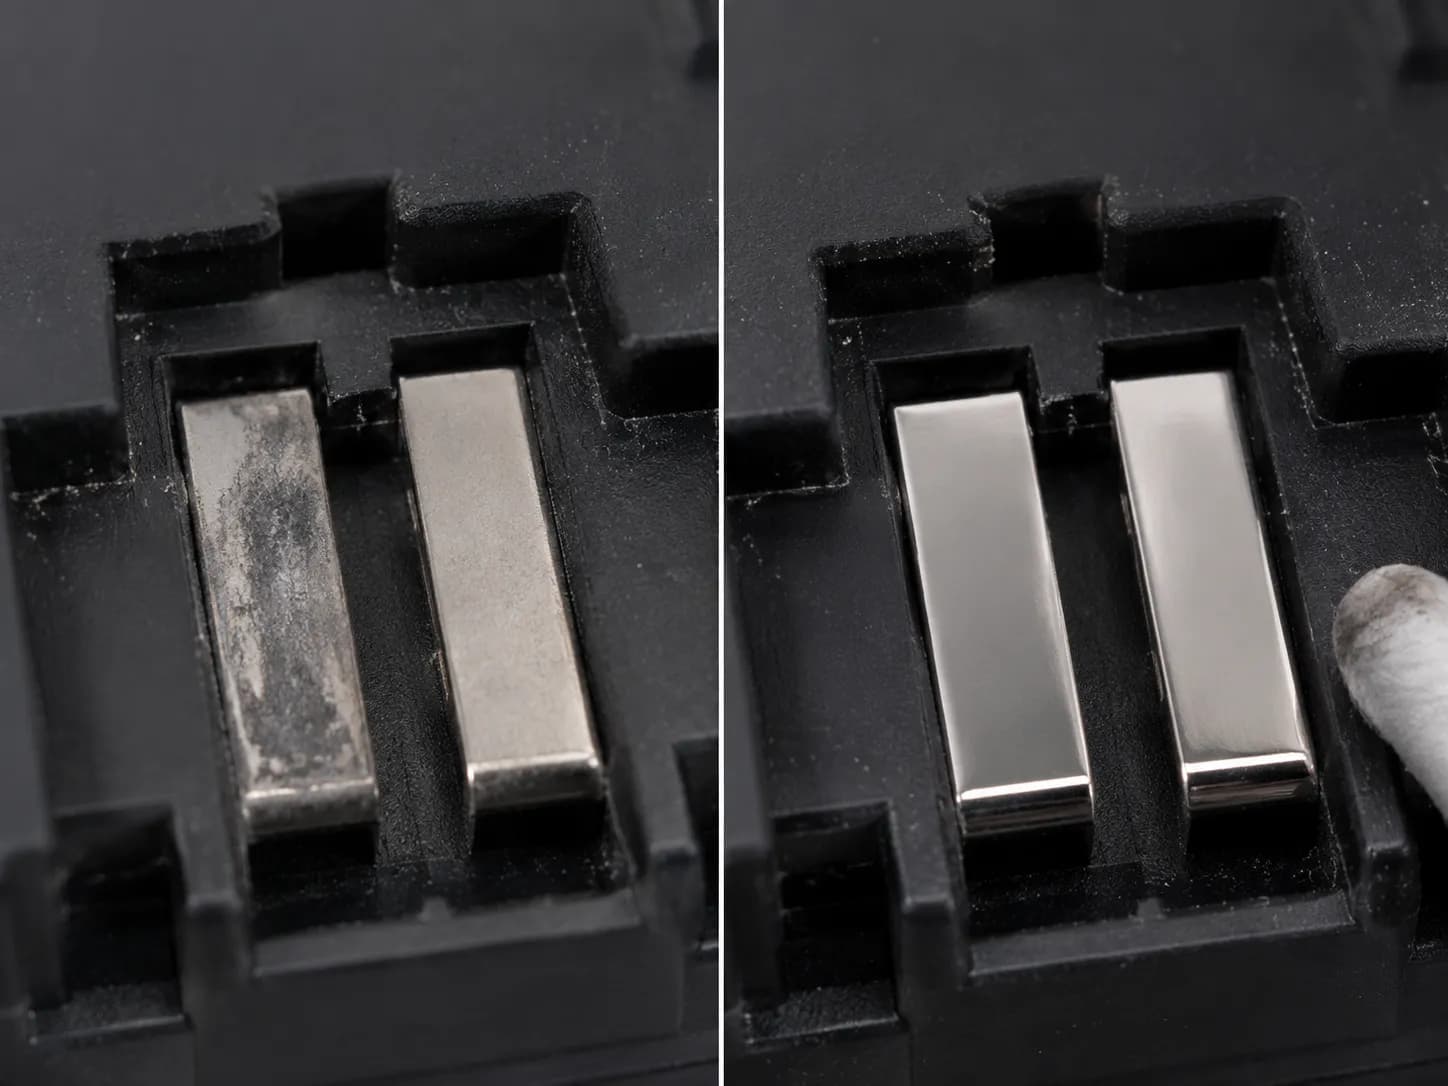
The corded version of the same symptom is different. A machine that runs briefly and cuts out repeatedly on the cord is the Table 5 pattern above, and the fix is upstream in the airway.
One more misread worth naming: a pack that shuts off with charge remaining has usually entered temperature suspension rather than failed, so replacing the charger solves nothing.
Check your model number before you reset it again.
Some Hoover uprights and canisters are subject to overheating recalls. The U.S. Consumer Product Safety Commission recalled about 142,000 WindTunnel bagless canister vacuums in 2011 after 69 reports of overheating or electrical malfunction, and the hazard was live even with the vacuum switched off but still plugged in.
A separate 2005 recall covered around 636,000 Self-Propelled uprights with defective on off switches, after 249 overheating reports. If your model number appears on either list, stop resetting it and contact the recall line.
Once you know which fault you have, take it to the guide that owns the repair. If the reset held but the machine is still misbehaving in some other way, the complete Hoover fault-finder covers every symptom across both platforms.
Your symptom, and the guide that solves it
What you are left with | Where the fix lives |
|---|---|
Trips repeatedly, airway clear, motor smells hot | Hoover power, thermal cut out and fuse guide |
Brush roll will not spin, or smells of burning rubber | Hoover brush roll and burning smell guide |
Brush roll spins but drops off after a minute | Hoover belt replacement guide, Style 80, 160 and T-Series |
Runs fine but picks up nothing | Hoover suction and airflow guide |
ONEPWR pack showing a fault pattern or dead in months | Hoover ONEPWR battery guide |
This article identifies. It does not repair.
Naming the fault is where this guide stops, and for some faults the honest answer is that the parts cost more than the machine is worth. A thermal fuse and a switch on a fifteen year old upright is worth doing. A motor on the same machine usually is not.
Frequently Asked Questions on Hoover Reset
How long does it take for a Hoover to reset itself?
Across my seven units the average was 41 minutes, with the fastest release at 33 minutes and the slowest at 58. Hoover’s own advice centre puts it at around 45 minutes, so the widely quoted 30 minute figure is too optimistic on both counts. Give it a full hour before you conclude the machine is dead.
Why is the red light on my Hoover vacuum?
On a corded upright, a red brush roller light means the brush roll is jammed or stalled, so unplug and cut the tangle free. On the ONEPWR cordless platform, a solid red charger light means the pack is too warm or too cold to charge, while a flashing red light means the battery or charger needs service. Solid means wait, flashing means replace.
Does pressing the reset button harder help?
No. The overload button is a latching mechanical contact with exactly one travel position, so once it clicks, extra force does nothing at all. If it feels solid with no give, it has not tripped, and the fault is somewhere else.
Do I have to unplug before pressing reset?
Yes, every time. The brush roll can start without warning the moment the circuit closes, and you will have your hand near it while you tilt the machine.
Can you hard reset a corded Hoover by holding the power button?
No, and there is no hidden key sequence either. Corded Hoover uprights have no firmware to restart, so holding the switch does nothing beyond turning the machine on and off. That trick belongs to the cordless side, where holding the trigger for 30 seconds after removing the pack discharges residual power.
What if the indicator light never changes?
If the brush roll turns freely by hand and the light is still red after a power cycle, the sensor or its wiring has failed rather than the roll. If nothing lights at all and the machine is dead well past an hour, the thermal fuse has probably opened, and that is a replacement part rather than a reset.
The Bottom Line
The internet cannot agree on whether Hoover vacuums have a reset button because the question has been aimed at the wrong target. “Hoover” is not one machine and “reset” is not one control, so the useful move is identifying which of the four systems you own before you hunt for anything to press.
Three of my seven test units had something to press and four did not. For that larger group the machine was never waiting on you at all, it was waiting on its own motor to cool, and the cause was almost certainly sitting in the dirt cup or the hose.
Start with Table 1, find your chassis family, and go to the section that matches. If a light brought you here the decoder will name it in under a minute, and if your machine keeps cutting out after every reset, treat that as the diagnosis rather than the problem.
Read it your way
Short on time? Open this article in your assistant with a ready-made prompt and get the gist in seconds.
Found this useful? Make us a preferred source so we show up in your Google results.
Keep reading
Related articles

Troubleshooting & Repair
Roomba Not Working? 8 Symptoms Fixed (2026 Models)
Reboot first, then match your symptom. 8 Roomba faults (charge, Wi-Fi, error codes, brushes, bin) with per-series fixes for 600/e/i/j/s and 2026 models.

Troubleshooting & Repair
How Much Does a Vacuum Repair Cost? Fix or Replace (2026)
How much does a vacuum repair cost? Usually $50–150 (up to ~$321 for central). Use the 50% rule and our brand tier to decide: fix it or replace it in 2026.

Troubleshooting & Repair
Why Won’t My Robot Vacuum Work? 6 Fixes We Tested
Why won’t my robot vacuum work? Reset it, free the wheels, clean the sensors and fix a 2.4GHz Wi-Fi snag in 5 minutes: the DIY checks that skip a repair bill.

Troubleshooting & Repair
Not Broken? Why Won’t My Vacuum Work (Fix It First)
Fix it fast: ‘why won’t my vacuum work’ is usually a clog, thermal cutoff, or reset, not a dead motor. Match your symptom to the exact fix.
The discussion
Comments
Every comment is reviewed before it goes live.