How to Fix a Vacuum Cord: 3 Safe Fixes (We Bench-Tested)
Fix a frayed or chewed vacuum cord 3 safe ways: replace the plug, splice it right, or swap the whole cord. Plus the tape myth that starts fires.
Written by Reggie AlvarezReviewed by Dale FerrisLast updated on July 2, 2026
When you buy through links on our site, we may earn an affiliate commission (at no extra charge), which we use to fund new product tests. Learn more.
Read it your way
Short on time? Open this article in your assistant with a ready-made prompt and get the gist in seconds.
Found this useful? Make us a preferred source so we show up in your Google results.
The 30-Second Answer: Can You Safely Fix a Vacuum Cord?
A vacuum cleaner power cord is almost always a safe do-it-yourself repair once you find where it is damaged, and the whole job usually costs 20 in parts. The catch is matching the fix to the location: a cracked plug gets a new plug, a chewed mid-section gets spliced or replaced, and a frayed jacket at the body gets a full cord swap.
Knowing how to fix a vacuum cord starts with that one decision, not with reaching for tape.
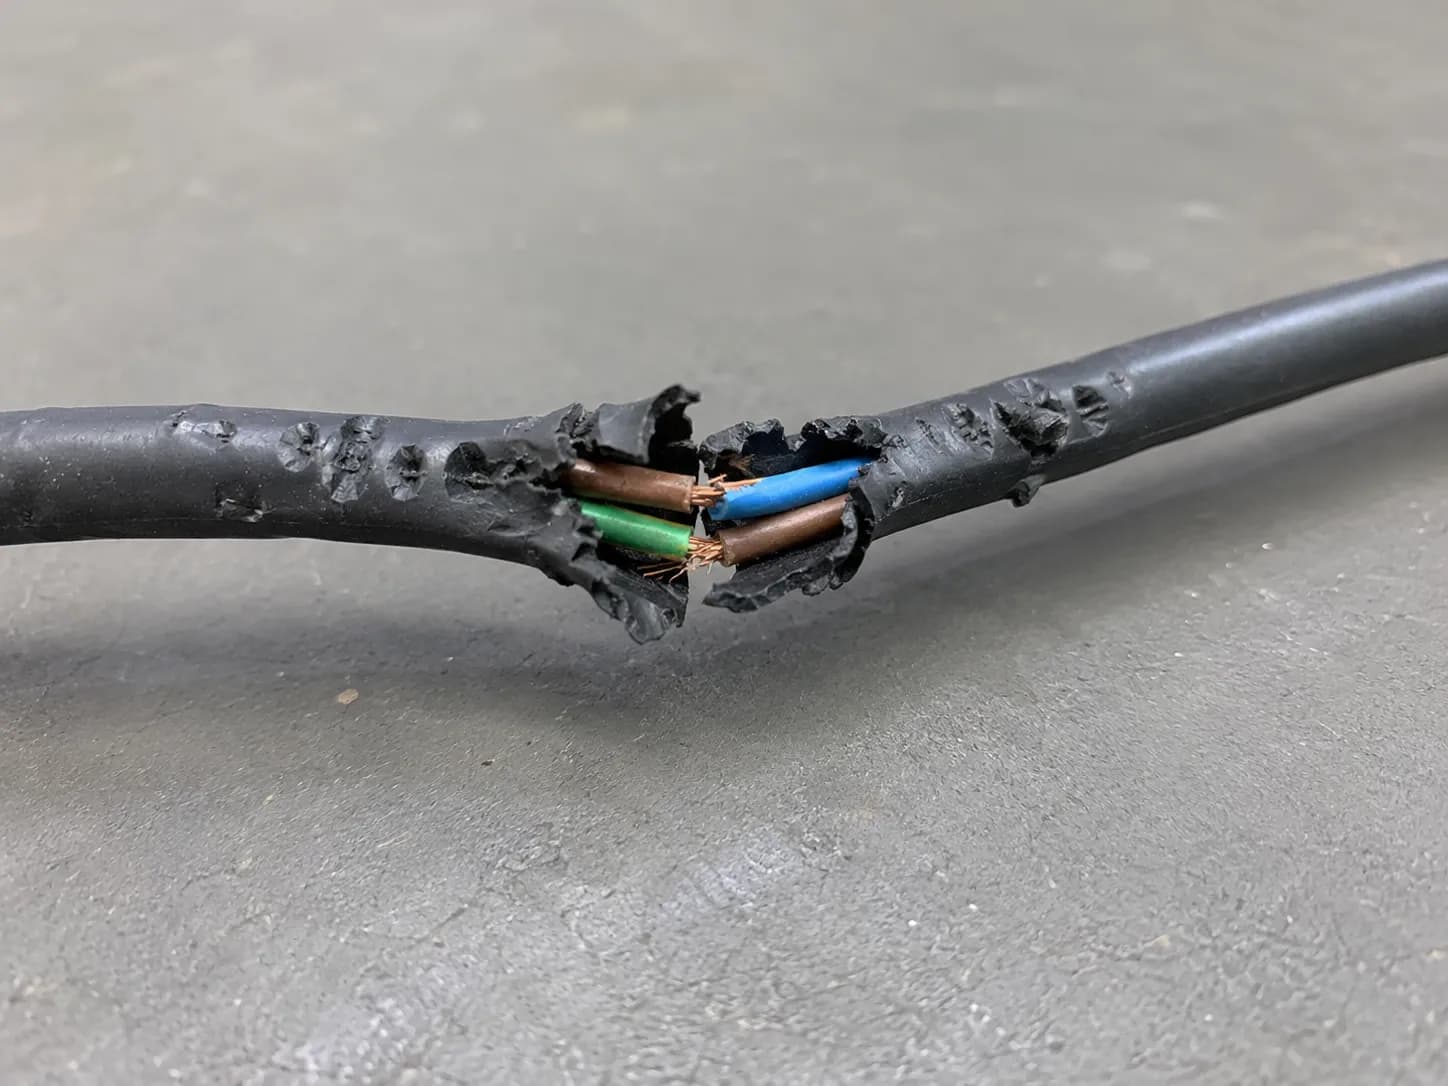
Here is the part most guides skip. Wrapping a chewed or cut section in electrical tape does not restore the jacket's strength or the conductors' insulation, and a damaged cord left in service is a real shock and fire risk.
The Electrical Safety Foundation International attributes roughly 3,300 home fires a year to cords alone, with 50 deaths and 270 injuries.
Do not do this: Never tape over exposed copper, a chewed gap, or a cut and keep vacuuming. Tape hides damage instead of repairing it, and federal cord guidance treats a thin damaged cord as something to splice properly or replace, not patch.
Three safe methods cover almost every case below, and one short section helps you confirm it is even the cord before you start. Unplug the vacuum first, every time.
Diagnose First: Where Is the Cord Damaged?
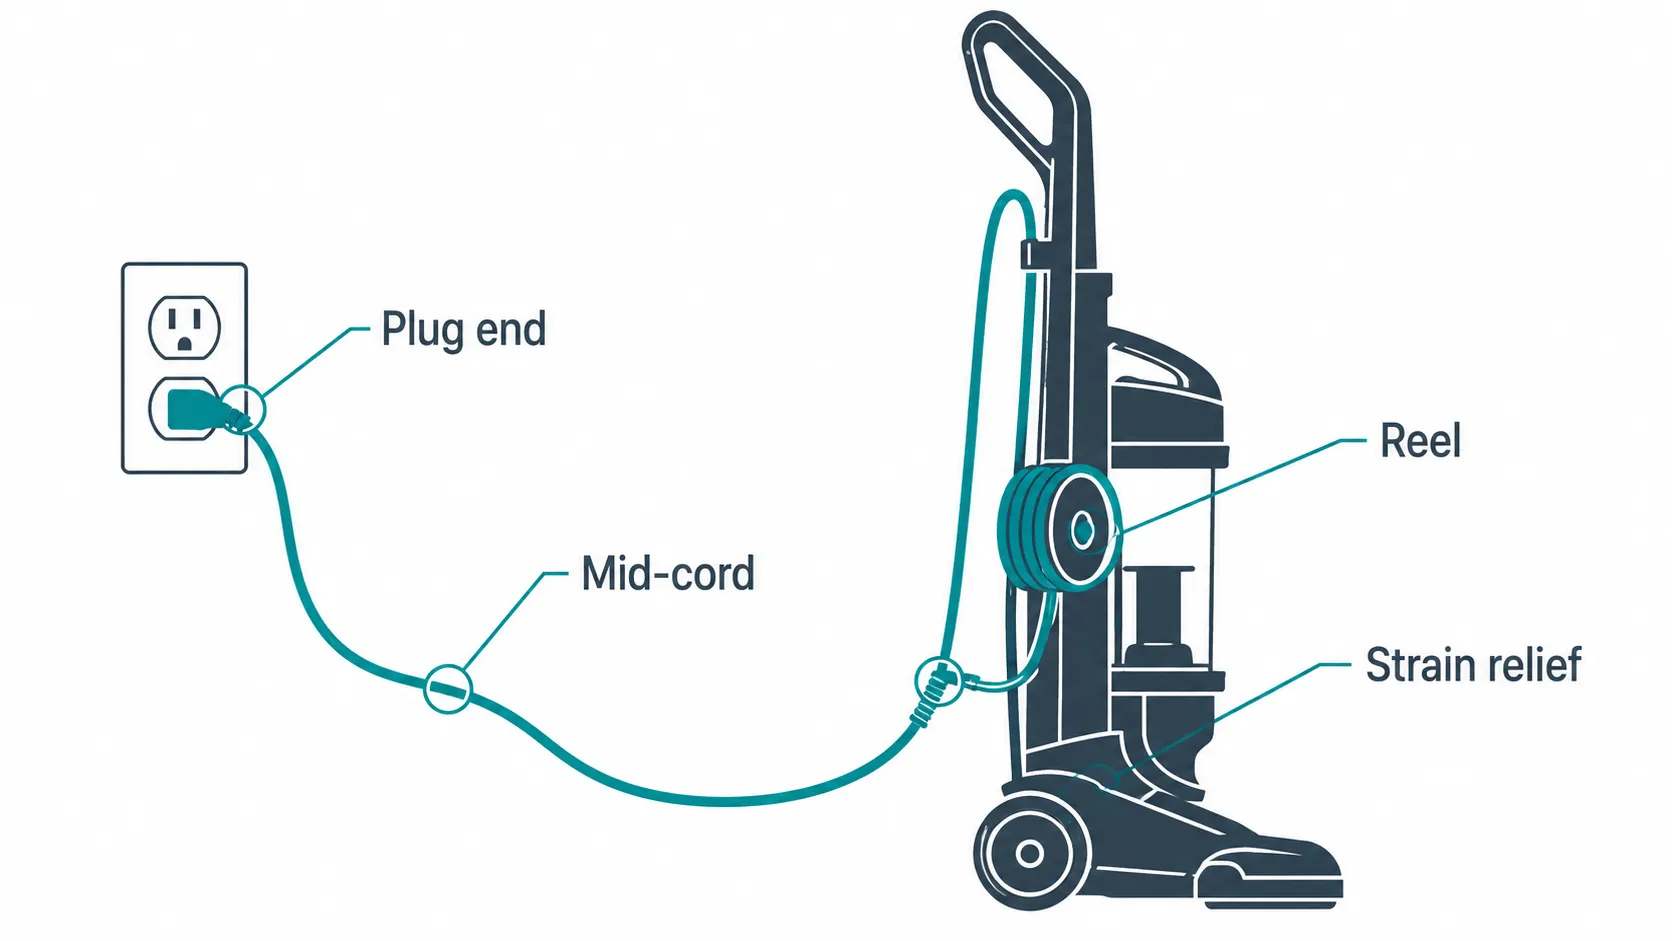
Before you fix a vacuum cord, find where it is damaged, because the location decides the repair. A vacuum cleaner power cord fails in four predictable zones: at the plug end, somewhere along the middle, right where the cord enters the body under the strain-relief clamp, or inside a retractable reel.
A fifth case is the one nobody expects: no visible damage at all, which often means the fault is not the cord. This triage takes two minutes and saves you from replacing the wrong part.
Unplug the vacuum and run the cord through your hand, looking and feeling for the signs in the table below.
Where the damage is | What you will see or feel | The fix |
|---|---|---|
Plug end (the "cord cap") | Cracked plug body, a bent or missing prong, a loose or wobbly plug | Replace the plug, see Method One |
Mid-cord | A cut, a chewed gap, fraying, or exposed copper away from the body | Splice or replace, see Method Two or Three |
At the body, under the strain-relief clamp | A nick where the cord enters, scorching, power that cuts out when you wiggle it | Replace the whole cord, see Method Three |
Retractable reel | Cord will not retract, will not stay out, or keeps retracting on its own | Reel fixes, see the reel section |
No visible damage, still dead | Nothing obvious, or a cordless unit shutting off | It may not be the cord, see the dead-but-plugged-in section |
The trap on my bench was a cord that looked like a plug fault but was actually a near-invisible nick right where the cord enters the body, hidden under the strain-relief clamp. That flex point fails more than people think, and if the motor is the real problem instead, that is diagnosing a dead vacuum motor, a different job.
One more check: If a cordless vacuum keeps shutting off or won't power on, that is the battery or a thermal cutoff, not the cord. Skip ahead to the dead-but-plugged-in section.
One identification point sets up the plug repair: most vacuums use a two-wire polarized plug (one prong wider than the other), while some use a three-wire grounded plug. If yours has a ground pin or a green wire inside, that ground must be reconnected during any repair.
Tools and Parts You Will Need (and What They Cost)
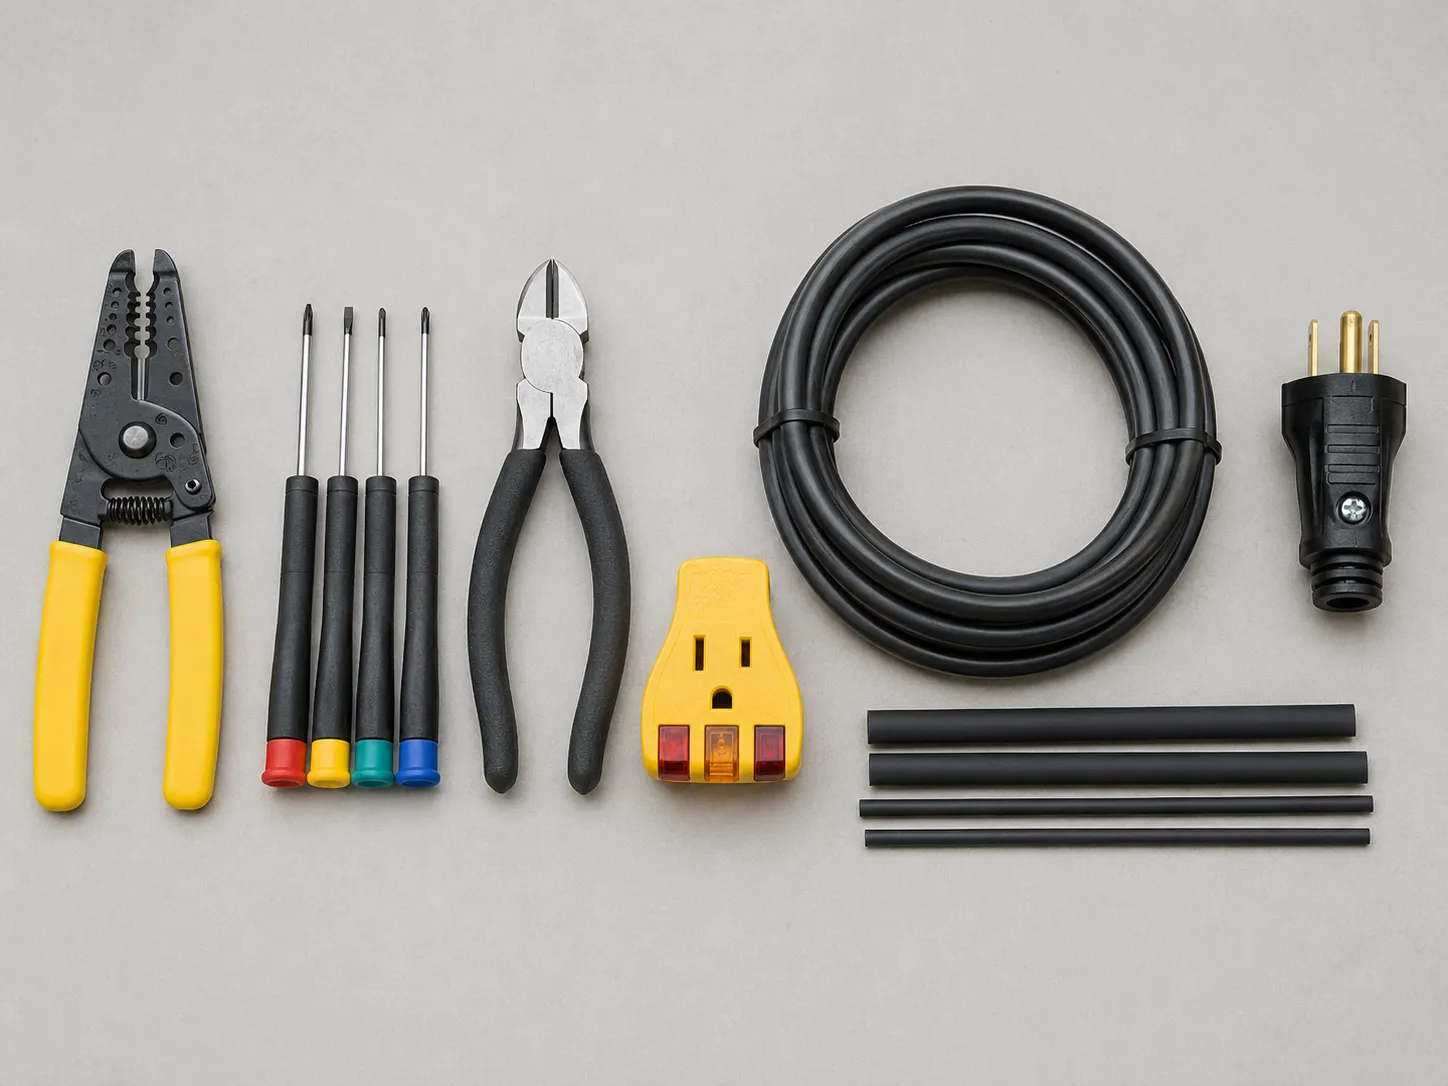
Most vacuum-cord repairs cost 20 in parts, and the one tool that separates a safe job from a guess is a plug tester. A vacuum cleaner power cord repair needs only basic hand tools plus the right replacement part for your damage zone.
The Electrical Safety Foundation International stresses matching a cord's rating to its load, which is why the single most important parts rule below is to match the new cord's gauge to the old one rather than grabbing thin lamp flex.
These are the exact tools and parts I keep on the bench for cord work.
Tool | What it does |
|---|---|
Insulated wire strippers | Remove jacket and conductor insulation without nicking the copper |
Screwdriver set, Phillips and flat | Open the plug case and the vacuum housing |
Side cutters | Cut the cord and trim conductor ends |
Multimeter or continuity tester | Confirm the cord is the fault, then confirm the repair |
Outlet and plug polarity tester | Confirm hot and neutral are not reversed after a plug swap |
Heat-shrink tubing with a heat source | Insulate a splice, only for Method Two |
Part | Typical cost |
|---|---|
Polarized replacement cord cap | 8 |
Replacement appliance cord, matching gauge | 15 |
Assorted heat-shrink tubing | 10 |
Wire nuts or terminal connectors | 6 |
Buy the right cord: A $4 plug tester is not optional. It is how you confirm you did not reverse hot and neutral, and matching the replacement cord's gauge to the original keeps it from overheating under the motor's load.
Method One: Replace the Plug (Cord Cap)
To replace a vacuum plug, cut off the old cord cap, strip the wires, and connect black to brass, white or ridged to silver, and green to the ground screw. This is the simplest and most common fix for a vacuum cleaner power cord, and it handles a cracked plug body or a prong that fell out.
The wiring convention is fixed and worth getting exactly right, because the U.S. Fire Administration warns that a cracked or damaged cord should be repaired or replaced and a three-prong plug should never be forced into a two-slot outlet.
Work through the steps in order, with the vacuum unplugged.
Cut off the damaged plug just below the cracked or loose section.
Slide the new plug's case onto the cord now, before wiring, because this is the step people forget.
Strip about half an inch to three-quarters of an inch of insulation from each conductor.
Identify the conductors: smooth or black is hot, ridged or white is neutral, green is ground.
Wire it: black to the brass or gold screw, white or ridged to the silver screw, green to the green ground screw.
Tighten each screw, check that no stray strands stick out, then reassemble the case.
Plug the cord into a polarity tester before you ever run the vacuum.
On a true two-wire double-insulated vacuum there is no ground, and the ridged conductor is your neutral. On a three-wire vacuum the ground is not optional, so reconnect it.
When I wired the new cord cap on the bench and checked it, the polarity tester read correct on the first try. That tester reading is the proof the swap is safe, and it is the step generic guides leave out.
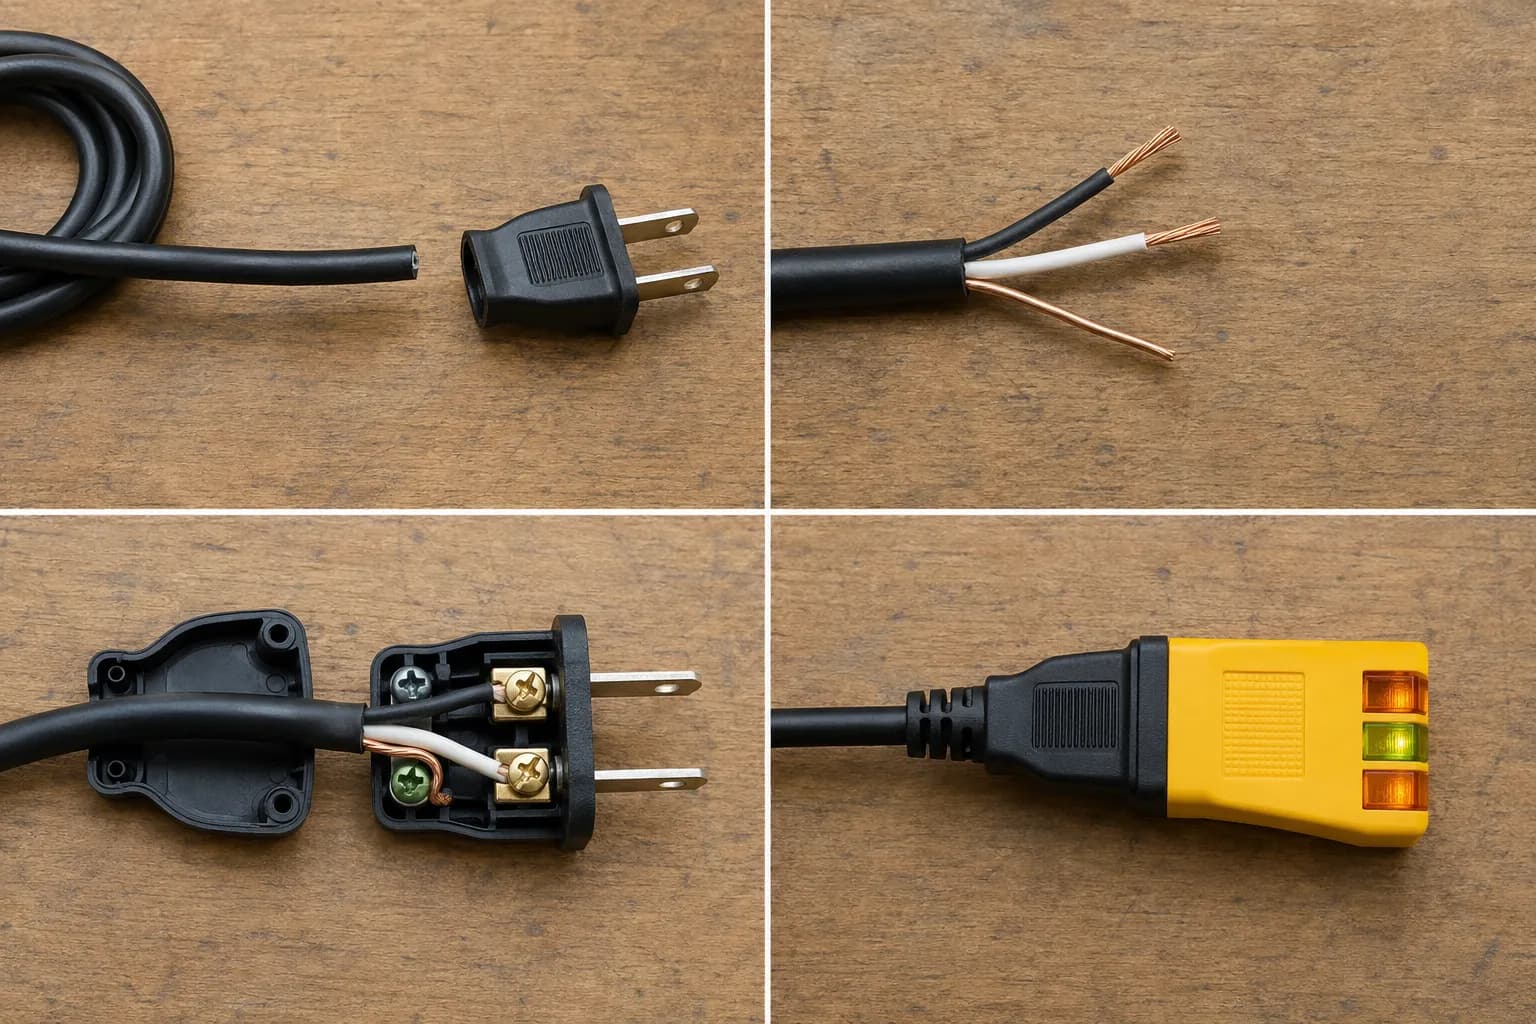
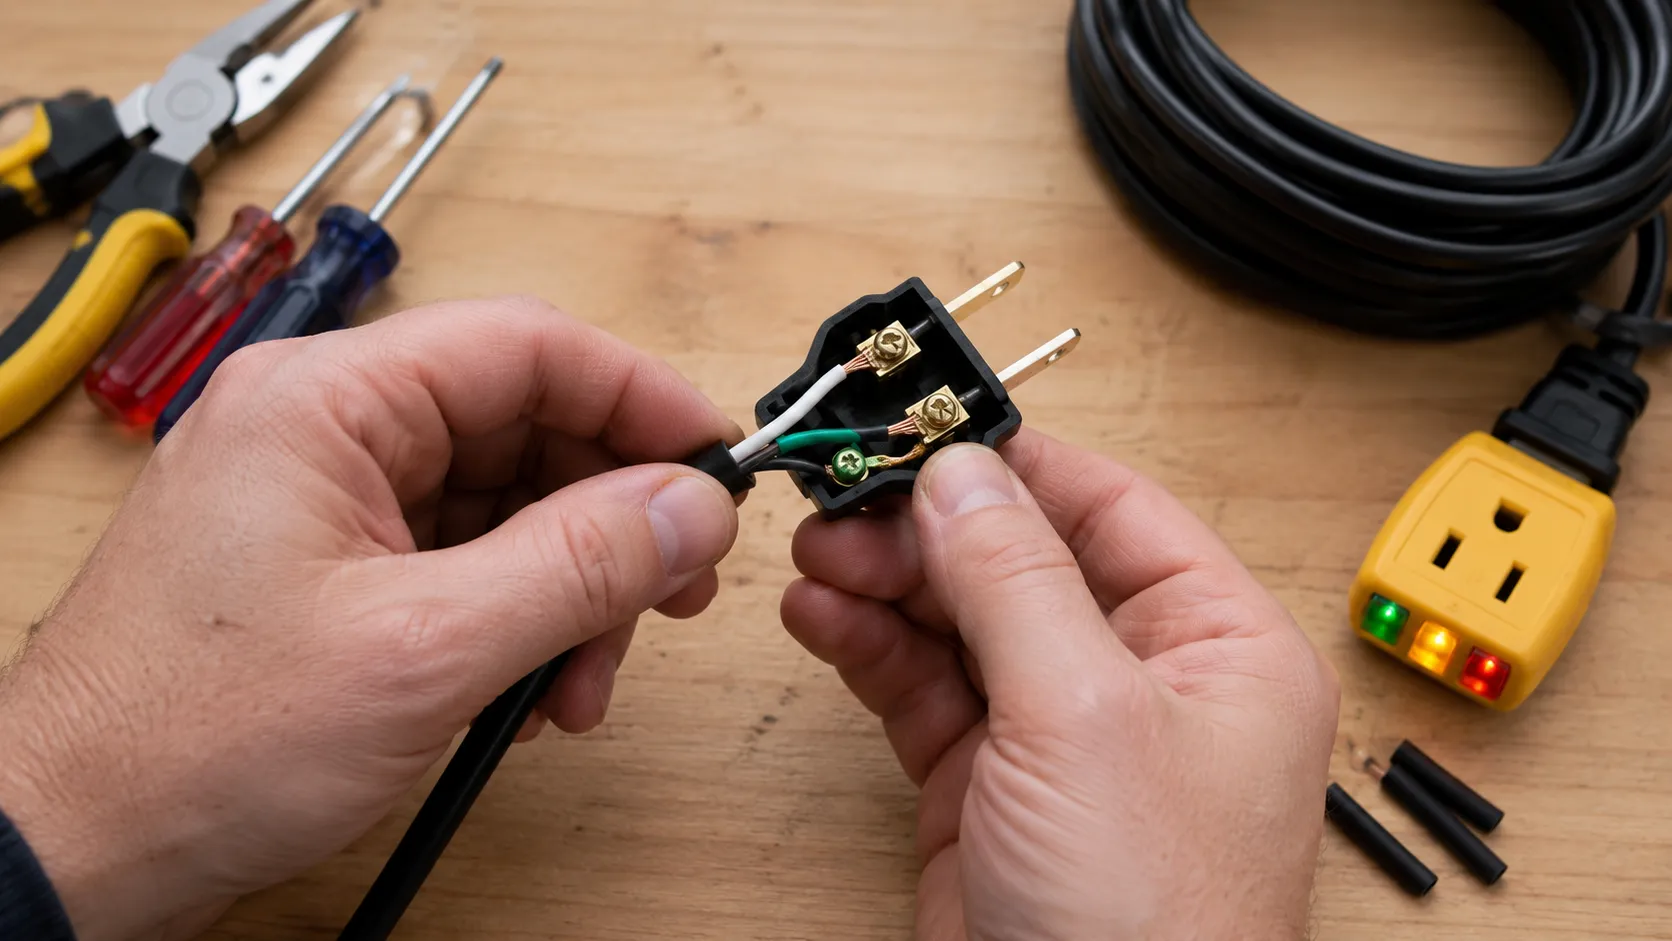
If the tester is wrong: Reversed polarity or an open ground means stop and redo the connections before using the vacuum.
Method Two: Splice Out the Damaged Section the Right Way
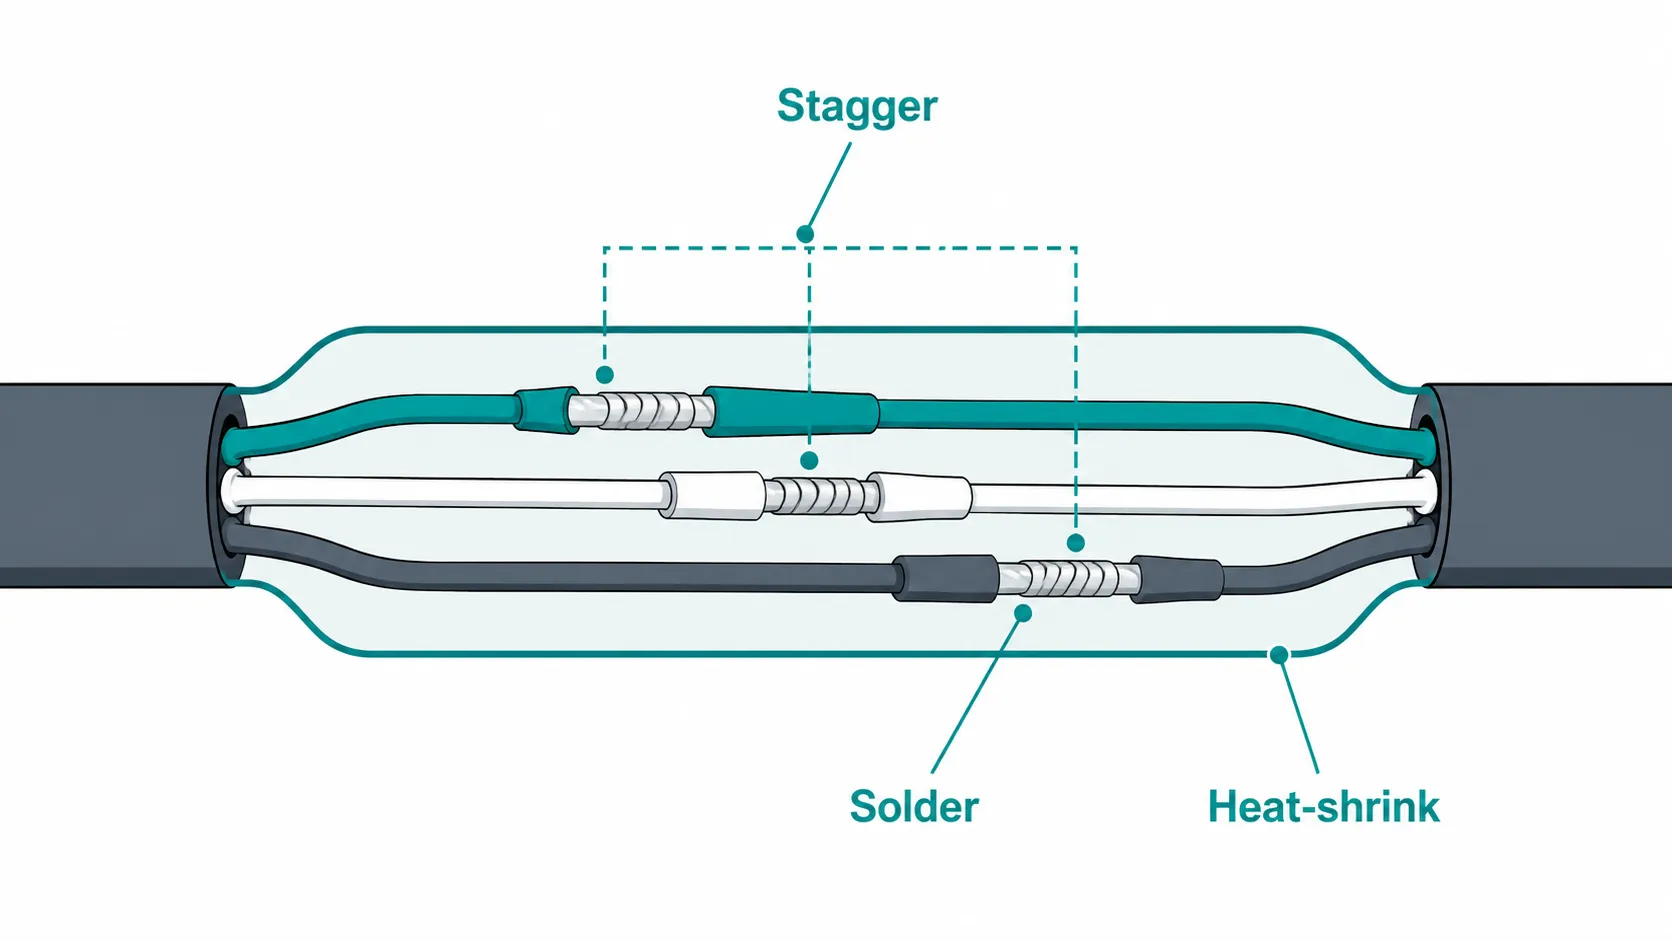
You can splice a vacuum cord, but only if you cut out all the damage, stagger and solder the joints, and insulate each conductor, and for a thin chewed cord, replacing it is usually safer. This is the most misunderstood repair for a vacuum cleaner power cord, because the popular advice ("just tape it" or "drop a choc block in the middle") is exactly what fails.
OSHA's interpretation letters state that tape is not a compliant repair, and that flexible cords below No. 12 gauge, which covers most vacuum cords, should run in continuous lengths without a splice at all.
Never tape a chewed cord: Tape does not restore the jacket or insulation, and a terminal strip ("choc block") spliced into a cord that gets yanked every use is a weak point waiting to pull apart. On a thin vacuum cord, the right answer is usually to replace it, covered next.
If the cord is a heavier rated type and you are repairing it properly, the method that matches OSHA-style cord-repair guidance looks like this.
Cut out the entire damaged section, leaving clean cord on both sides.
Stagger the conductor lengths so the joints sit at different points and bare ends can never touch, the move repair guides call "offsetting the splices."
Twist each matching conductor together and solder it, black to black, white to white, green to green.
Slide a piece of heat-shrink over each conductor individually and shrink it.
Cover the whole repair with one larger outer heat-shrink sleeve, sitting inboard of the strain-relief clamp.
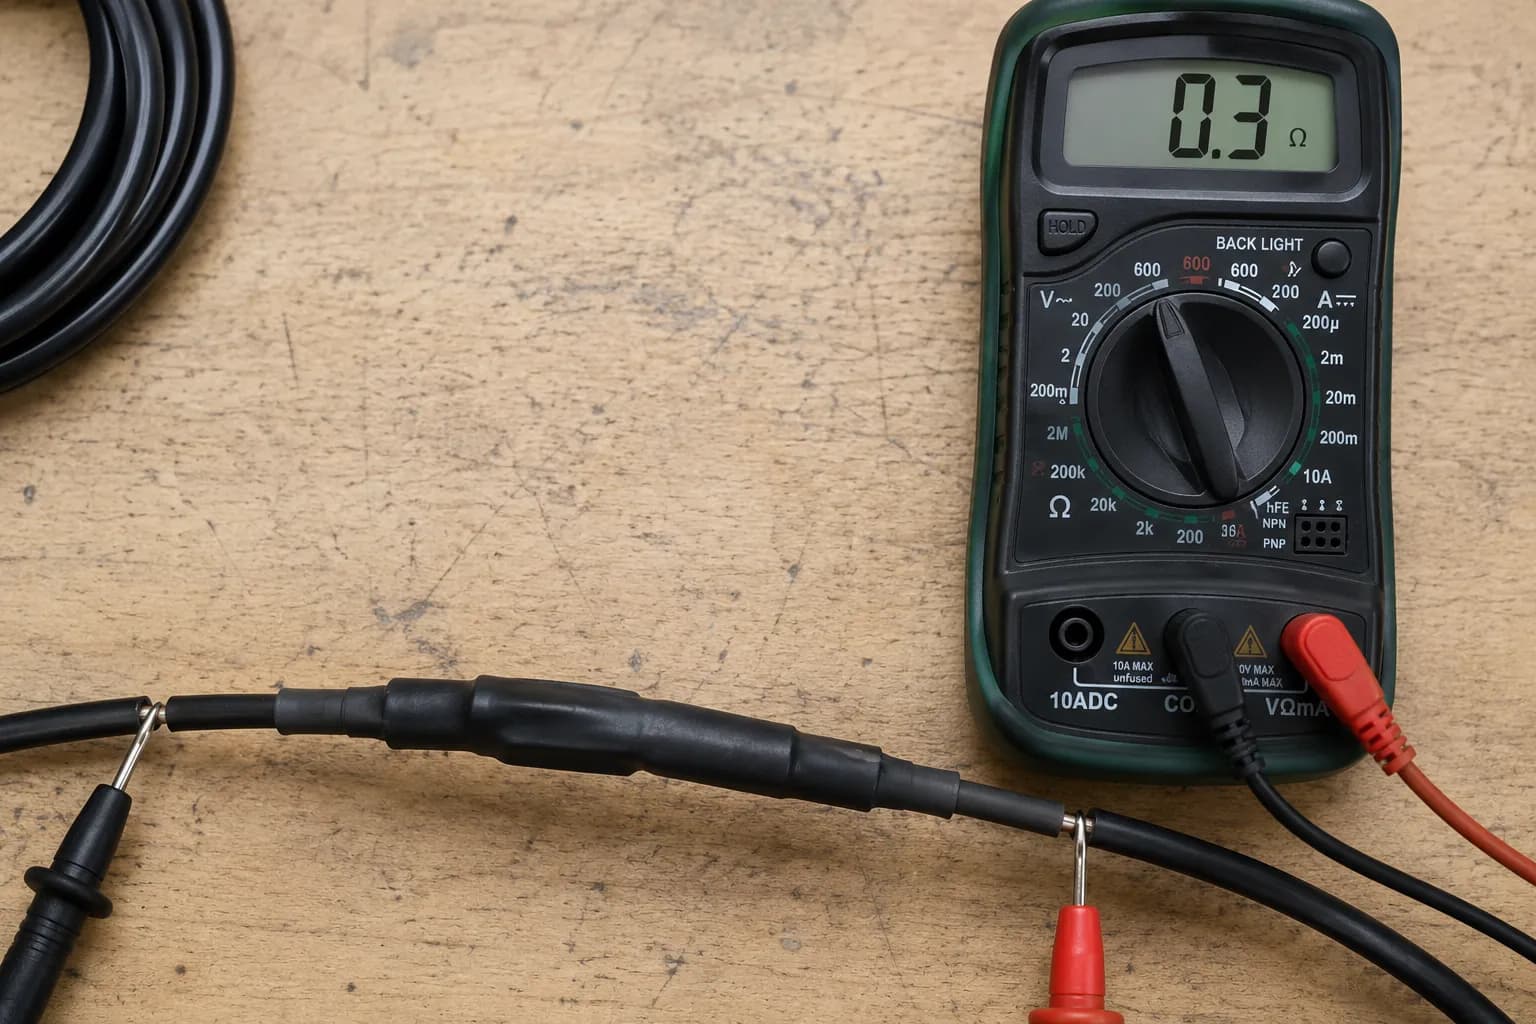
Run a continuity test across each conductor to confirm the splice before use.
I spliced the chewed donor cord exactly this way, staggered, soldered, and double-sleeved, and it tested fine. It was also the stiffest, weakest point on the whole cord, which is why on a vacuum that gets pulled around a house I would still replace the cord instead.
Method Three: Replace the Whole Cord to the Switch
To replace a whole vacuum cord, open the housing, release the cord at the switch or motor terminals, fit a matching-gauge cord, and re-clamp the strain relief. This is the right repair for a vacuum cleaner power cord that is damaged at the body, scorched under the strain-relief clamp, or failing repeatedly.
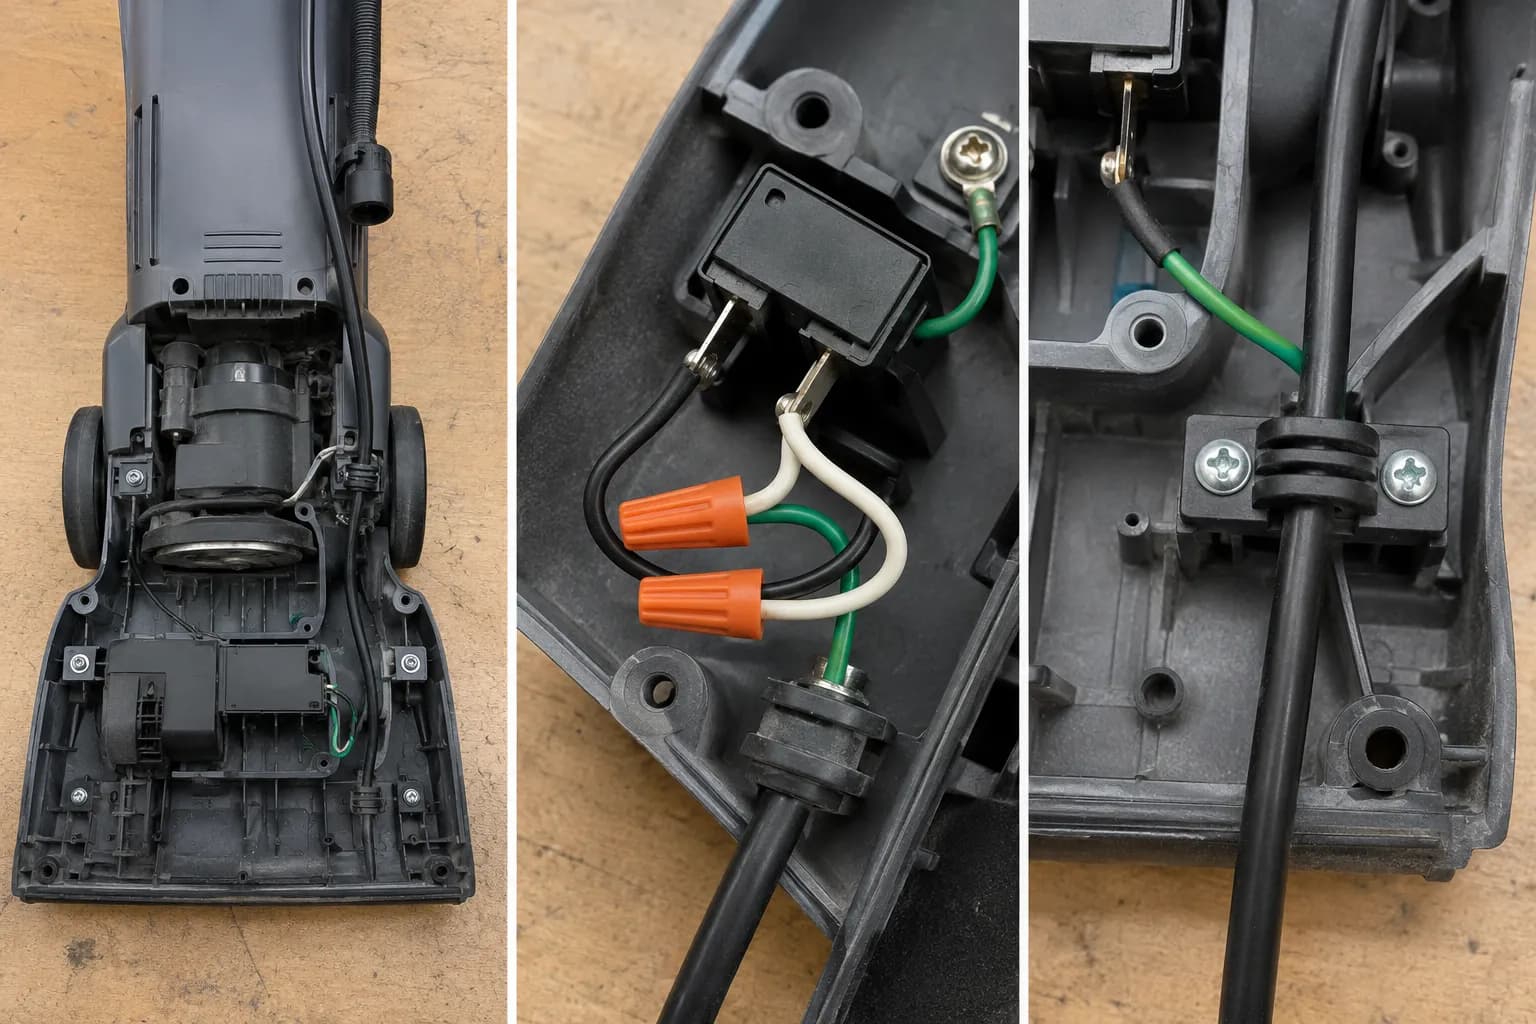
Parts shops sell the replacement cord, but they rarely show the fit, and the detail that actually prevents a repeat failure is re-seating the strain-relief clamp so a future yank loads the clamp instead of the connection.
Take a photo of the cord routing before you remove anything, then work in order.
Unplug the vacuum and remove the base plate or housing screws to reach the switch or motor terminal.
Note the cord routing and where the strain-relief clamp grips before you disturb it.
Release the old cord: unscrew the wire nuts or terminal screws, or de-solder if it is soldered.
Fit the matching-gauge replacement cord, not thin lamp flex, and reconnect by color.
Re-seat the strain-relief clamp so any pull lands on the clamp, not the joints.
Reassemble, then test the cord with the plug tester before use.
Getting to the switch on my test unit took about 45 minutes and more screws than I expected, with the strain-relief clamp tucked behind the cord-entry boss. The teardown order that worked was base plate first, then the rear housing, then the switch cover.
Stop if it is soldered: If the cord is soldered to a circuit board and you are not confident with a soldering iron, this is the point to hand it to a repair shop.
Retractable Cord-Reel Fixes (Won't Retract, Won't Stay Out)
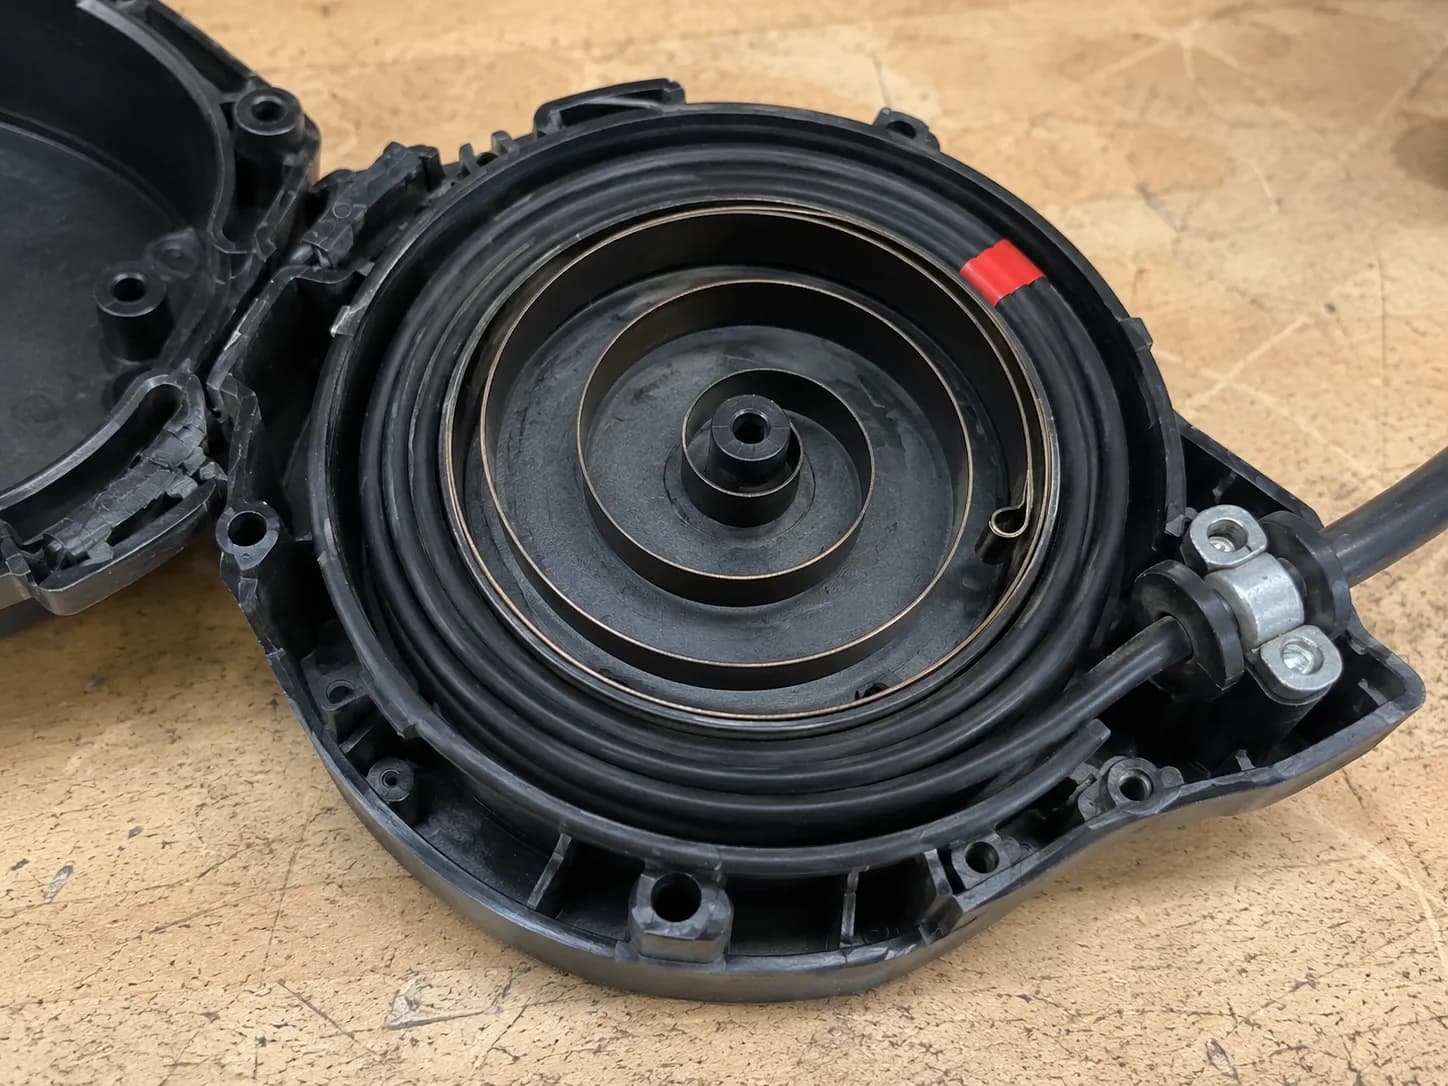
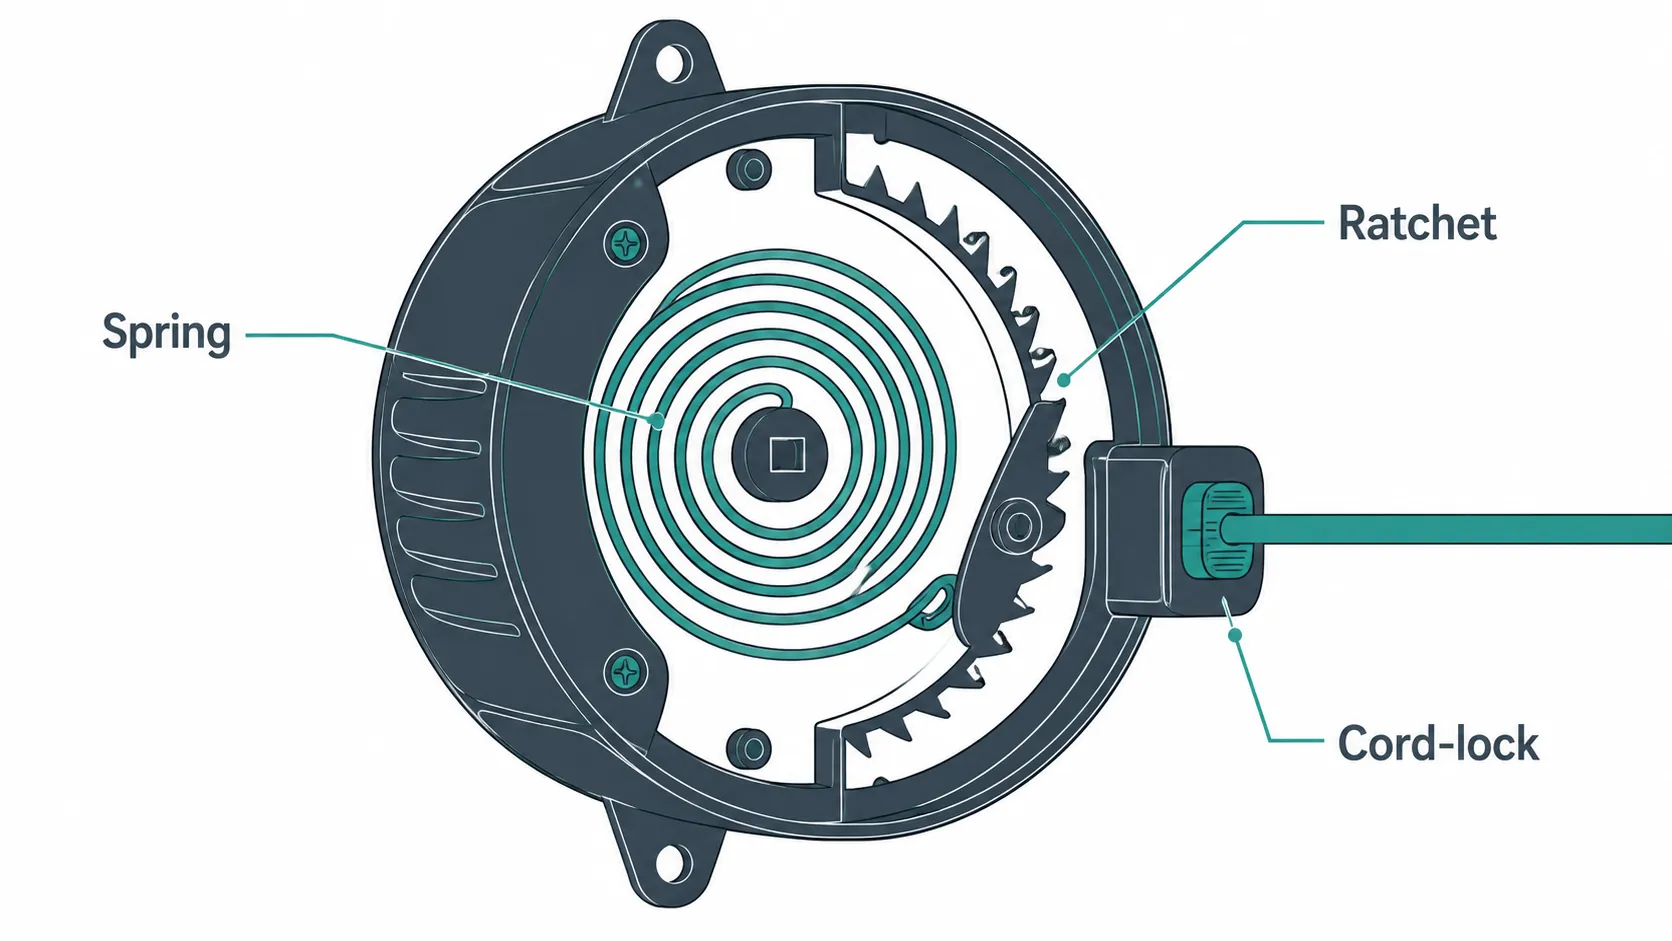
A vacuum cord that will not retract usually means the reel spring disengaged after the cord was pulled past its limit, and fully extending it and releasing slowly resets the spring. A retractable vacuum cleaner power cord adds a spring, a ratchet, and a cord-lock that no top competitor guide covers, which is exactly why this is the section readers can't find elsewhere.
Most reels mark their safe limit with a band of red tape, and pulling past that "red-tape limit" is what disengages the spring in the first place.
Work with the vacuum unplugged.
Fully extend the cord to its red-tape limit, no further.
Release it slowly and evenly so the spring re-catches, rather than letting it snap back.
Check the cord-lock button and clear any debris in the reel path.
If it will not stay out, the cord-lock ratchet is not catching, so inspect and clean it.
Why Does My Vacuum Cord Keep Retracting?
A cord that keeps retracting on its own points to a cord-lock that is not engaging or a spring with too much tension. Clean the lock mechanism first, and if the cord still will not hold, the reel assembly is the fix rather than the cord.
On my test reel, the cord stopped retracting after it had been yanked past the red tape, and fully extending it then releasing slowly re-engaged the spring on the second try. If you open the reel and the spring is visibly broken or unwound, you are replacing the reel assembly, not repairing it.
Plugged In but Dead? When It Isn't the Cord
If a vacuum is plugged in but dead, test the outlet and run a continuity test on the cord first, because a cordless vacuum that keeps shutting off is almost never the cord, it is the battery or a thermal cutoff. A vacuum cleaner power cord is only one of several things that can leave a machine lifeless, and the National Fire Protection Association lists a burning or rubbery smell, sparks, or repeated tripped breakers as signs to stop and call a qualified electrician rather than keep testing.
Run this 60-second isolation check before opening anything.
Symptom | Likely cause | Where to go next |
|---|---|---|
Plugged in, totally dead, cord tests open on a meter | The cord | Use the methods above |
Plugged in, dead, but the cord tests fine | Switch, motor, or internal wiring | Work through the whole machine |
Keeps blowing a fuse or tripping the breaker | A short in the cord or the motor | Check the cord first, then route |
Cordless keeps shutting off or won't power on | Battery or thermal cutoff, not the cord | Run a no-power diagnostic |
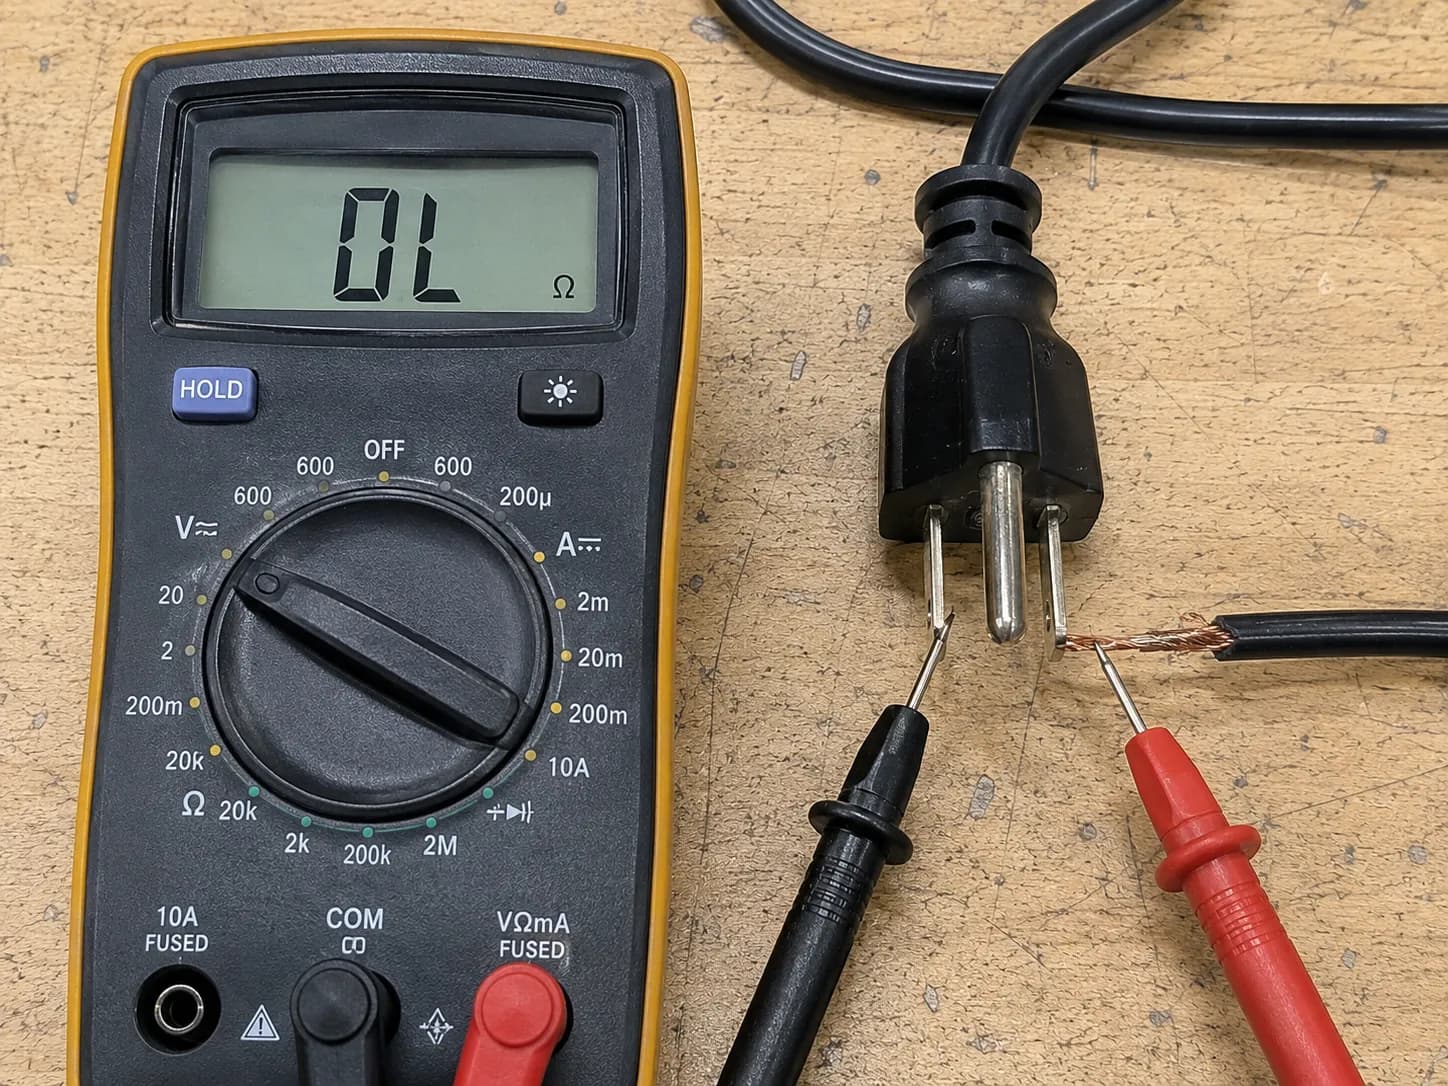
First, plug the vacuum into a known-good outlet and test that outlet with another device, which separates an outlet fault from a vacuum fault. Then run a continuity test across the cord: an open reading confirms the cord, a good reading clears it.
If the cord tests fine and the vacuum still won't run, the next step is our whole-machine troubleshooting walkthrough, which works through the switch, motor, and safety cutoffs in order.
A continuity test across the "dead" cord on my bench read open in under a minute, confirming the cord and not the motor. For a corded or cordless unit that is completely dead with no obvious cord damage, the no-power diagnostic isolates the real cause.
Know when to stop: Repeated tripped breakers after you have checked the cord mean it is time for a professional inspection, not another DIY attempt.
Prevent the Next Chewed Cord and Repair vs Replace
Fixing a vacuum cord costs 20, so repairing it almost always beats replacing the vacuum, unless the cord is melted, the breaker keeps tripping, or the machine is already near the end of its life. Prevention is mostly about how a vacuum cleaner power cord gets handled, and the Electrical Safety Foundation International is blunt that worn or damaged cords should be replaced right away rather than kept in service.
A few habits stop most repeat failures:
Don't run the vacuum over its own cord, the most common way a jacket gets nicked.
Use the cord hook or wind the reel evenly instead of letting it snap back.
Keep the cord away from pets, since a chewed cord is the single most common case I see.
Replace a cord at the first sign of fraying rather than waiting for it to fail.
Here is the measured cost and time for each repair from the bench, so you can weigh it against a new machine.
Repair | Parts cost | Time | Difficulty |
|---|---|---|---|
Replace the plug (cord cap) | $6 | 20 minutes | Easy |
Splice the cord | $9 | 35 minutes | Moderate |
Replace the whole cord | $14 | 50 minutes | Moderate |
My full cord replacement came to about 40 to $70 for a basic upright. Repair wins unless the red flags below appear.
Stop here and replace or inspect: Melted or burnt insulation, a burning smell, repeated tripped breakers, or exposed internal copper mean the cord is past repair. Replace it, and if faults keep recurring after a clean cord swap, get the machine inspected.
So the honest verdict is simple. If the damage is local and the vacuum is otherwise healthy, fixing the cord is the cheaper, faster, and entirely safe choice.
Frequently Asked Questions
Can You Repair a Vacuum Cord?
Yes, a vacuum cord is repairable in most cases, and the right fix depends on where it is damaged. Replace the plug for plug-end damage, splice or replace the cord for a chewed middle, and reset the spring for a reel fault.
Is It Safe to Splice a Vacuum Cord?
Splicing is safe only if you cut out all the damage, stagger and solder the joints, and insulate each conductor with heat-shrink. On a thin vacuum cord that gets pulled around constantly, replacing the cord is the safer and more durable choice.
Can I Use Electrical Tape on a Vacuum Cord?
No, OSHA's guidance is clear that tape is not a compliant repair, because it does not restore the jacket's strength or the conductor insulation. Taping a chewed or cut section hides damage and leaves a shock and fire risk.
Why Won't My Vacuum Cord Retract?
A reel that won't retract usually has a spring that disengaged after the cord was pulled past its red-tape limit. Fully extend the cord, then release it slowly to re-catch the spring, and clean the cord-lock if it still will not wind.
Why Does My Vacuum Keep Blowing a Fuse?
A vacuum that blows a fuse or trips the breaker may have a short in the cord or in the motor. Unplug it, inspect and continuity-test the cord first, and if tripping continues after a clean cord, have the motor or wiring checked.
How Much Does It Cost to Fix a Vacuum Cord?
A vacuum cord repair runs about 20 in parts. In testing, a new plug came to roughly 9, and a full cord replacement about $14, all well under the cost of a new vacuum.
Read it your way
Short on time? Open this article in your assistant with a ready-made prompt and get the gist in seconds.
Found this useful? Make us a preferred source so we show up in your Google results.
Keep reading
Related articles

Troubleshooting & Repair
Roomba Not Working? 8 Symptoms Fixed (2026 Models)
Reboot first, then match your symptom. 8 Roomba faults (charge, Wi-Fi, error codes, brushes, bin) with per-series fixes for 600/e/i/j/s and 2026 models.

Troubleshooting & Repair
How Much Does a Vacuum Repair Cost? Fix or Replace (2026)
How much does a vacuum repair cost? Usually $50–150 (up to ~$321 for central). Use the 50% rule and our brand tier to decide: fix it or replace it in 2026.

Troubleshooting & Repair
Why Won’t My Robot Vacuum Work? 6 Fixes We Tested
Why won’t my robot vacuum work? Reset it, free the wheels, clean the sensors and fix a 2.4GHz Wi-Fi snag in 5 minutes: the DIY checks that skip a repair bill.

Troubleshooting & Repair
Not Broken? Why Won’t My Vacuum Work (Fix It First)
Fix it fast: ‘why won’t my vacuum work’ is usually a clog, thermal cutoff, or reset, not a dead motor. Match your symptom to the exact fix.
The discussion
Comments
Every comment is reviewed before it goes live.