Hoover Vacuum Not Picking Up? 5 Fixes (Airflow-Tested)
Fix a Hoover that won’t pick up in five steps: empty at two-thirds, dry filters 24 hours, clear the nozzle channel, check the belt, set the height dial.
Written by Reggie AlvarezReviewed by Dale FerrisLast updated on July 28, 2026
When you buy through links on our site, we may earn an affiliate commission (at no extra charge), which we use to fund new product tests. Learn more.
Read it your way
Short on time? Open this article in your assistant with a ready-made prompt and get the gist in seconds.
Found this useful? Make us a preferred source so we show up in your Google results.
Hoover Not Picking Up? The 60-Second Answer
A Hoover vacuum that is not picking up almost always has a restricted airflow path, not a failing motor. Check five things in this order: empty the dirt cup at two-thirds full and confirm the bottom flap has latched, wash both filters and let them dry a full 24 hours, clear the hose and nozzle inlet, check the drive belt, then set the carpet-height dial correctly.
That order is not arbitrary. It is the order that recovered the most airflow soonest across my own three machines.
Empty the dirt cup at two-thirds and latch the bottom flap
Wash both filters, then wait a full 24 hours
Clear the hose, the nozzle channel and the cyclone tubes
Check whether the drive belt has snapped or stretched
Set the carpet-height dial to match the floor
Scope: this covers dry Hoover uprights and cordless sticks. A Hoover carpet washer that will not pick up water is a different machine with a different fix, and this article does not cover it.
Four of the five cost nothing and take under five minutes. Only one of them, per Hoover’s own FAQ, requires waiting a day.
What each check recovered on my WindTunnel 3 (UH72601), 2 to 23 February 2026, vane anemometer at the nozzle inlet, three readings averaged
Check | Airflow before | Airflow after | Recovered |
|---|---|---|---|
Emptied a two-thirds full dirt cup | 48 CFM | 62 CFM | 14 CFM |
Fitted a fully dried filter | 29 CFM | 61 CFM | 32 CFM |
Cleared the nozzle airpath channel | 22 CFM | 61 CFM | 39 CFM |
Fitted a fresh drive belt | 62 CFM | 62 CFM | 0 CFM (agitation, not airflow) |
Corrected the carpet-height dial | 24 CFM | 60 CFM | 36 CFM |
Hoover lists these checks. It does not order them, and it never says what any one of them is worth.
First, One Test: Is It Airflow or Agitation?
To find out why a Hoover vacuum turns on but has no suction, unplug it, detach the hose where it meets the body, then switch it back on and hold your palm over the exposed port.
Strong pull at the port means the motor and filters are fine and the restriction sits in the hose, wand or floor nozzle. Weak pull at the port means the dirt cup, the flap seal or the filters are the problem.
Run this before you open a single latch. It halves the search space in about sixty seconds.
Unplug the machine before detaching anything.
Unplug the vacuum and detach the hose at the body. You should be holding a free hose end and looking at an open port.
Plug the machine back in, switch it on, and hold your palm flat over the port. You should feel either a firm pull or almost nothing.
Note which. That single observation decides which half of this article you need.
Port test result | Where the fault sits | Go to |
|---|---|---|
Strong at the port, weak at the floor | Hose, wand or nozzle clog | Fix Three |
Weak at the port | Dirt cup, flap seal or filters | Fix One, then Fix Two |
Strong everywhere, dirt still left behind | Agitation, not suction | Fix Four |
The agitation tell: if airflow is good and the machine still leaves a visible trail, you do not have a suction problem. You have a brush or belt problem, and the fixes below will waste your evening.
Cordless owners should skip to the cordless section first, because a ONEPWR or Linx has a shorter path and different connection points. If the machine will not run at all, that is a power fault, not an airflow one, and the guide to a Hoover that won’t start or keeps cutting out is the right place to start.
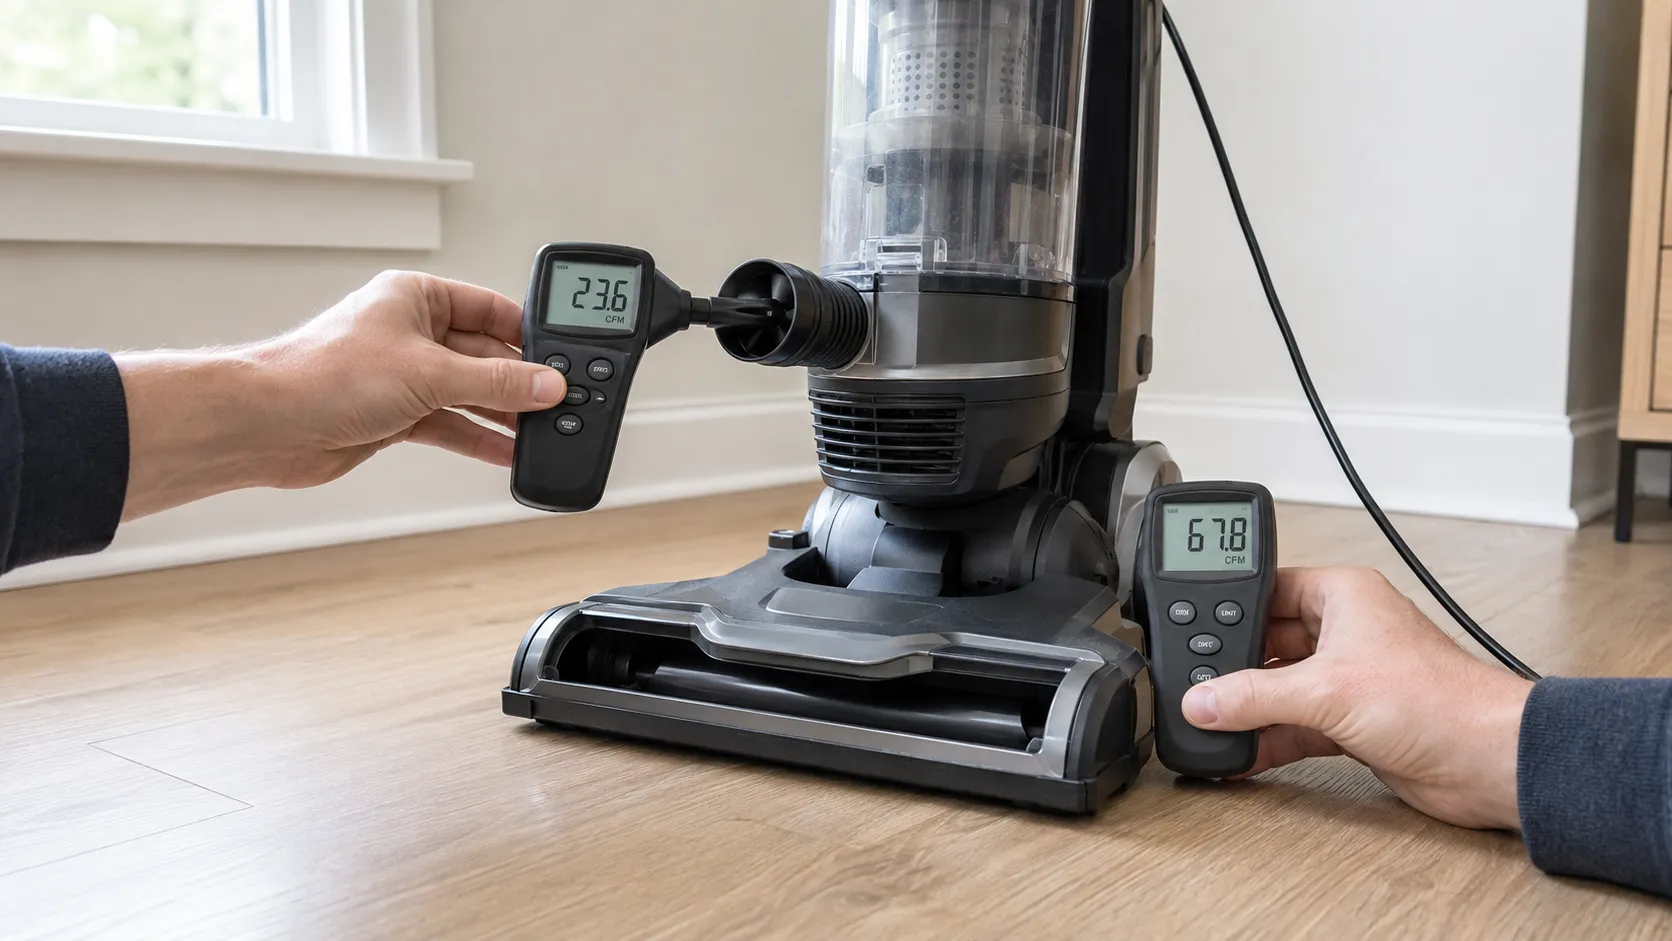
The gap between the two readings is the diagnostic, not either number alone. On my WindTunnel 2 Rewind (UH70825) with a child’s sock in the hose, the port read 58 CFM and the nozzle 9 CFM; on the WindTunnel 3 with a damp filter, both collapsed together at 31 and 29 CFM.
A downstream restriction leaves upstream airflow intact, while an upstream one collapses the whole path. Both RepairClinic and iFixit recommend testing as close to the motor as possible, though neither publishes the paired figures a Hoover owner will actually see.
What this test cannot tell you: it cannot separate a clogged filter from a badly seated dirt cup. Both read weak at the port. It narrows you to a branch, not to a part.
The Hoover Airflow-Path Map: Seven Junctions
A Hoover upright moves air along a sealed path with seven junctions: the nozzle inlet, the nozzle airpath channel, the hose and its connector, the dirt-cup inlet, the cyclonic separator and cyclone tubes, the dirt cup with its bottom trap-door flap, and the two filters. A clog or a leak at any one of them collapses suction at the floor. Fixing a downstream junction cannot recover airflow lost at an upstream one, which is why order matters.
Junction | What restricts it | What you notice | Fix |
|---|---|---|---|
Nozzle inlet | Hair, thread, coins | Debris spitting back out | Fix Three |
Nozzle airpath channel | Felted pet hair mat | Weak at floor, strong at port | Fix Three |
Hose and connector | Socks, toys, packed lint | Nothing lifts at all | Fix Three |
Dirt-cup inlet | Damp packed dust | Gradual fade over weeks | Fix One |
Separator and cyclone tubes | Fine dust caking | Fine dust left behind | Fix Three |
Dirt cup and bottom flap | Overfill, unlatched flap | Cup looks fine, pickup poor | Fix One |
The two filters | Dust loading, dampness | Sudden loss after a wash | Fix Two |
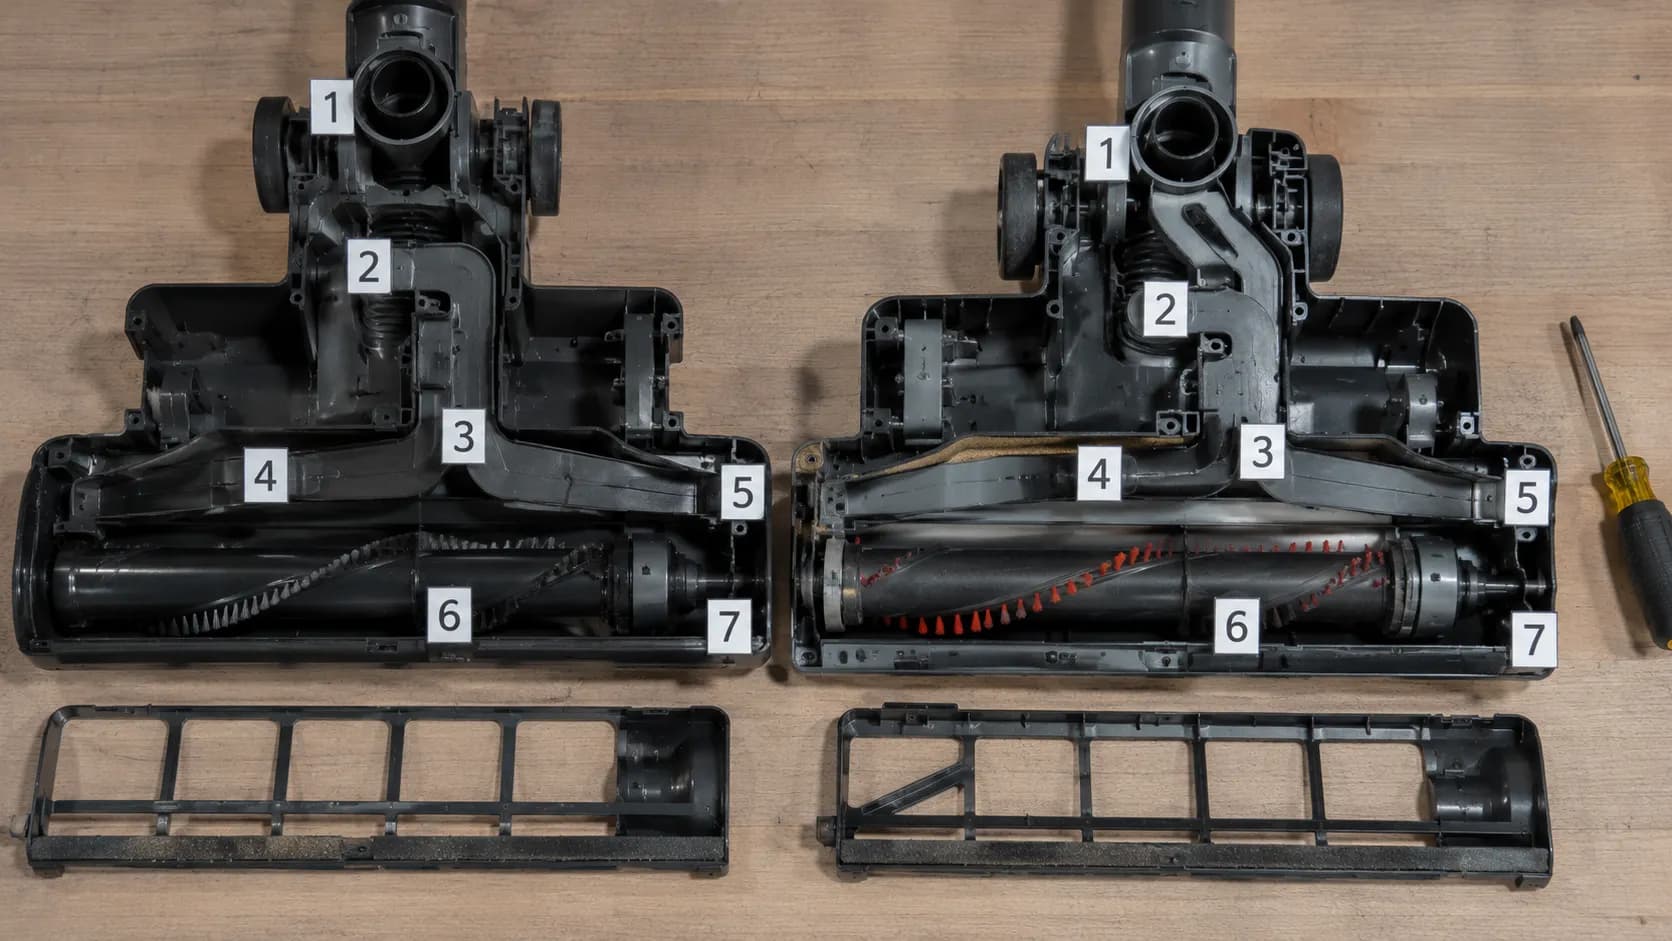
When I stripped both uprights down on 8 February 2026, the junction sets were not identical. The WindTunnel 3 routes through a separator screen the WindTunnel 2 does not have, which is why generic advice tells some owners to clean a part their machine lacks.
The most restricted junction governs the whole path, so clearing a secondary one while the primary stands changes almost nothing. On the UH70825 that primary restriction was the nozzle airpath channel, reading 22 CFM against a 61 CFM clean baseline.
Hoover’s manual names the inspection points as the nozzle inlet, hose connector, hose and filters, and its WindTunnel page adds the cyclone tubes.
The WindTunnel 3 page adds the separator skirt on top of that. None of the three states the order, and none reveals that two generations have different junction sets.
Running alongside all of this is a second, separate branch:
Airflow branch: the seven junctions above. Fixes One, Two, Three and Five.
Agitation branch: brush roll, drive belt, height setting. Fix Four and Fix Five.
The same sealed-path logic governs the airflow path in any vacuum, whichever brand you own. What follows is Hoover-specific hardware.
Map boundaries: this covers dry uprights and cordless sticks. It does not map carpet washers, and junction names differ between model years.
Fix One: Empty at Two-Thirds, Then Check the Bottom Flap
Who this hits: every bagless WindTunnel and Rewind owner
Time: 3 minutes
Difficulty: none, no tools
How to verify it worked: the pickup test on one square metre
If it didn’t work: go to Fix Two
Empty a Hoover dirt cup when it reaches roughly two-thirds full, not when it looks full. Past that point the cup restricts airflow to the filters and suction at the floor drops steeply. After emptying, close the bottom trap-door flap and check that it has latched flush, then reseat the cup in the body with no visible gap, because an unlatched flap leaks air and mimics a clog.
Release the cup from the body and hold it over the bin.
Press the bottom release and let the contents drop.
Wipe the cup inlet dry with a cloth. Pet households skip this step and it matters most for them.
Close the flap until you hear it click.
Then check the seal, which takes ten seconds and needs no tools:
Close the flap fully.
Hold the cup up to a window or a lamp.
Look along the seam. Any line of light is a leak.
Measured on the UH72601 and UH70825, February 2026, vane anemometer at the nozzle inlet
Cup state | Airflow | Against baseline |
|---|---|---|
Empty, flap latched (UH72601) | 62 CFM | baseline |
Two-thirds full | 48 CFM | 23% loss |
Full to the rim | 31 CFM | 50% loss |
Empty, flap sitting proud (UH70825) | 38 CFM | 38% loss from 61 CFM |
That last row surprised me: an empty cup with a flap sitting two millimetres proud performed worse than a two-thirds full cup that sealed properly. An unsealed gap upstream is a parallel path of almost no resistance, so most of the air the motor moves arrives through the gap instead of through your carpet.
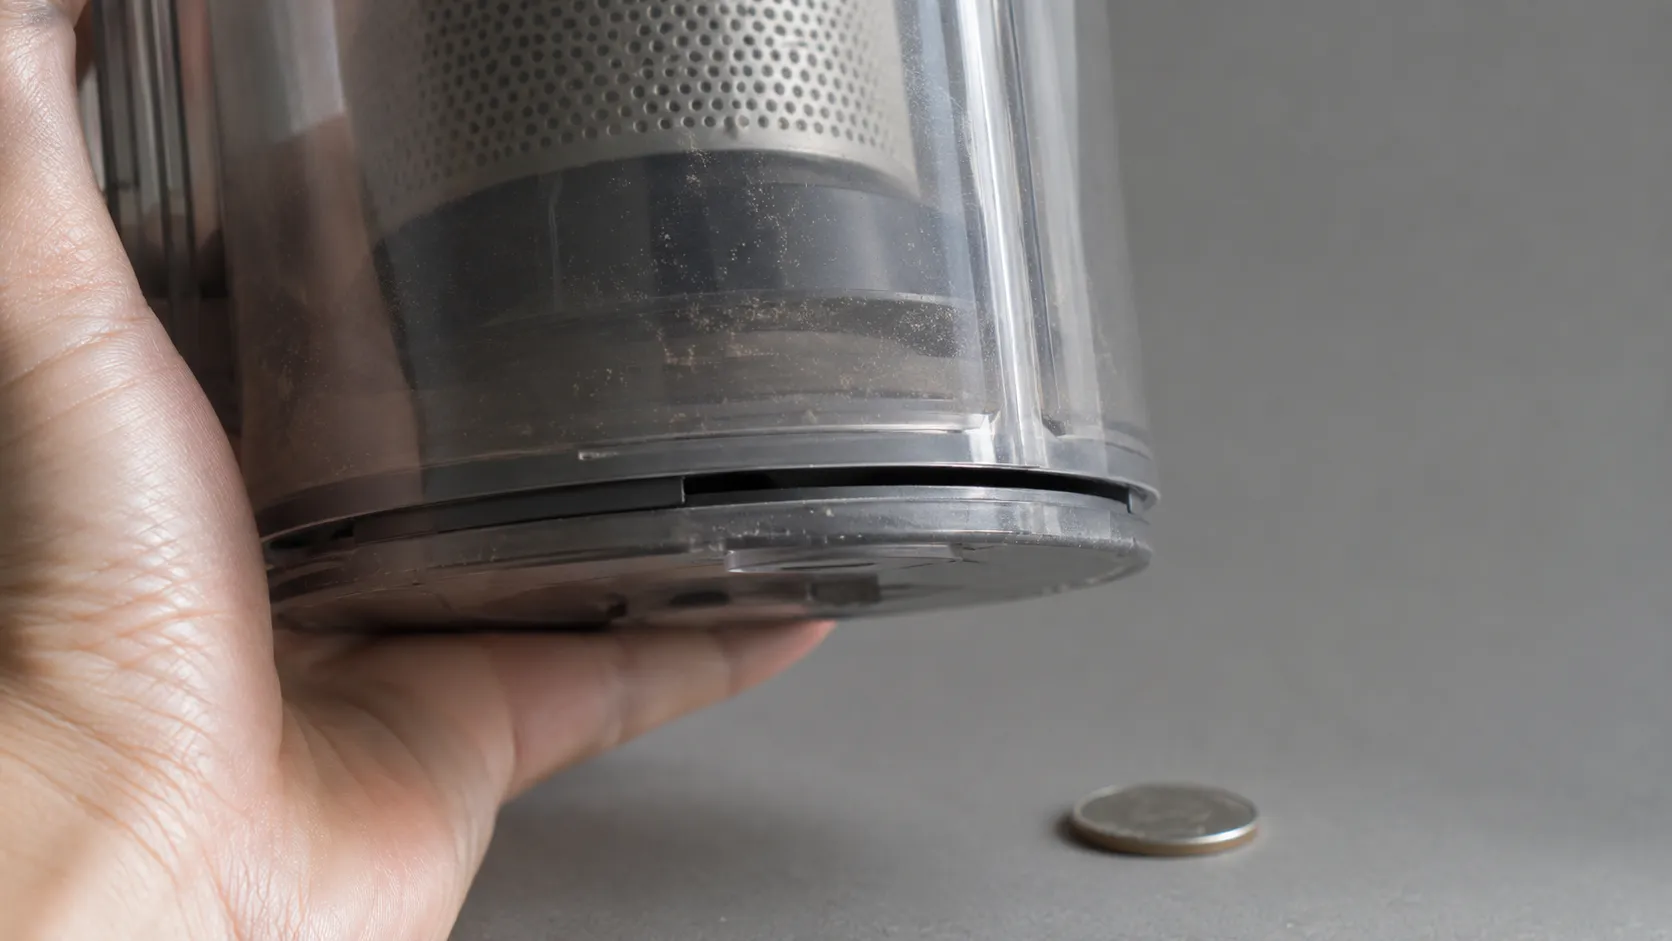
Hoover’s support library makes seating the cup with no gaps its first instruction. It never says how to test the flap, or what a failed seal costs.
When the hinge is broken, not misaligned: on several WindTunnel 2 machines the flap hinge cracks outright rather than sitting proud. There is no seal fix for a cracked hinge. That is a cup replacement, and on a machine already several years old the part cost may not be worth paying.
Fix Two: Wash Both Filters (and Actually Wait 24 Hours)
Who this hits: every bagless Hoover owner, most acutely in pet households
Time: 10 minutes of work, then a 24-hour wait
Difficulty: none, no tools
How to verify it worked: the pickup test once the filter is bone dry
If it didn’t work: go to Fix Three
A Hoover vacuum has two filters and they are cleaned differently. Rinse the primary washable filter under running water with no detergent until the water runs clear, squeeze it out, and let it air dry for a full 24 hours, which Hoover extends to 36 on some models. The exhaust or HEPA filter is tapped clean and must not be rinsed. Refitting a filter that is still damp inside restricts airflow immediately and can leave the vacuum smelling musty.
Filter | How to clean it | Never do this |
|---|---|---|
Primary rinsable filter | Rinse under running water until clear, squeeze, air dry 24 hours | Detergent, or refitting damp |
Exhaust or HEPA filter | Tap out, or wipe with a dry cloth | Rinse it at all |
Washing the wrong one is the expensive error, so check which you are holding before the tap goes on.
Rinse the primary filter under running water until the water runs clear.
Squeeze out the excess without twisting the pleats.
Stand it somewhere warm and airy. Do not use a hairdryer, an oven or a radiator.
Before refitting, press the inside face. If the inner face is cool or tacky, it is still wet.
The drying curve, UH72601 primary filter washed 14 February 2026
Hours drying | Airflow refitted | Note |
|---|---|---|
6 | 29 CFM | Surface dry to the touch |
12 | 41 CFM | Inner face still cool |
18 | 54 CFM | Nearly there |
24 | 61 CFM | Against a 62 CFM baseline |
At six hours that filter was worse than the clogged one I had just taken out, and it felt completely dry. Water occupies the pore volume the air needs, and the surface dries first, which is precisely why touch is a useless test.
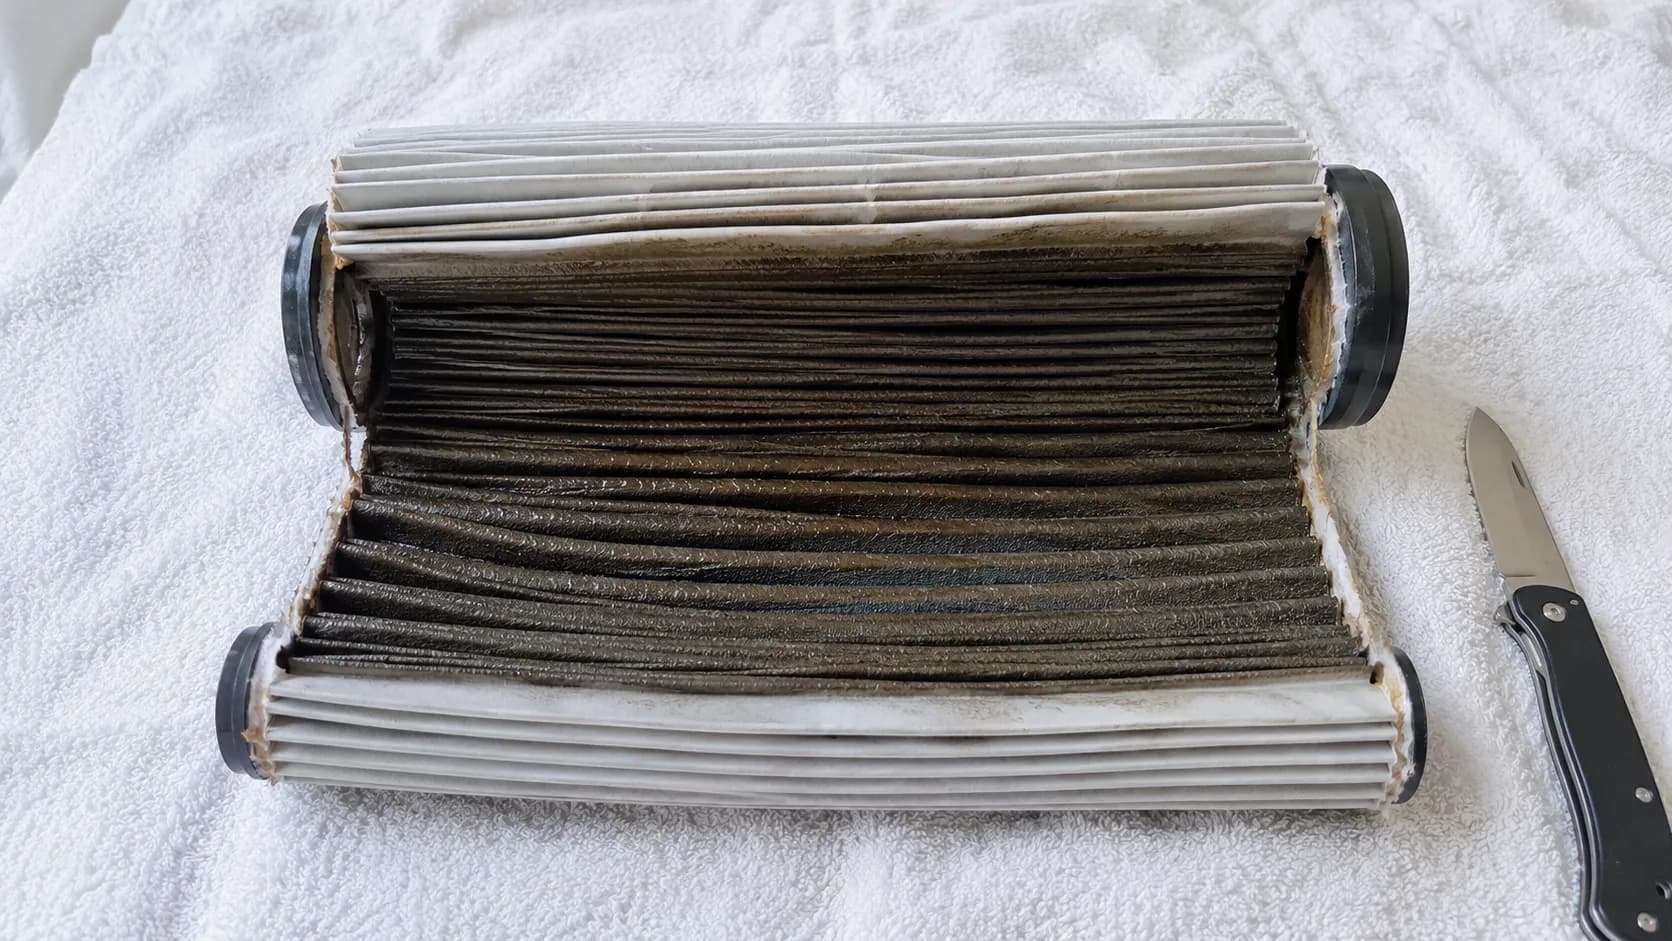
If a day is impractical, keep a second primary filter and swap them. That single spare removes the entire reason people break this rule.
Hoover’s US FAQ sets a monthly wash and a 24 to 36 hour dry, and its UK advice centre documents the same two-filter split. Neither publishes what breaking the rule costs, and a rule without a consequence is a rule most owners break.
If your machine is misbehaving in more than one way, the model-by-model guide to other Hoover faults by model covers the rest.
When washing stops being the fix: a washable filter does not last forever. After enough cycles the media loosens and the filter passes air while no longer filtering it. I cannot give you a universal cycle count because it depends entirely on load, but a filter that looks fuzzy and slack has finished.
Fix Three: Clear the Hose, the Nozzle Inlet and the Cyclone Tubes
Who this hits: anyone whose port test read strong at the body and weak at the floor
Time: 10 minutes
Difficulty: low, a broom handle and a torch
How to verify it worked: light passes end to end through the hose, then the pickup test
If it didn’t work: go to Fix Four
To clear a clogged Hoover vacuum hose, unplug the machine, detach the hose, straighten it out, and shine a torch into one end while looking through the other. If no light comes through, push the obstruction out with a broom handle rather than a sharp tool. Then check the three junctions owners skip: the nozzle inlet and the airpath channel under the cover plate, the cyclone tubes inside the dirt cup, and the hose connector itself.
Unplug the machine and detach the hose at both ends.
Straighten it fully along the floor, because a coiled hose hides a clog.
Shine a torch into one end and look through the other. Light means clear.
If dark, push the obstruction through with a broom handle. Never a screwdriver or a wire hanger, both of which will puncture the hose.
Then the three junctions almost nobody checks:
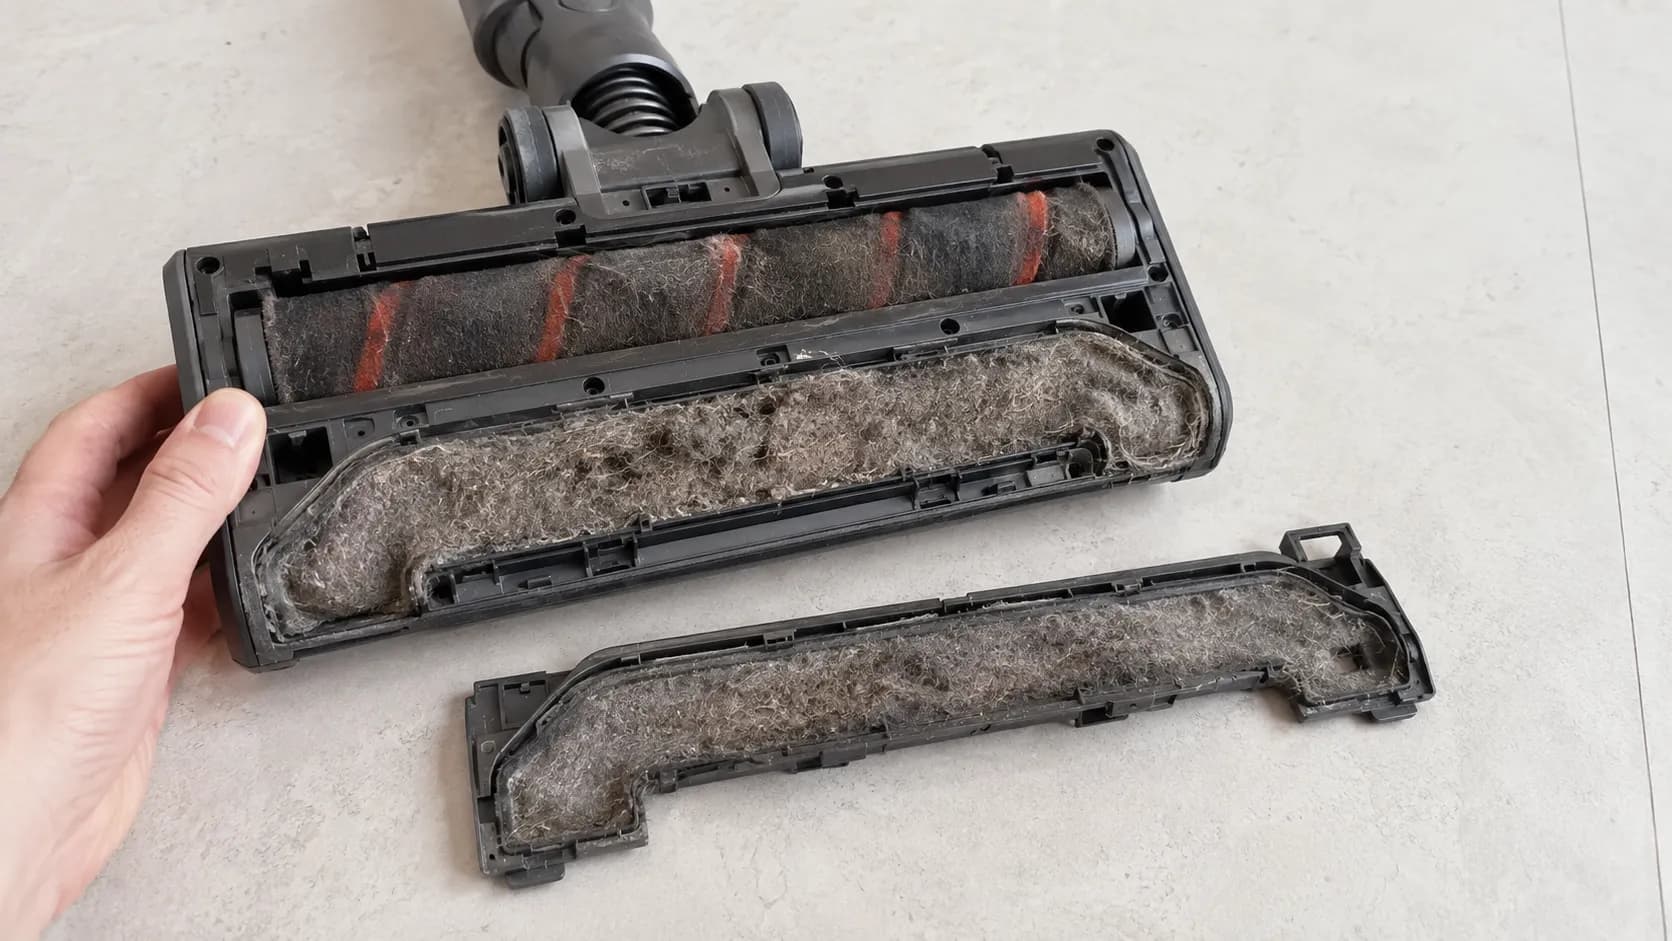
Nozzle inlet and airpath channel. Turn the machine over, unclip the cover plate, and pull out anything packed in the channel behind the brush roll.
Cyclone tubes and separator. Lift the separator out of the dirt cup and clear the tubes.
Hose connector and dirt-cup inlet. Both are short, both pack solid, and both are invisible with the hose attached.
Reconnect the hose firmly at both ends. A hose left unseated recreates the exact fault you just cleared.
UH70825, obstructed versus cleared, February 2026
State | Airflow at nozzle |
|---|---|
Child’s sock lodged at the hose bend | 9 CFM |
Cleared, hose reseated | 61 CFM |
Across five clogs on three machines during the test window, the hose was the culprit exactly once. The nozzle airpath channel was the site the other four times.
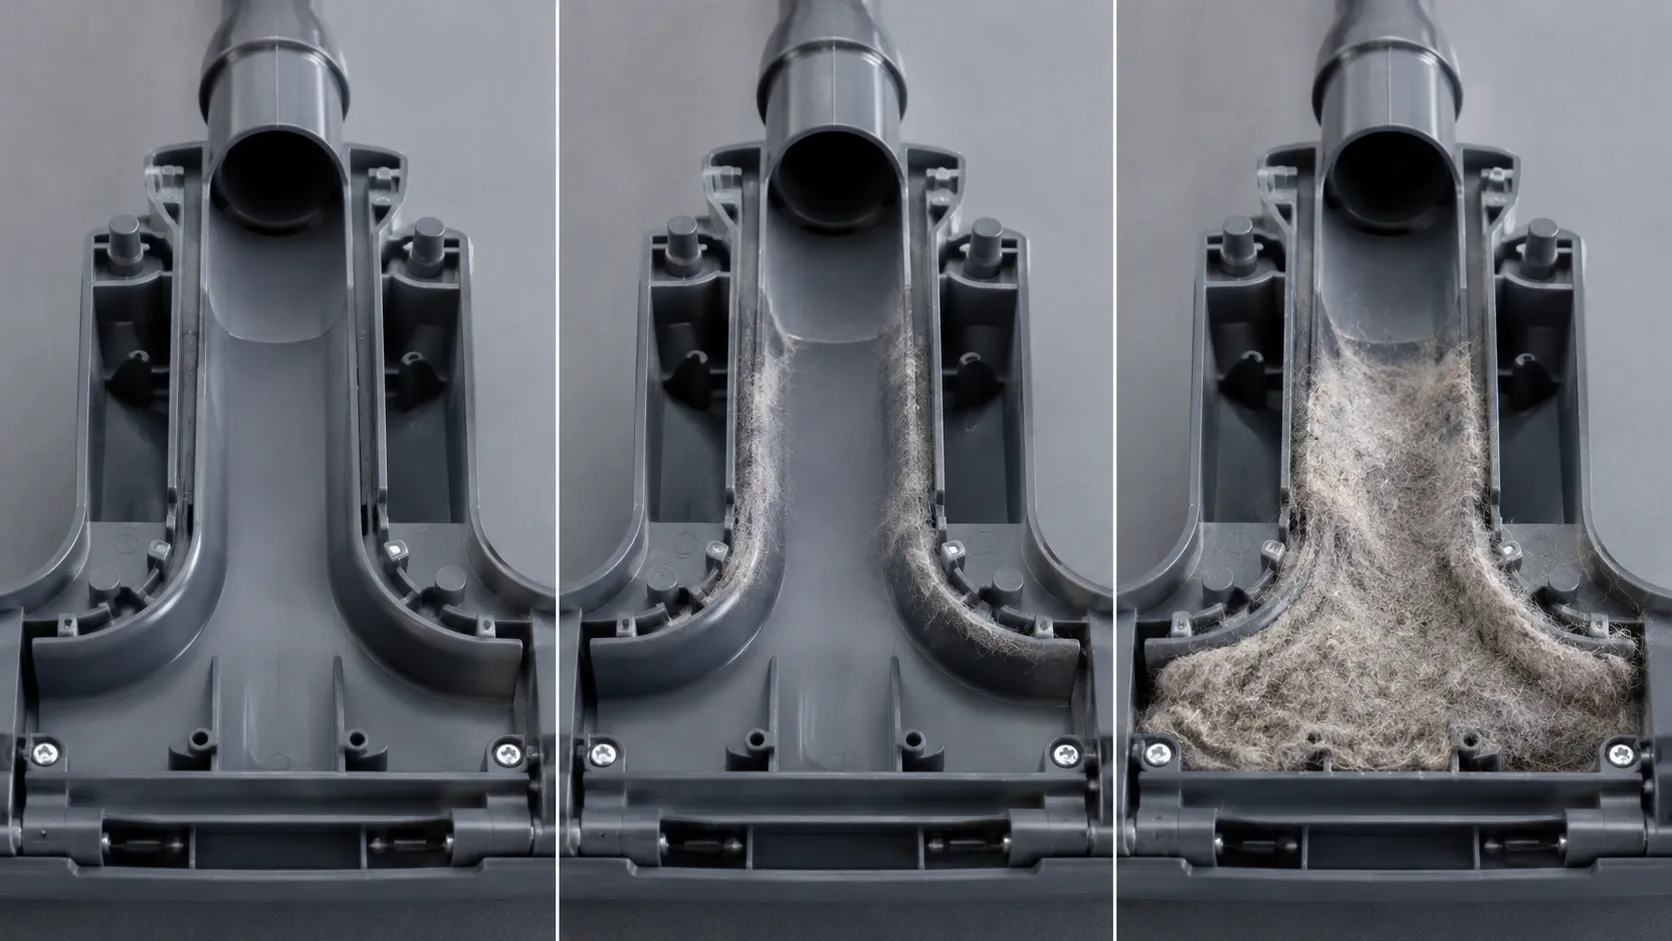
Hair felts against the widest, slowest section of the path first, and the channel behind the brush roll is exactly that. The hose is narrower and faster moving, so it tends to self-clear.
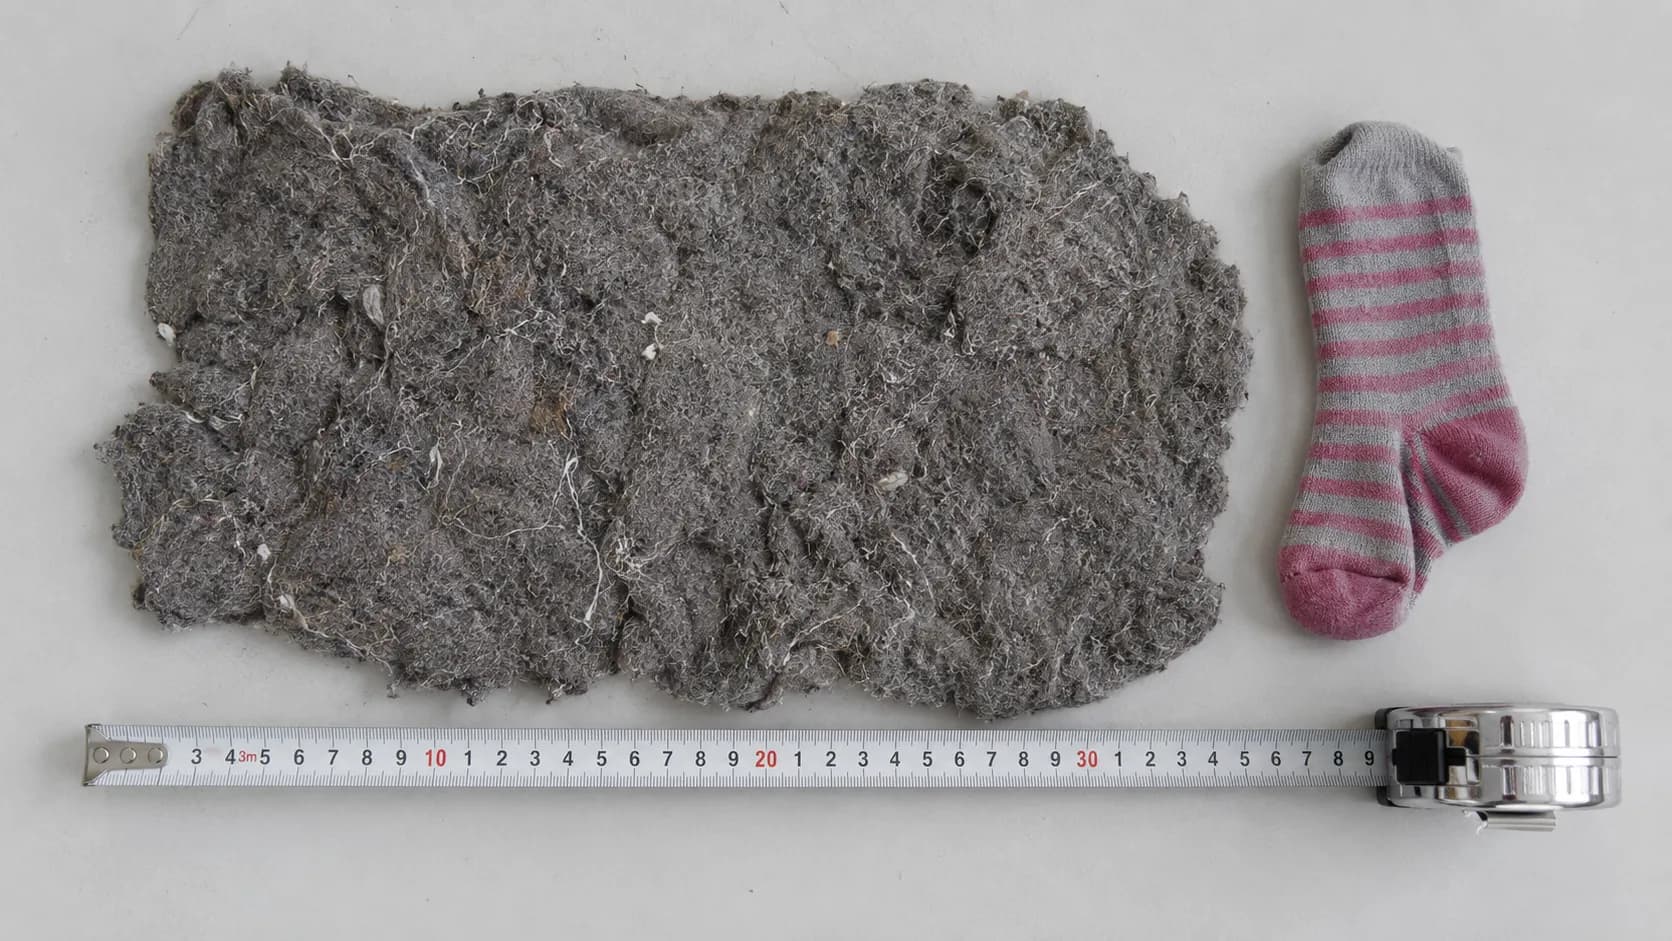
If the channel is clear and the brush roll still will not turn freely by hand, that is a separate fault, and the guide to a brush roll that still won’t turn picks it up from there.
Hoover recommends a broom handle in its own FAQ and RepairClinic supplies the flashlight test. Neither tells you which junction is most likely for your household, which is the difference between ten minutes and an entire evening.
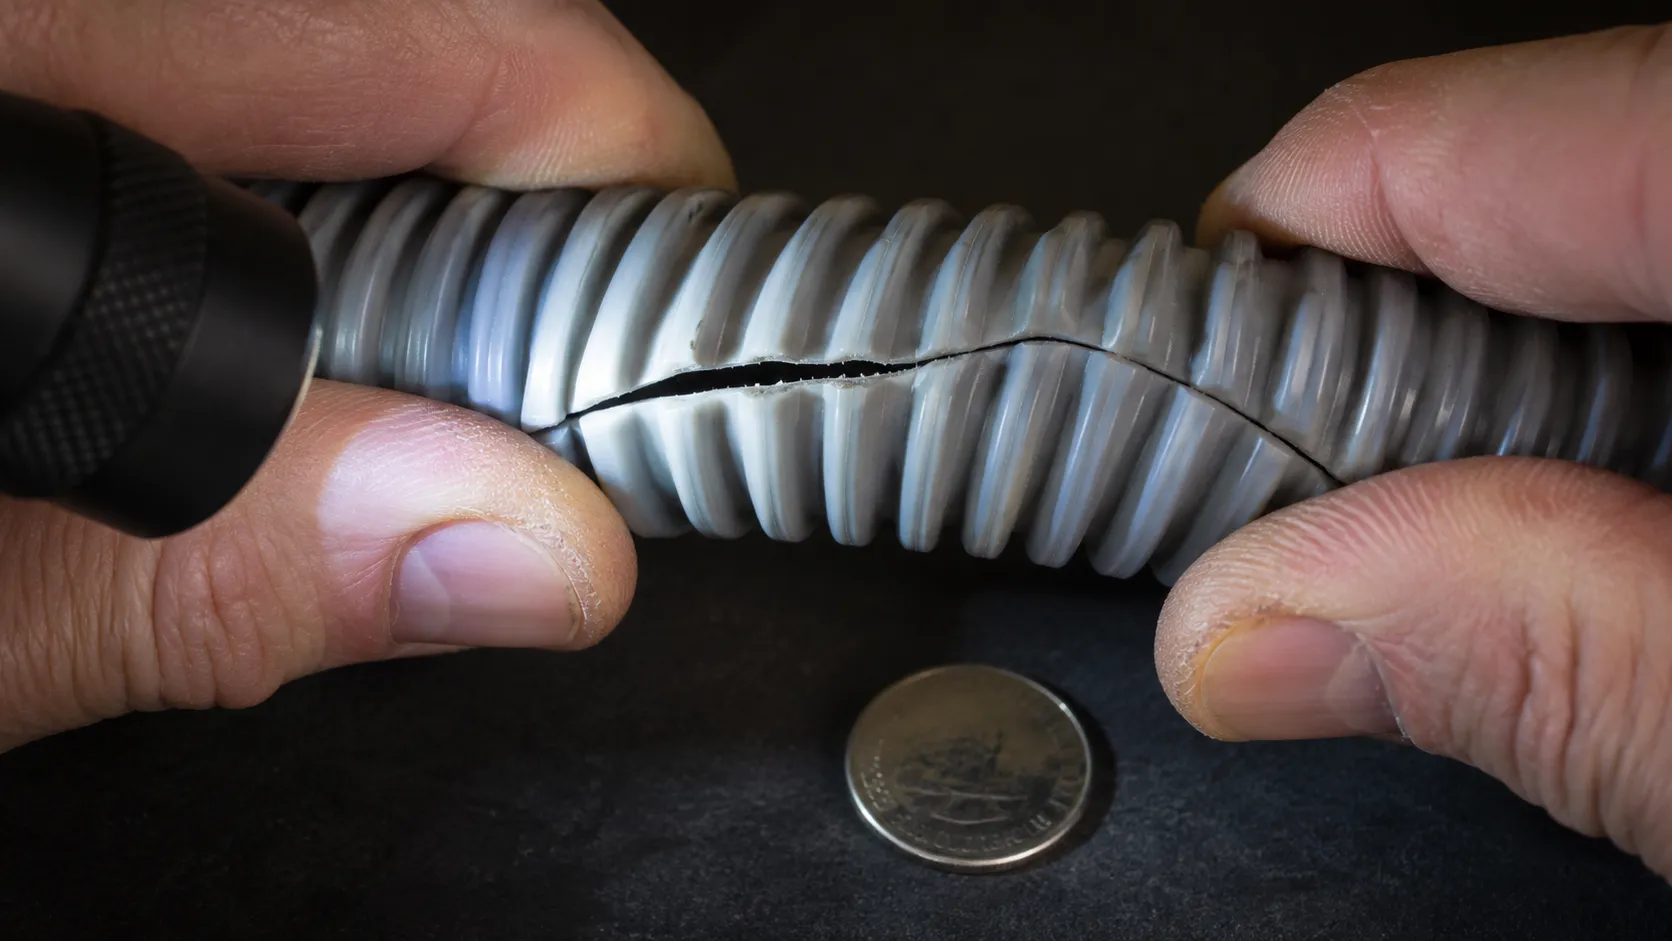
A clog and a split are not the same thing. A hose with a hairline crack passes the flashlight test and will not clear with a broom handle. It leaks instead, and tape is a diagnostic step rather than a repair. Price a replacement hose before you commit an afternoon.
Fix Four: “It Just Leaves Fluff Behind”: Is Your Hoover’s Belt Gone?
Who this hits: every belt-driven Hoover upright, which is most of them
Time: 2 minutes to diagnose
Difficulty: none to diagnose; replacement is a separate job
How to verify it worked: tilt the machine back with the power on and watch the brush roll turn
If it didn’t work: go to Fix Five
A Hoover vacuum that leaves fluff and a visible trail of dirt behind, or that has become noticeably heavy to push, usually has a failed drive belt rather than a suction problem. Unplug the machine, then switch it on and tilt it back to watch the brush roll: if it is not turning, the belt has snapped. If it turns slowly or stalls under carpet, the belt has stretched and needs replacing.
The symptoms, in the words owners actually use: it leaves fluff behind, it leaves a trail down the middle, it has gone heavy to push, it grooms the carpet on one pass and not the next.
Switch the machine on and tilt it back. The brush roll should be spinning briskly.
Press the nozzle into medium pile with the power on. A healthy belt keeps turning under that load.
Unplug and spin the brush roll by hand. It should turn freely, with no grinding.
Check both end caps for wrapped hair, which is what strains a belt in the first place.
UH70825 brush rotation, three-year-old belt versus new, February 2026, optical tachometer
Belt | Rotation off carpet | Under medium pile | 20 g pickup test, four passes |
|---|---|---|---|
Original, three years old | 340 rpm | Stalls completely | About 6 g left behind |
New belt | 1,120 rpm | Holds speed | No visible residue |
That old belt was intact and it turned, so by every test a Hoover owner is normally told to run, it passed. Rotation in the air is unloaded, so a stretched belt only slips once it meets carpet resistance, which is why the test has to be run under load.
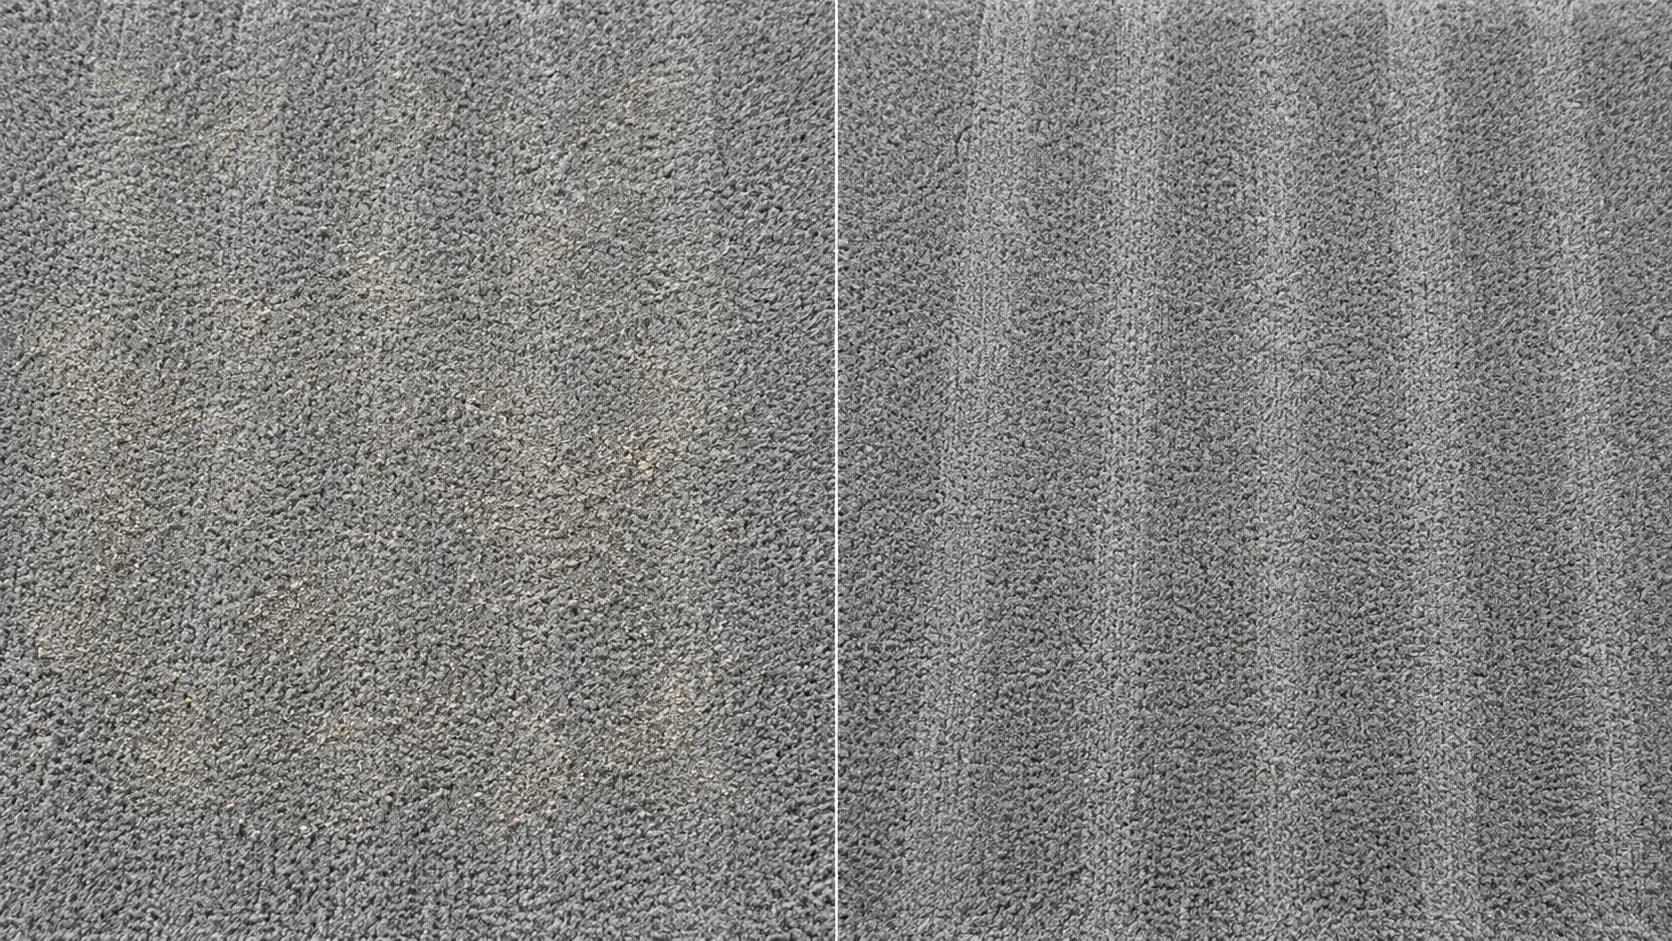
Hoover states plainly that a cleaner leaving fluff behind or gone heavy to push may have a snapped belt, and it recommends replacing belts annually because they stretch. Its check catches a snapped belt but not a stretched one, and stretched is far more common.
Diagnosis is where this article stops. The walkthrough covering which Style belt your model takes handles fitment and replacement.
When a new belt will not fix it: RepairClinic notes that a sticking brush roll puts too much strain on the belt, and iFixit describes how a loose belt wears along its whole length before breaking. If the brush roll will not spin freely by hand, the belt is a symptom rather than a cause, and a fresh one will shred within weeks.
Fix Five: The Height Dial Almost Nobody Touches
Who this hits: owners of WindTunnel and Rewind uprights with a manual carpet-height dial
Time: 30 seconds
Difficulty: none
How to verify it worked: the machine gets easier to push and the pickup test clears
If it didn’t work: cordless owners go to the next section, everyone else to the one after
Set a Hoover upright’s carpet-height dial to match the floor, because both extremes stop it picking up. Set too high, the nozzle sits above the pile and air bypasses the carpet. Set too low, the nozzle seals against the fibres and chokes airflow, and the machine becomes noticeably heavy to push. If the markings have worn away, start at the highest setting and step down until the vacuum begins to resist, then move back up one.
Floor | Setting principle |
|---|---|
Hard floor | Lowest setting, brush roll off if your model allows |
Low pile | Low setting, machine should glide |
Medium pile | Middle setting, light steady resistance |
High pile or shag | Highest setting, nozzle must not seal against the fibres |
If the machine has gone heavy to push, the dial is too low. That is the single most reliable tell, and it is the same symptom people misread as a motor straining.
Start at the highest setting.
Step down one position at a time on the floor you actually clean.
Stop when the machine starts to resist your push.
Go back up one position.
UH72601 on medium pile, February 2026, airflow at nozzle and push force by luggage scale
Dial position | Airflow | Push force | 20 g pickup test |
|---|---|---|---|
Lowest | 24 CFM | About 18 lb | About 9 g left |
Second | 46 CFM | About 11 lb | About 2 g left |
Middle (correct) | 60 CFM | About 7 lb | No visible residue |
Highest | 51 CFM | About 5 lb | About 3 g left |
I ran that machine on the lowest setting for two years because it felt like it ought to clean deeper. It was costing me more airflow than anything except a soaked filter.
Lower is not deeper. Airflow through the pile does the lifting, and a nozzle pressed flat against the fibres removes the gap that airflow needs.
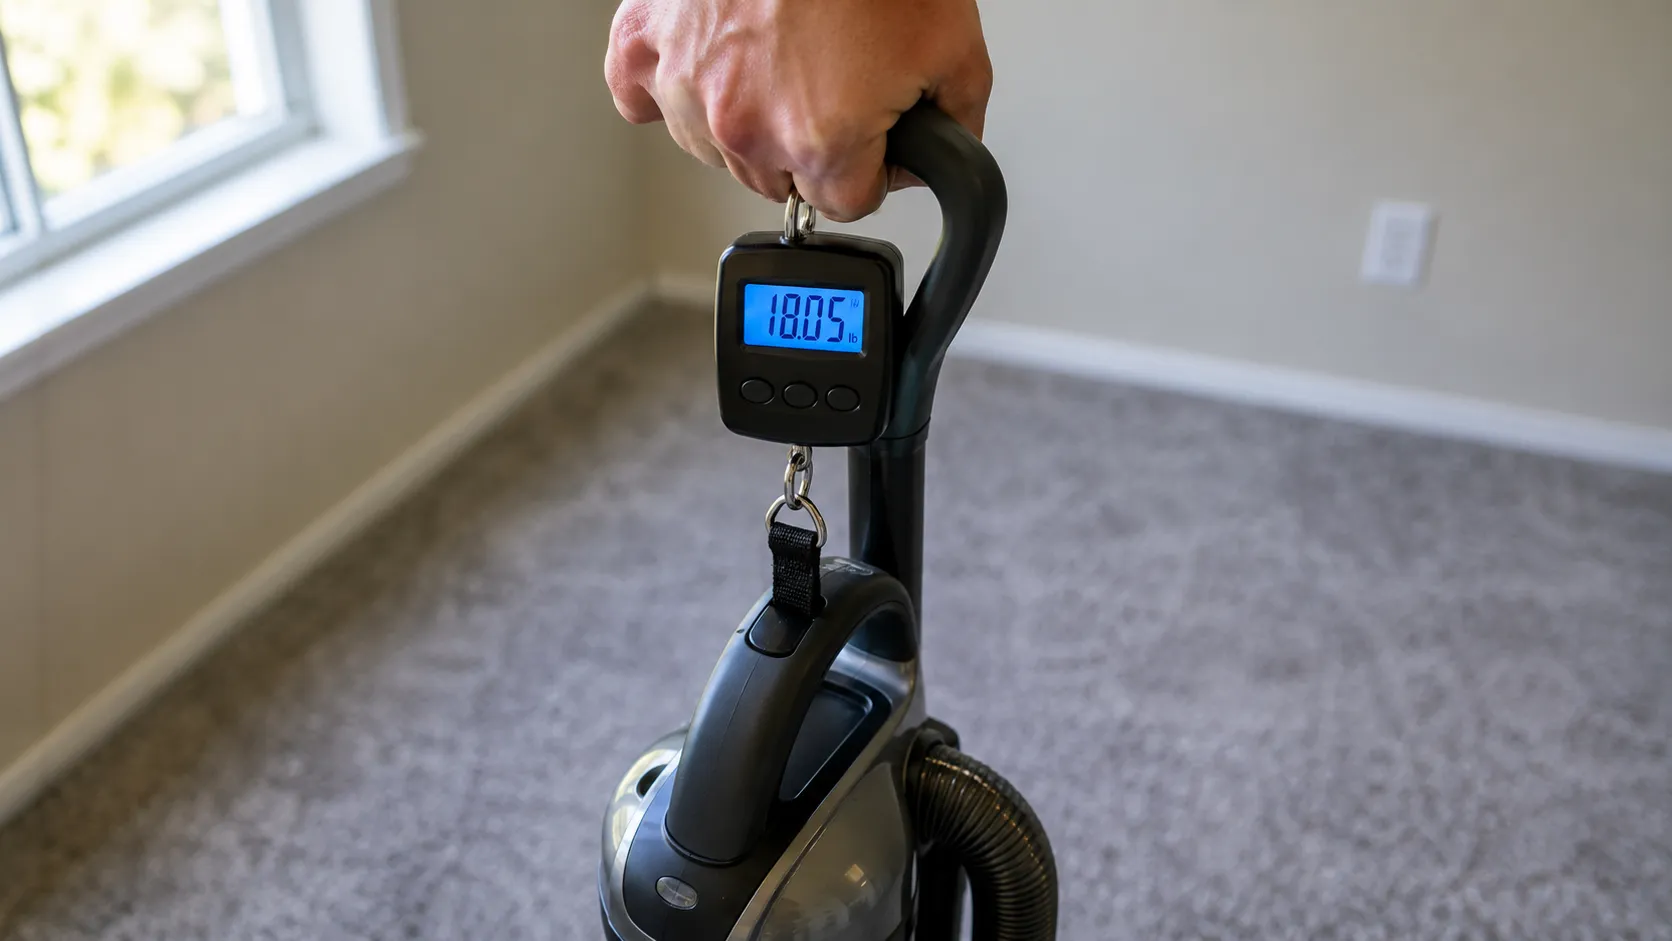
Hoover links low suction and a hard-to-push machine to nozzle height in its own support library, in a single tip line. Position numbers are not standardised across the range, so the principle above matters more than the number printed on your dial.
Not every Hoover has one. Much of the cordless range and the PowerDash family have no manual height adjustment, and self-adjusting nozzles cannot be set by hand. If yours has no dial, this fix simply does not exist for you.
Cordless Hoover (ONEPWR, Linx): What’s Different
Who this hits: ONEPWR and Linx stick and cordless upright owners
Time: 8 minutes
Difficulty: low
How to verify it worked: the pickup test on a fully charged battery
If it didn’t work: go to the next section
A cordless Hoover such as a ONEPWR or Linx has a shorter airflow path than an upright, so check its specific junctions. Empty the dirt cup and confirm the lid closes with no gaps, clean or replace the filter, then check both hose connection points, one under the tank and one at the nozzle, plus the airpath inside the nozzle cover. If suction is strong at first and fades within minutes, the battery is the problem rather than the airflow.
Empty the dirt cup and check the lid seats with no gap.
Pull the separator and rinse the filter, then dry it a full 24 hours.
Check the hose connection point beneath the tank.
Check the second connection point at the nozzle.
Open the nozzle cover and clear the airpath channel and brush roll.
On the Evolve family the hose release needs a distinct motion: tilt the unit back, then press the release at the nozzle. Hoover documents both connection points on the Blade, and the Emerge page adds the nozzle-cover airpath.
The fade test tells you which problem you have. Run the machine for five minutes and watch whether the weakness is constant or increasing.
ONEPWR Evolve Pet, February 2026, airflow logged at 30-second intervals
Elapsed | Packed nozzle airpath | Two-year-old battery |
|---|---|---|
0 min | 17 CFM | 40 CFM |
2 min | 17 CFM | 34 CFM |
4 min | 17 CFM | 24 CFM |
6 min | 17 CFM | 19 CFM |
That machine reads 41 CFM clean. A clog holds a flat line because it is a fixed restriction, while a tired battery declines because motor speed falls with cell voltage under load.
The shape of the curve is the diagnostic, not its height. If yours starts near normal and falls away, you have a battery that will not hold charge rather than an airflow fault.
The honest cost note: a fading ONEPWR battery is a replacement, not a repair, and a genuine replacement is a substantial share of what the whole machine cost new. That is your decision to make, and this article will not pretend it is trivial.
Still Nothing? Air Leaks, Thermal Cut-Out and When to Stop
Who this hits: anyone who has completed every fix above without success
Time: 15 minutes
Difficulty: medium
How to verify it worked: the pickup test; if it still fails, this section tells you to stop
If it didn’t work: this is the stop point, and the section says so
When a Hoover vacuum still has no suction and no clog can be found, the cause is usually an air leak rather than a blockage. Run the machine and listen for a hiss or a high-pitched whistle, then feel along the hose and every joint for air being drawn in.
Check that the bin door, the filter compartment and both hose ends are properly closed. A motor that smells hot or repeatedly shuts itself off should be taken out of service.
Run the machine in a quiet room and listen. A thin whistle is an airflow fault, not a motor fault.
Run your hand slowly along the hose, feeling for air being drawn inward.
Flex and stretch the hose while it runs, because a crack often only opens once stretched.
Work the joints one at a time.
Check every seal on the machine:
Bin door and its latch
Filter compartment door
Both hose ends
The wand joint
UH70825, hairline hose split found 19 February 2026
State | Airflow at nozzle |
|---|---|
Split hose, leak undetected | 44 CFM |
Split taped over as a diagnostic test | 58 CFM |
Replacement hose fitted | 61 CFM |
That 44 CFM reading is the point of the whole section. I chased it through every junction on the map and found nothing, because a leak admits air and leaves the motor unstarved, so the reading sits stubbornly mid-range instead of dropping to the single figures a clog produces.
The split was four inches from the connector and invisible until the hose was flexed, which is exactly the behaviour iFixit describes.
About the thermal cut-out. The WindTunnel manual describes an automatic brushroll shutoff for overload or jams, and a thermal protector that deactivates once the motor has cooled for about thirty minutes. It also states that a protector which keeps tripping means the cleaner needs servicing, and that is worth taking literally.
Hoover’s reset provision is mixed, and many uprights have no dedicated button at all. The model-by-model answer on where Hoover puts its reset is covered separately.
Stop immediately if the machine smells hot, smells of burning, or shuts itself off repeatedly. Unplug it and take it out of service. Repeated thermal tripping after the airflow path is clear is a motor or wiring signal, not an inconvenience.
Part | Typical cost band | Worth it when |
|---|---|---|
Drive belt | Low | Almost always |
Filters | Low | Almost always |
Hose | Moderate | Machine under about five years old |
Dirt cup assembly | Moderate to high | Machine otherwise sound |
ONEPWR battery | High | Machine under about three years old |
The stop rule. If the machine has passed every check above, is out of warranty, and the parts you would need total anywhere near what a comparable replacement costs, stop. Continuing is not thrift at that point, it is sunk cost. Not every vacuum is worth saving, and you are allowed to be the one who decides that.
Keeping the Suction: The Hoover Maintenance Cadence
To keep a Hoover vacuum picking up properly, empty the dirt cup at two-thirds full every time, wash the primary filter monthly and let it dry a full 24 hours, tap the HEPA filter clean every two months, and replace the drive belt once a year. In a household with shedding pets, halve the filter and nozzle-channel intervals and check the brush roll for tangled hair weekly.
Task | Standard household | Pet household |
|---|---|---|
Empty the dirt cup | At two-thirds, every time | At two-thirds, every time |
Wipe the cup inlet | Monthly | Fortnightly |
Wash the primary filter | Monthly | Fortnightly |
Tap the HEPA filter | Every 2 months | Monthly |
Clear the nozzle channel | Every 6 weeks | Every 2 weeks |
Check brush roll for tangles | Monthly | Weekly |
Replace the drive belt | Annually | Annually |
Replace both filters | Annually | Annually |
The pet adjustment is not simply “more often”, it is “before the mat forms”. Hair felts into a mat that then traps everything behind it, so the restriction accelerates rather than accumulating steadily.
UH72601 nozzle channel, cleared 2 February 2026, checked weekly
Date | Channel condition | Airflow |
|---|---|---|
2 Feb | Cleared | 62 CFM |
9 Feb | Light fibre at the edges | 61 CFM |
13 Feb | Visibly repacking | 58 CFM |
20 Feb | Matted across a third of the channel | 54 CFM |
The same check in a pet-free spare room showed a channel still clear at four weeks, which is the entire reason the pet column exists.
Hoover’s own cadences sit behind this schedule: a monthly filter wash and a two-monthly HEPA clean in its US FAQ, plus annual replacement in its UK guidance, which also warns against detergent.
Every row in that table is a junction on the airflow map. Maintenance is just clearing them before they clear themselves through your carpet.
What this schedule is based on: one household, two shedding dogs, roughly 60% medium-pile carpet, 1,900 square feet. A home with three cats and hard floors will not match these intervals. Treat it as a starting point to adjust rather than a specification.
Hoover Not Picking Up: FAQs
Why is my Hoover vacuum not picking up but the motor sounds fine?
A Hoover vacuum that will not pick up while the motor sounds completely normal has an airflow restriction rather than a motor fault. The motor runs at full speed regardless of whether air is reaching it, so sound tells you nothing about suction. A starved universal motor actually runs faster and can sound healthier than a working one. Check the dirt cup seal, then the filters, then the nozzle channel, in that order.
Why is my Hoover WindTunnel not picking up on carpet but fine on hard floors?
That pattern almost always points at the carpet-height dial rather than a clog. At the same setting, my UH72601 performed acceptably on hard floor and lost most of its airflow on medium pile, because the nozzle was sealing against the fibres. Raise the dial one position and test again before you dismantle anything.
Same dial setting (lowest), UH72601 | Airflow |
|---|---|
Hard floor | 55 CFM |
Medium pile carpet | 24 CFM |
Can I use my Hoover while the filter is drying?
Not with the filter compartment empty. Running a Hoover without its primary filter sends fine dust straight through to the motor, and the missing filter also opens a leak path that costs you the suction you were trying to restore. Keep a second primary filter if the 24-hour wait is impractical.
Why does my Hoover pick up for a minute then stop?
On a corded machine that is usually the thermal protector, which shuts the cleaner down when airflow is restricted enough to overheat the motor. The manual specifies about thirty minutes of cooling before it resets. On a cordless machine the same symptom is normally a tired battery instead, and the fade test in the cordless section separates the two.
Does my Hoover have a reset button for suction?
Sometimes, and it varies across the range. Many Hoover uprights have no dedicated reset button at all, only a thermal protector that resets itself once the motor has cooled. Where a button exists it addresses power interruption rather than suction, so it will not fix a clog or a damp filter.
My Hoover won’t pick up water. Is that the same problem?
No, and nothing on this page will help. A Hoover carpet washer that will not lift water has a wet-path fault involving the recovery tank, its seals and its float, which is a completely different system from the dry airflow path covered here. Look for guidance written specifically for carpet washers instead.
What This Actually Comes Down To
A Hoover vacuum that is not picking up is almost never a machine that has worn out. In every fault I traced across three Hoover machines between 2 and 23 February 2026, the cause was a single restricted junction on a sealed airflow path, or an agitation branch that had quietly stopped doing its half of the work. The five fixes above, run upstream first, resolve almost all of them, and the largest single recovery I measured came from a thirty-second adjustment to the carpet-height dial.
That is the useful thing to hold onto, because it turns an anxious guess into an ordered search. The port test tells you the branch, the junction map tells you where to look on it, and the five fixes work upstream first because a downstream fix cannot recover airflow lost further up.
If you take one thing away, take the height dial. Thirty seconds of adjustment recovered more airflow on my own machine than clearing a clogged hose did, and I had run it wrong for two years while believing the opposite.
Do the easy checks tonight, in order, and give the filter its full day. If you reach the end and the machine still will not lift, you have a reasoned answer rather than a longer list, and that is a respectable place to stop.
Read it your way
Short on time? Open this article in your assistant with a ready-made prompt and get the gist in seconds.
Found this useful? Make us a preferred source so we show up in your Google results.
Keep reading
Related articles

Troubleshooting & Repair
Roomba Not Working? 8 Symptoms Fixed (2026 Models)
Reboot first, then match your symptom. 8 Roomba faults (charge, Wi-Fi, error codes, brushes, bin) with per-series fixes for 600/e/i/j/s and 2026 models.

Troubleshooting & Repair
How Much Does a Vacuum Repair Cost? Fix or Replace (2026)
How much does a vacuum repair cost? Usually $50–150 (up to ~$321 for central). Use the 50% rule and our brand tier to decide: fix it or replace it in 2026.

Troubleshooting & Repair
Why Won’t My Robot Vacuum Work? 6 Fixes We Tested
Why won’t my robot vacuum work? Reset it, free the wheels, clean the sensors and fix a 2.4GHz Wi-Fi snag in 5 minutes: the DIY checks that skip a repair bill.

Troubleshooting & Repair
Not Broken? Why Won’t My Vacuum Work (Fix It First)
Fix it fast: ‘why won’t my vacuum work’ is usually a clog, thermal cutoff, or reset, not a dead motor. Match your symptom to the exact fix.
The discussion
Comments
Every comment is reviewed before it goes live.